Yesterday, Tuesday 16th October saw the much anticipated release of VMware’s vSphere 6.7 Update 1, however, shortly after the announcement a number of Veeam users decried the release due to compatibility issues with Veeam’s Backup & Replication suite. None other than Veeam’s Anton Gostev first announced the issue with the below tweet:
Looks like vSphere 6.7 Update 1 completely breaks backups, so please avoid updating until further notice. I must say I really miss those times when we didn’t even have to test vSphere updates, and literally supported them by default because they never broke anything – for years!
The very next day the Veeam team announced a workaround in the form of Veeam KB2784, as well as ‘out-of-the-box’ support being included with highly awaited (and much delayed) next release, Update 4.
vSphere 6.7 U1 compatibility issue has been researched, and the simple workaround is now available for use in test labs. Official out-of-the-box support for vSphere 6.7 U1 will be included in Update 4. See this Veeam forums topic for more details > https://t.co/BNgMNWDOmS
Where the fault lies with such release/compatibility issues is not the goal of this post (which Twitter seems to be more focused on). However, with a high number of pros likely raising internal changes to upgrade their vCenter(s) and ESXi hosts, you’ll want to implement the Veeam workaround in-line with this upgrade, as well as a number of solid backup/restore tests.
Not only will this year mark my first ever visit to VMworld Europe, I’ll also be taking part in a Customer Panel session.
If you are interested in hearing my VMware NSX Data Center journey, how we implemented and operationalised NSX; how NSX continues to increase security and application performance, while simplifying troubleshooting and improving network provisioning time, then join me on Thursday, 8th November at 12:00-13:00 to hear more.
You don’t have to have an enterprise-grade lab environment to run VMware NSX Data Center for vSphere. For those who neither wish to house half a rack of servers, storage, and enterprise networking kit at home, nor wish to incur the wrath of their energy company for the privilege, a single desktop/laptop with appropriate compute and storage is more than capable of handling NSX.
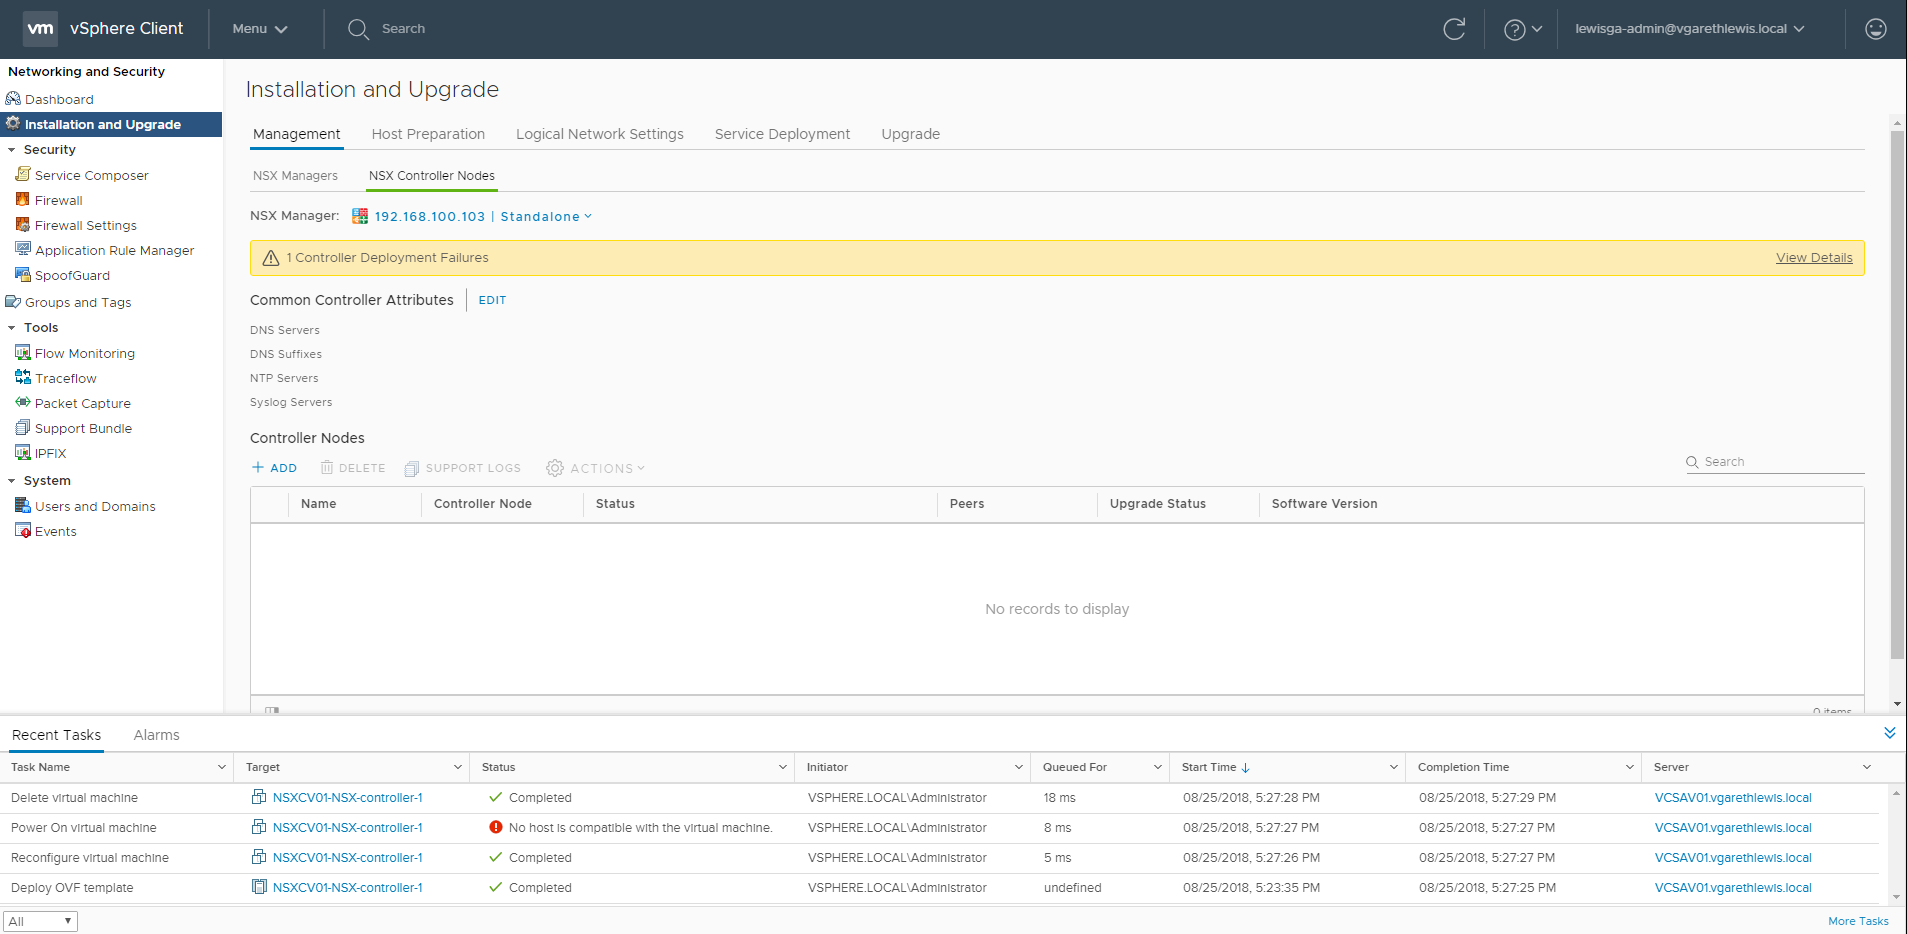
However, there are obvious limitations to this style of lab environment and, as you’re reading this, I’m guessing you’ve been unable to deploy an NSX Controller (likely due to its CPU requirements). By default, NSX Controllers are deployed with 4 vCPU and 4 GB memory. This is likely too high a requirement to be accommodated in smaller lab environments and, as a result, NSX Controller deployments will fail.
NSX Controller Deployment Failed – No host is compatible with the virtual machine.
Challenge – We are unable to specify NSX Controller resources during their deployment via UI. As NSX Controllers are also Protected VMs, we are unable to alter their resources via UI after the template is deployed and before it is deleted due to the error ‘No host is compatible with the virtual machine’.
Solution – We will a) remove the lock from the protected NSX Controller, and b) apply a more ‘lab-friendly’ resource configuration to the NSX Controller via PowerCLI.
Okay, so I’m guessing you’ve already attempted to deploy an NSX Controller. No problem, we just need to identify the failed entity’s Managed Object Reference ID (moRef ID). For more information, see my previous post regarding moRef IDs.
vCenter is quite predictable in that all newly created entities are assigned moRef IDs incrementally. Identifying the moRef ID of the previously failed NSX Controller (Stage 1) will allow us to delete the next moRef ID (which will remove the Protected VM lock) and, subsequently, enable us to reconfigure the NSX Controller’s resources via PowerCLI before the VM is powered on (Stage 2).
Please note, as stated in my previous post, VMware do not support or recommend this procedure in any way. As such, this procedure should not be implemented in a production environment.
Stage 1 – Identify Failed NSX Controller moRef ID
1. Connect to your vCenter Server via SSH.
2. Enable and enter Bash.
shell.set --enable True
shell
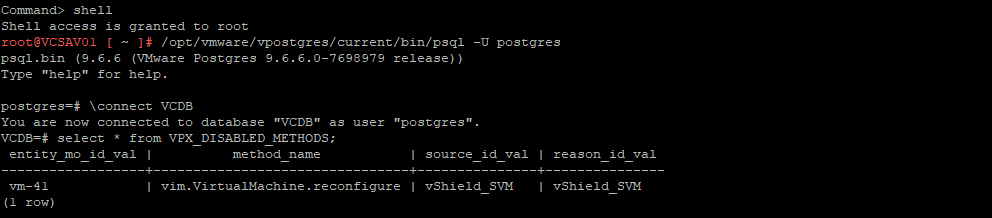
3. Connect to the vCenter Postgres Database via PSQL.
5. Identify and note the moRef ID of the failed NSX Controller. In my case, this is ‘vm-41’ (see below screenshot).
select * from VPX_DISABLED_METHODS;
The previous NSX Controller creation attempt. Note the MO_ID (vm-41).
Stage 2 – Remove Future NSX Controller Protected VM Lock and Reconfigure VM Resource via PowerCLI
Identification done, we now need to prepare for the next stage – the deployment of a new NSX Controller, the removal of the Protected VM lock via SSH, and the reconfiguration of its resources via PowerCLI.
For this we’ll need to setup two commands in readiness, both of which must be run at specific stages of the NSX Controller ‘Deploy OVF template’ task.
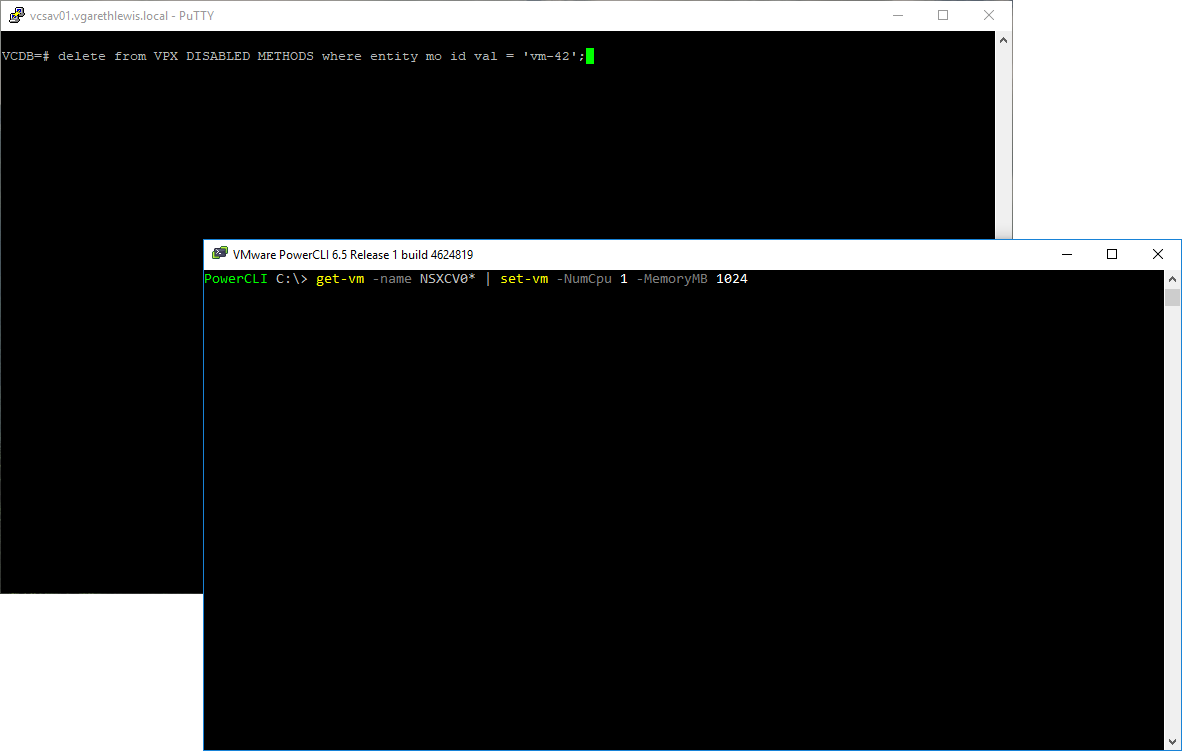
1. Remove Protected VM Lock via SSH – Jump back into your previous SSH session and ready the below command (but don’t run it yet), configured with the ‘next in line’ moRef ID (in my case ‘vm-42’). This will remove the Protected VM lock at the end of the OVF template deployment, and will allow PowerCLI to jump in and reconfigure the VM just before it is powered on.
delete from VPX_DISABLED_METHODS where entity_mo_id_val = 'vm-42';
2. Reconfigure NSX Controller Resources via PowerCLI – Launch PowerCLI, connect to your VCSA, and ready the below command (but don’t run it yet). This is the NSX Controller resource configuration change. For my lab environment, 1x vCPU and 1 GB of memory is fine. Note, ‘NSXCV0’ is the start of my NSX Controller name. Configure yours accordingly.
3. With both commands prepared, do not run them yet. They will be run AFTER the NSX Controller deployment has started.
Protected VM Lock Removal and PowerCLI Resource Configuration commands prepared.
4. Jump back into your vSphere Client and create a new NSX Controller.
5. At specific stages of the Deploy OVF Template task, run the prepared commands detailed above.
~60% – Reconfigure NSX Controller Resources via PowerCLI. This will queue until it’s able to run (e.g. – following the removal of the Protected VM lock).
~98% – Remove Protected VM Lock via SSH. Run this command repeatedly from 98%, and until you receive the ‘DELETE 1’ feedback. Don’t hold back on this step! Repeat the command as you would mash your keyboard to enter BIOS.
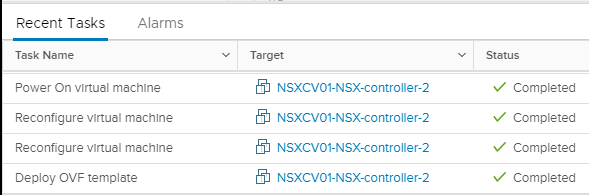
And, hey presto! From the below screenshots we can see the Protected VM lock has been removed successfully, allowing the PowerCLI command to complete, resulting in a reconfigured NSX Controller.
Protected VM Lock Removed after repeatedly running the delete command via SSH at ~98%.Allocating a more ‘lab-friendly resource configuration via PowerCLI.
Via the vSphere Client, we can see the Deploy OVF template, Reconfigure virtual machine, and Power On virtual machine tasks were able to complete successfully.
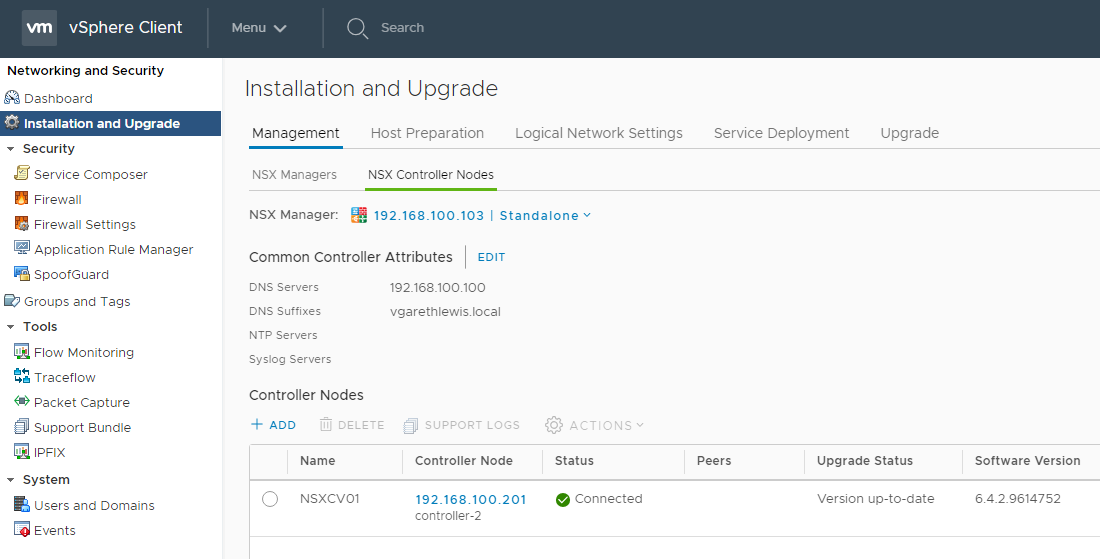
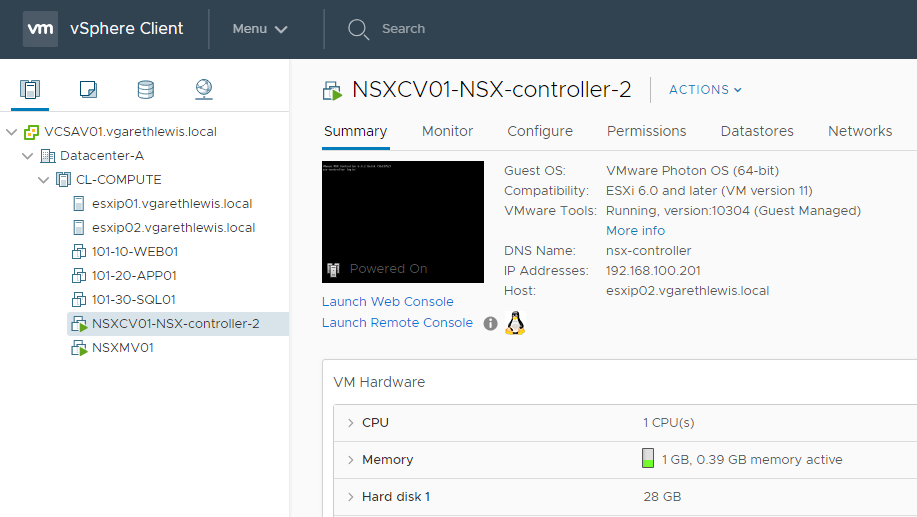
And below, our shiny, new, ‘lab-friendly’ NSX Controller.
The ‘Lab-Friendly’ NSX Controller.…and confirmation of its more appropriate resource allocation.
References
During my research for this article, I came across to below guides, without which, the above would not have been possible. Props.
You may have noticed that your usual Active Directory user account (which might afford you full administrative access in vCenter) doesn’t get you very far when attempting to manage NSX for vSphere. This is by design, as NSX access is not governed or controlled by vCenter Server roles.
NSX utilises it’s own predefined security roles for role based access, all of which can be assigned to Active Directory Users and/or Security Groups. This is great for larger teams with clearly defined areas of demarcation and responsibilities, smaller teams of administrators and read-only support teams, and even one-off auditor visits.
In this post, I detail the procedure for implementing AD integration in VMware NSX for vSphere 6.4.2, however, the procedure is the same for NSX 6.X. Before we start, let’s take a look at the six NSX Security Roles:
NSX Security Roles
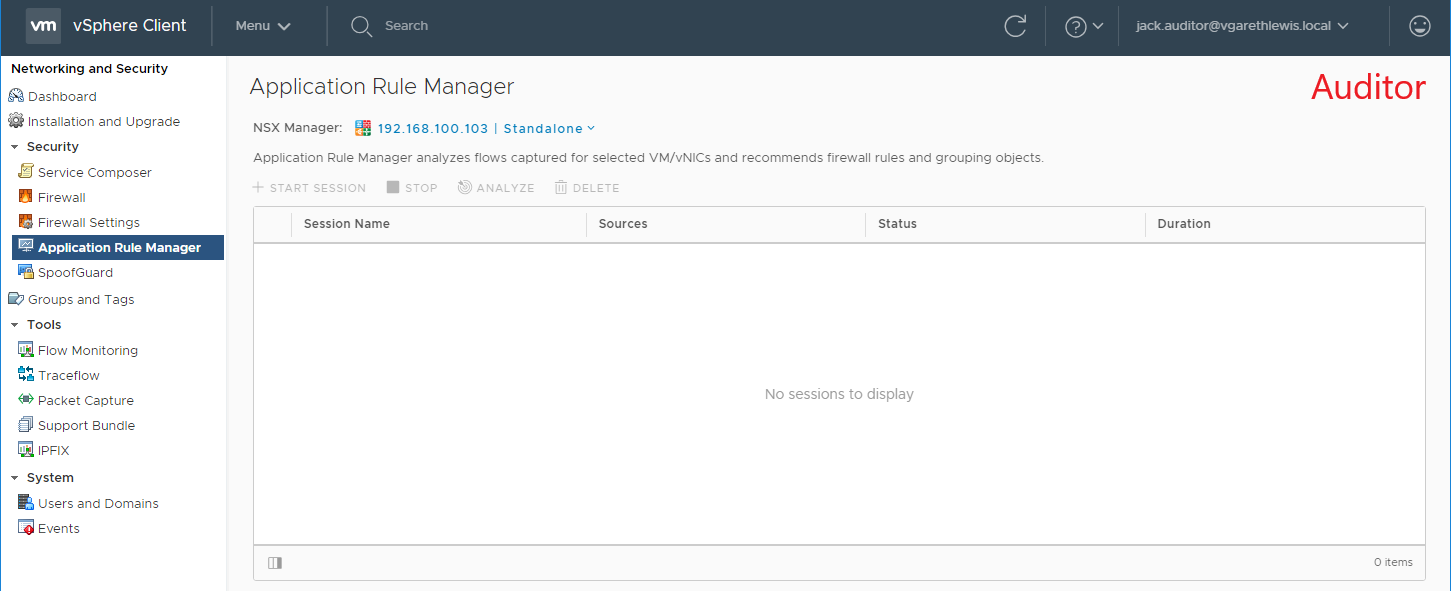
Auditor – Users in this role can only view system settings and auditing, events and reporting information and will not be able to make any configuration change.
Security Engineer – Users in this role can perform all security tasks, such as configuring policies and firewall rules. Users have read access to some networking features, but no access to host preparation and/or user account management.
Network Engineer – Users in this role can perform all networking tasks, such as routing, DHCP, bridging, etc. Users have read access to endpoint security features, but no access to other security features.
Security Administrator – Users in this role can configure security compliance policies in addition to viewing the reporting and auditing information in the system.
NSX Administrator – Users in this role can perform all tasks related to deployment and administration of this NSX Manager instance.
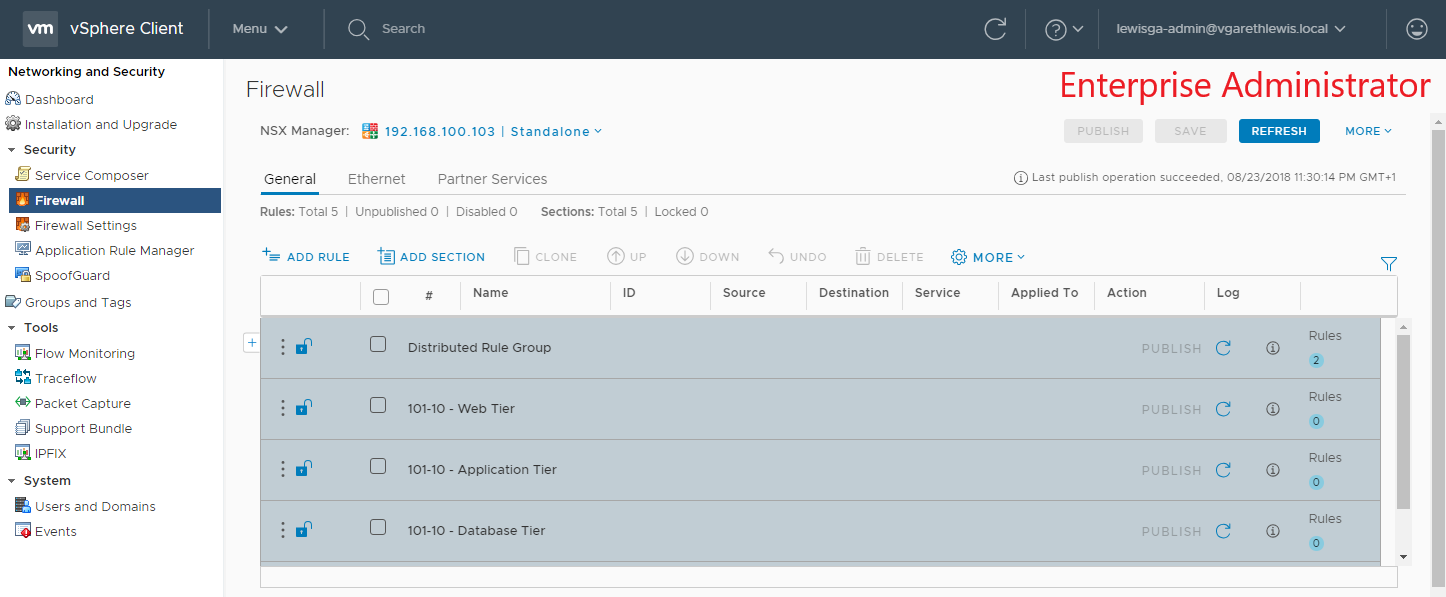
Enterprise Administrator (God Mode) – Users is this role can perform all tasks related to deployment and configuration of NSX products and administration of this NSX Manager instance.
Procedure
Please note, due to current feature parity differences between the vSphere Web Client (Flex) and vSphere Client (HTML 5), the below procedure will need to be performed utilising the vSphere Web Client (Flex).
1. Create your required AD Security Groups, naming accordingly.
2. Log in to the vSphere Web Client (Flex) as administrator@vsphere.local.
3. Browse to Networking & Security > System > Users and Domains.
4. Via the Users tab, click the Add icon.
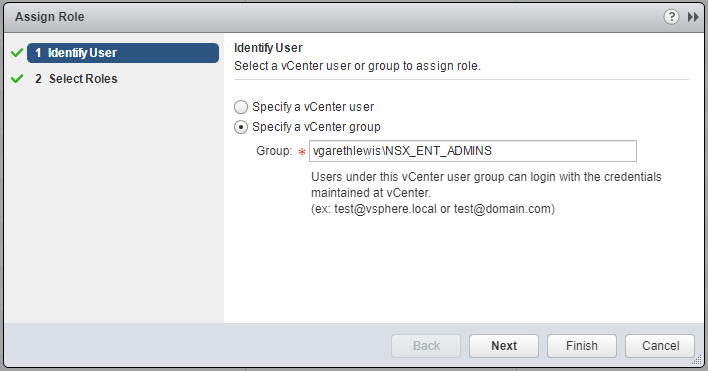
5. Select Specify a vCenter group and enter the AD Security Group name as per above AD Objects. When ready, click Next.
6. Select the appropriate NSX Security Role to associate with the AD Security Group and click Finish.
7. Repeat steps 4 – 6 until all required AD Security Groups have been added.
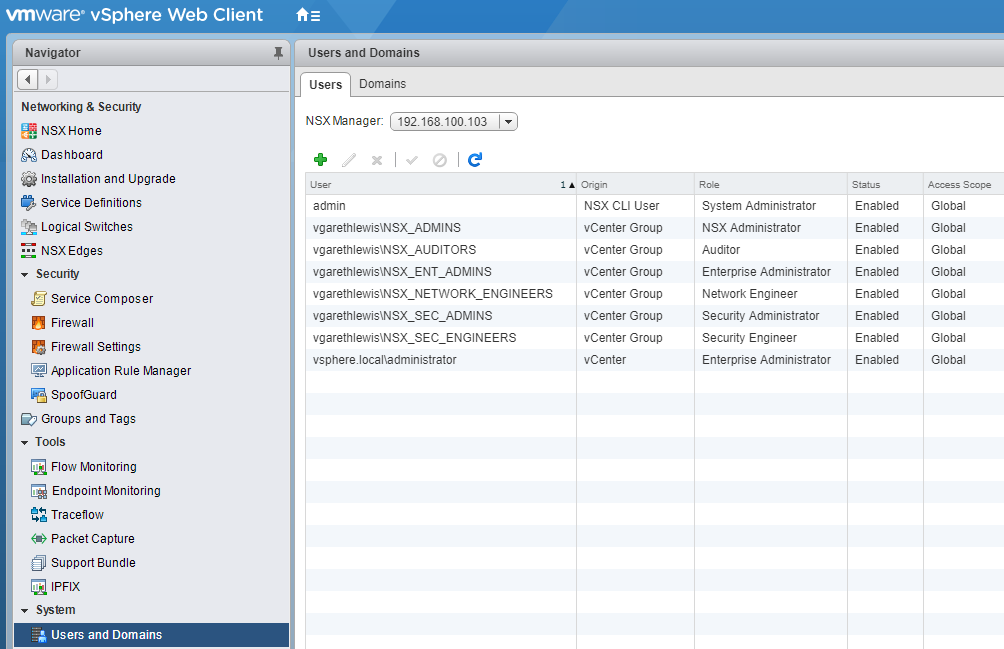
8. Confirm successful addition of all NSX Security Roles. At this point, you can assign further AD Users/Security Groups, disable or enable accordingly, and delete.
9. Log in to either the vSphere Web Client or vSphere HTML5 Client as a user associated to one of the newly added AD Security Groups and test access. Below I detail an example of both Auditor and Enterprise Administrator roles.
Here, the user is assigned the NSX Auditor Security Role.Here, the user is assigned the NSX Enterprise Administrator Security Role.
Back in October 2017, VMware released a number of free NSX guides. A detailed overview of the releases can be found by clicking here. Just last week the NSX Guide Library was enhanced further thanks to the release of a number of new publications. Regardless of whether you’re new to NSX or simply interested in topping up, if you work with NSX in any way, the VMware NSX Guide Library is essential reading.
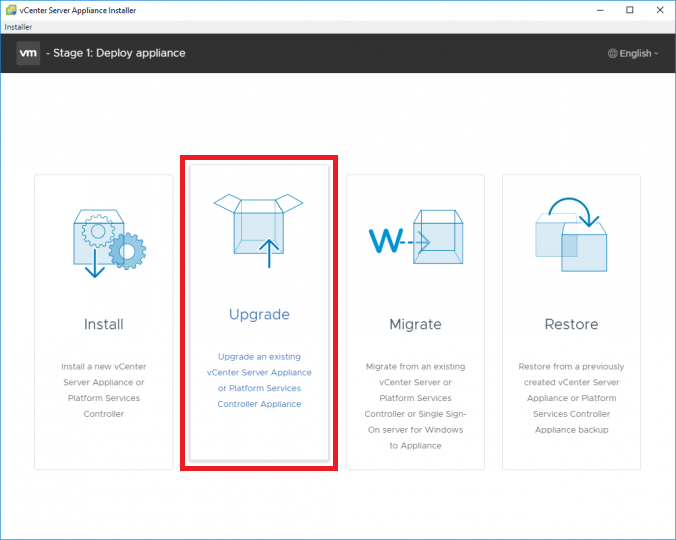
With the release of vSphere 6.7 back in April 2018, a host of new enhancements, features, and goodies had the vCommunity going wild. With enhanced feature parity between the legacy vSphere Web Client and new HTML 5 vSphere Client, as well as the vCenter Server Appliance boasting performance increases of ~2X faster performance in vCenter operations per second, ~3X reduction in memory usage, and ~3X faster DRS-related operations (e.g. power-on virtual machine); these two areas alone made most of us want to upgrade. Nice.
vSphere 6.7 also boasts the new Quick Boot feature for vSphere hosts running the ESXi 6.7 hypervisor and above. This feature allows users to a) reduce maintenance time by removing the number of reboots required during major version upgrades (Single Reboot), and b) allows users to restart the ESXi hypervisor without having to reboot the physical host (essentially skipping the time-consuming hardware initialisation). Very nice!
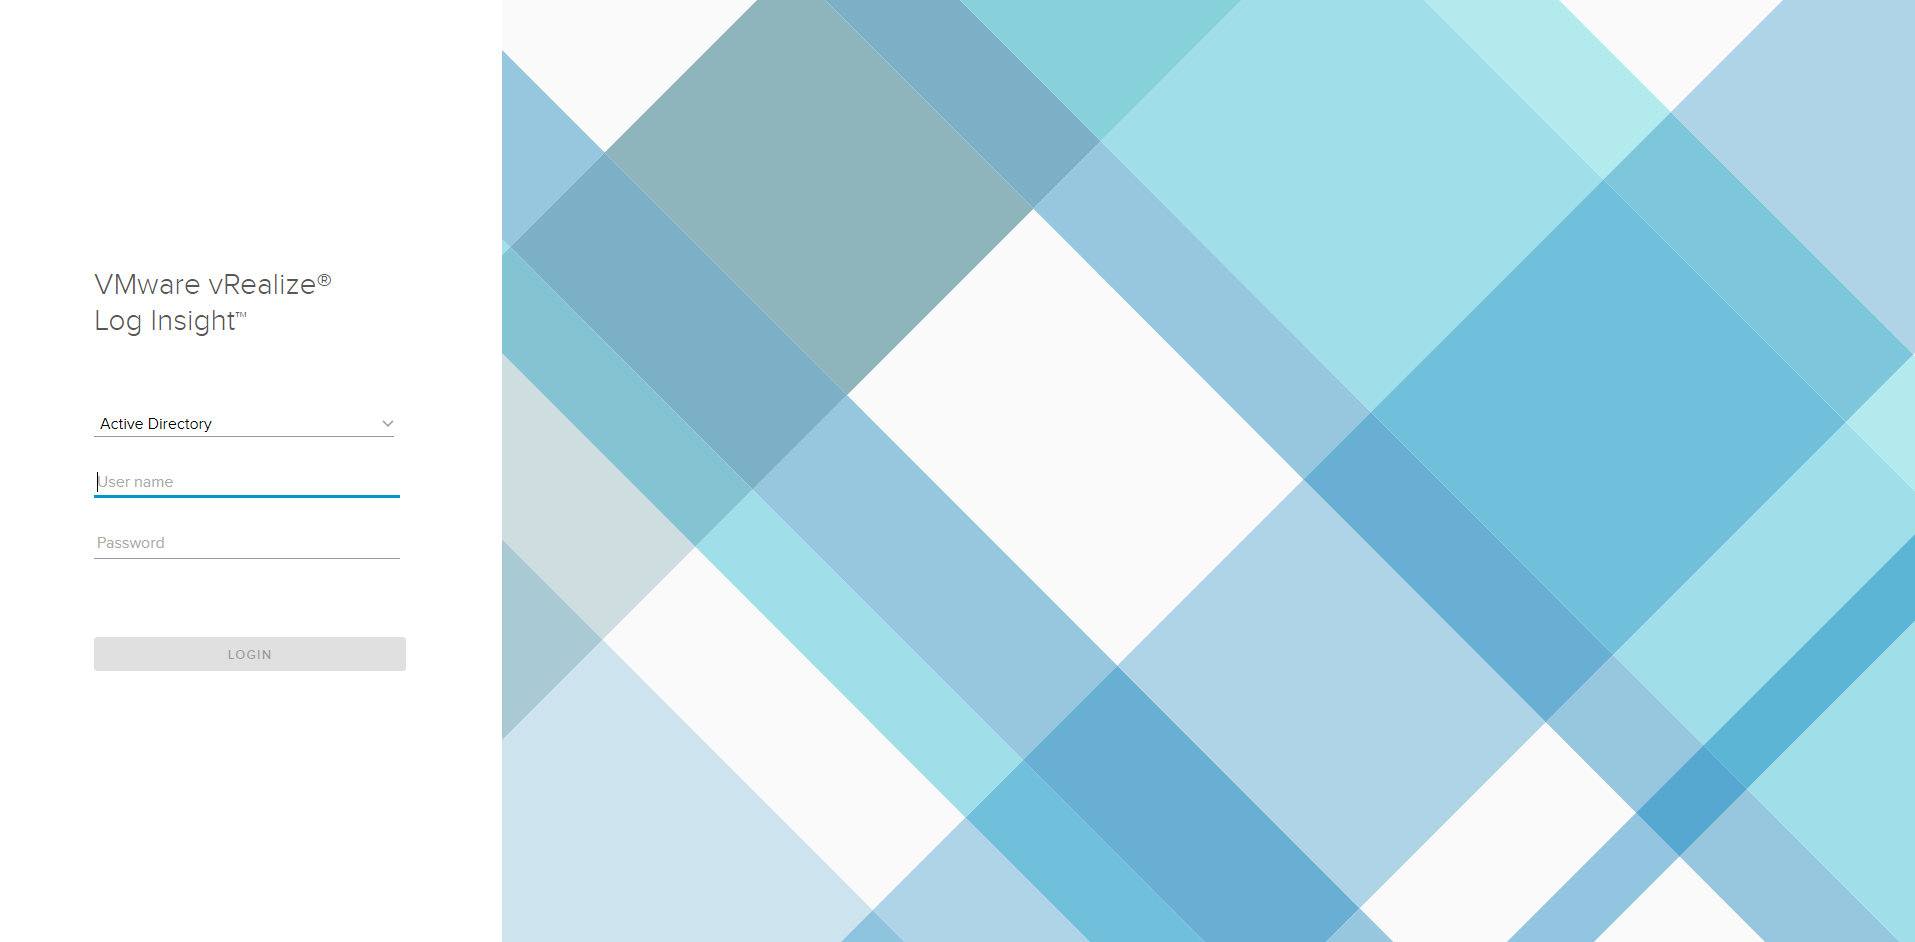
Yesterday (Monday 16th July 2018) VMware announced the End of Availability for vRealize Log Insight for vCenter. This enabled all vCenter Server licensees to enjoy a cool 25 OSI (Operating System Instance) usage. Sadly, the current version of vRealize Log Insight (6.4.x) will be the last version to support vRealize Log Insight for vCenter and, as such, the next release will not accept vCenter Server license keys during activation. End of General Support for vRealize Log Insight for vCenter will run until 23rd August 2019.
Please note, vRealize Log Insight standalone (part of the vRealize and vCloud Suites), Log Insight for NSX, and Log Insight for VMware Cloud Foundation will not be affected.
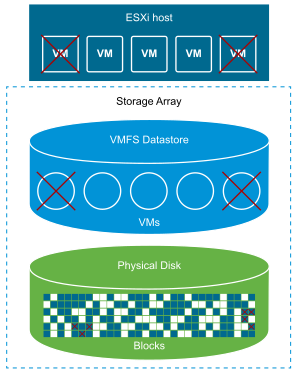
Since the release of vSphere 5.5 back in September 2013 we have been able to utilise ESXCLI to manually reclaim deleted blocks from VMFS datastores. Essentially, by using the VAAI UNMAP primitive, we can reclaim previously used blocks by releasing them back to the storage array, allowing them to be re-utilised by other devices/virtual machines. It wasn’t until the release of vSphere 6.5 in November 2016 that the much sought-after automation of disk space reclamation was announced with the availability of VMFS 6. More on VMFS 6 and automated reclamation in a future post.
In this article we will cover the manual process of reclaiming deleted blocks from a VMFS 5 (or earlier) file system via a esxcli UNMAP call.
Procedure
We have two options when making an UNMAP call on a VMFS volume:
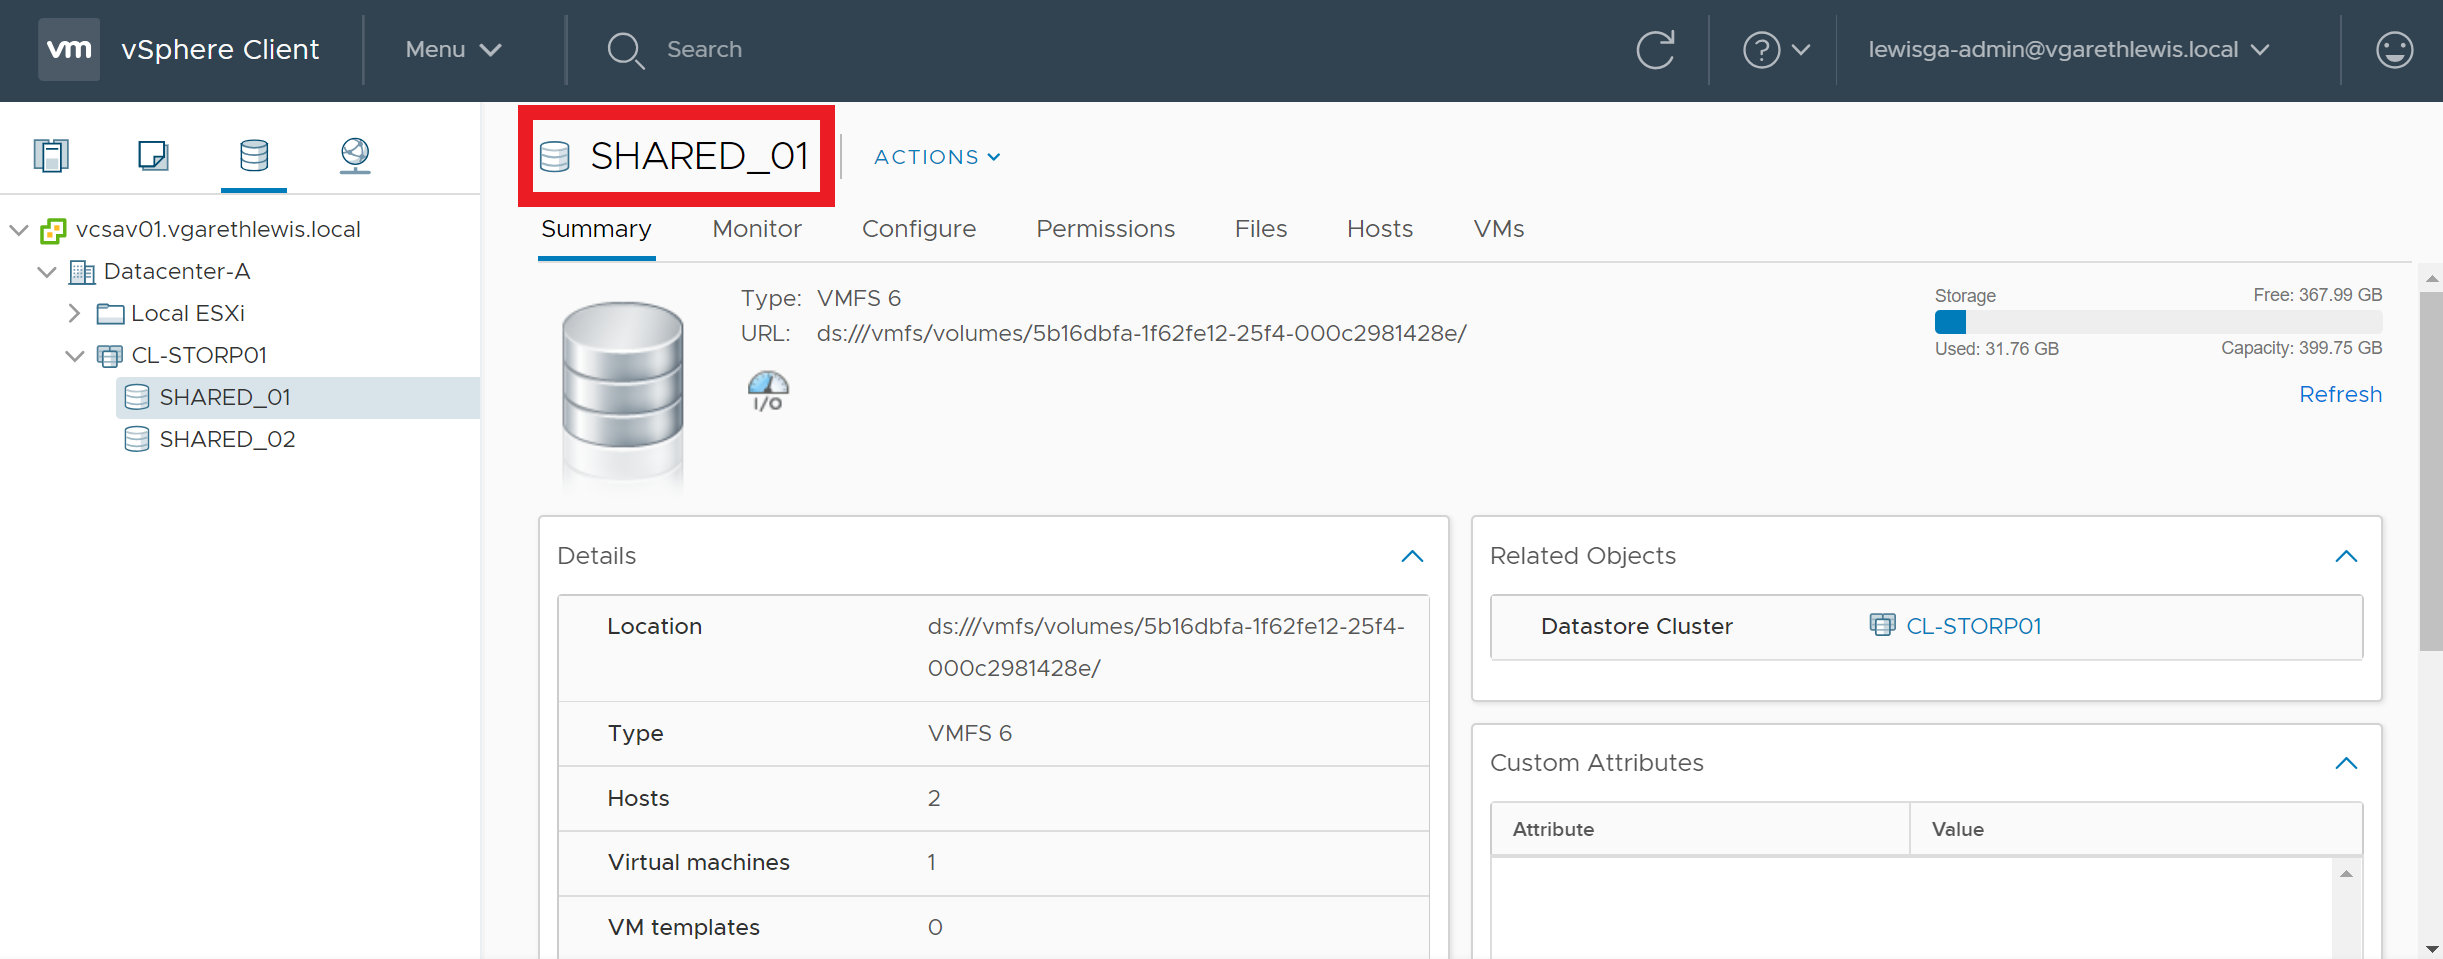
Option 1 – Reference the Volume Label
1. Identify the volume/datastore label.
2. Via SSH, connect to an ESXi host which has access to the datastore in question.
3. Run the below command to perform an UNMAP call utilising the volume label.
esxcli storage vmfs unmap -l DatastoreName
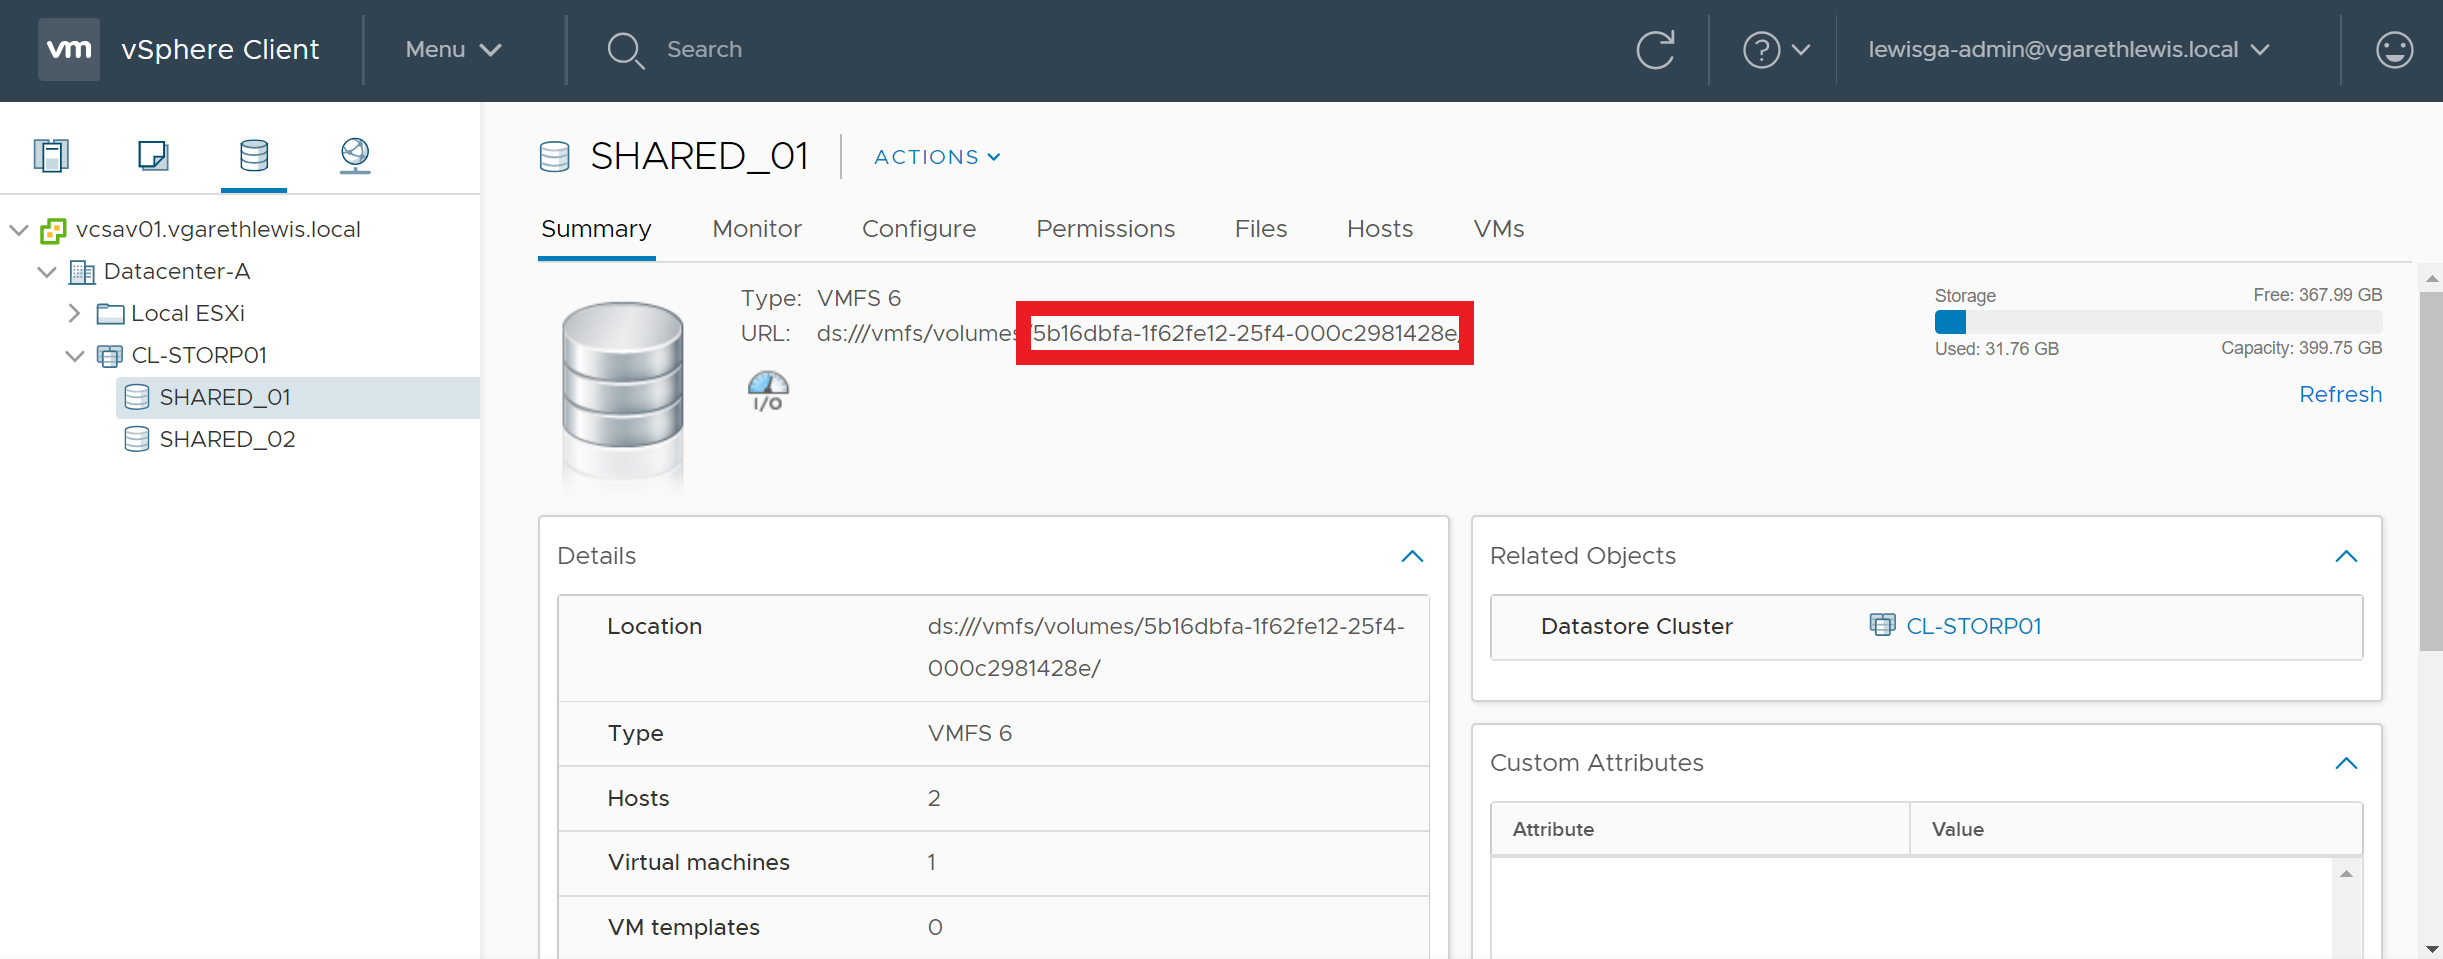
Option 2 – Reference the Volume UUID
1. Identify the UUID of the datastore/volume in question.
2. Via SSH, connect to an ESXi host which has access to the datastore in question.
3. Run the below command to perform an UNMAP call utilising the volume UUID.
As an example, the below screenshots detail a storage volume before and after an UNMAP call. Over time, the storage volume has experienced a high number of VM deletions and storage vMotions. Following either of the above UNMAP commands, the volume has reclaimed over 2 TB of deleted blocks.
Reclaim VMFS Deleted Blocks via UNMAP – BEFOREReclaim VMFS Deleted Blocks via UNMAP – AFTER
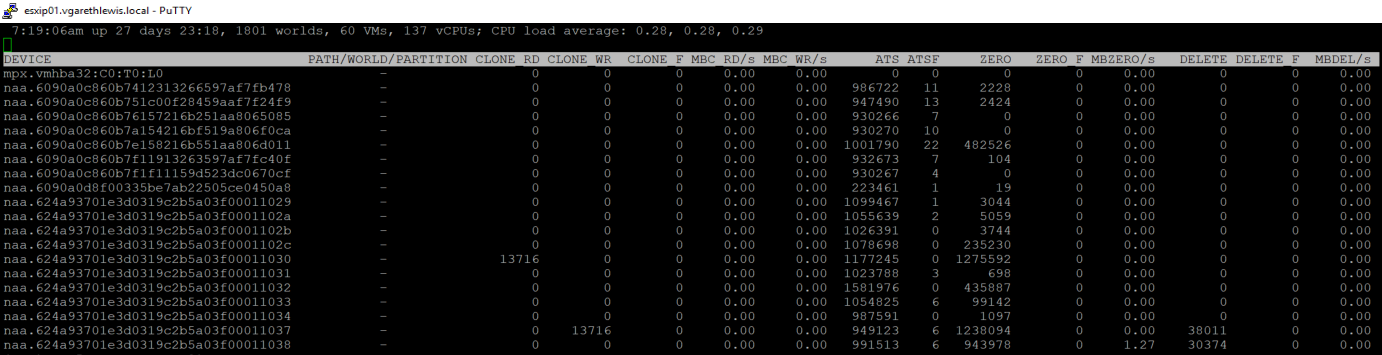
Monitoring UNMAPs via ESXTOP
Finally, it’s nice to be able to monitor such actions and, via ESXTOP, we can. Connect to one of your hosts via SSH and launch ESXTOP. There is going to be a lot of information displayed at this point, so we’ll likely need to toggle-off some of the superfluous information. Press ‘U’ to view disks/devices, and press ‘F’ to launch the currently displayed field order. In the below screenshot I have toggled-off all columns except A, B, and O.
From the below screenshot you can see that, following a little housekeeping on two volumes in my environment, the DELETE counters display the UNMAP I/O count issued to those devices. Note, ESXTOP counters are reset with each host restart.
With VMFS 6 now available, you’ll probably want to leverage it’s automated reclamation capabilities, however, the only upgrade path is to create new datastores, migrate your workloads, and blow away the old VMFS 5 datastores. More on VMFS 6 in a future post.
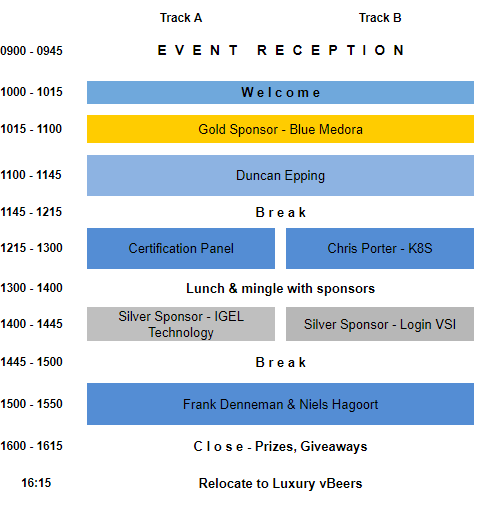
Thursday 14th June saw the latest London VMUG take place at Tech UK, London, with the User Group marking it’s third outing for 2018 in just six months! Rarely does any event see such heavy hitters as Duncan Epping, Frank Denneman, and Niels Hagoort in one place, but today, we got to see all three in attendance. Add to that line-up further awesomeness in the form of vCommunity member, Chris Porter, and this was one truly great London VMUG indeed! I’ve been to a number of VMUGs around the UK, however, this was to be my first time joining the London gang.
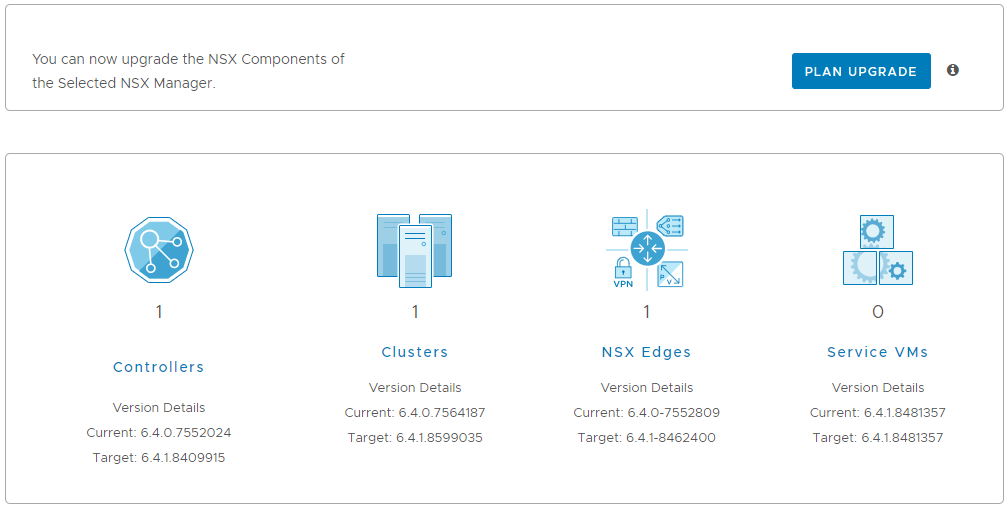
With the release of VMware NSX for vSphere 6.4.1 on May 24th 2018, interoperability/compatibility between VMware vSphere 6.7 and NSX was achieved. In addition to this, a number of nice new features were also included in the update.
In this article we will upgrade a 6.4.0 (build 7564187) lab environment to 6.4.1 (build 8599035) utilising the One Click upgrade process.
We use cookies to ensure that we give you the best experience on our website. If you continue to use this site we will assume that you are happy with it.