There may be some scenarios where you will need to patch a vSphere Host manually. Maybe the host is air-gapped for security purposes, or maybe the host is simply a standalone ESXi Server and isn’t connected to a vCenter Server.
Patching the host is a simple enough exercise, and in this article, I detail both the implementation and validation steps.
I recently ran into a small issue applying a patch to one of my lab’s vCenter Servers. Specifically, attempts to patch the vCenter Server ran into the error, Exception occurred in install precheck phase.
vSAN deployments in brownfield environments are simple. New hosts are configured based on projected workloads (plus points for utilising vSAN Ready Nodes), they’re purchased, racked, built, and absorbed into an existing vCenter workload domain before vSAN is finally enabled and configured. But how would we deploy vSAN into a greenfield environment? An environment with no vCenter, no shared storage, but only brand new ESXi hosts with valid (yet unconfigured) cache and capacity vSAN disks? As vSAN is reliant on vCenter for its operations, we seemingly have a chicken-and-egg scenario.
In this article, I detail the process of deploying (Stage 1) and configuring (Stage 2) a vCenter Server Appliance into a greenfield environment and, more specifically, onto a single-node vSAN cluster in hybrid-mode (Note – this is in no way supported by VMware for anything other than deploying vCenter and vSAN into a greenfield environment). I then add additional hosts to the cluster and configure vSAN storage and networking via the brilliant Cluster Quickstart tool (Stage 3), before applying a vSAN VM Storage policy to the vCenter Server Appliance (Stage 4). Once complete, our vSAN cluster will be ready to host live workloads.
Patching my lab’s vCenter Server Appliance this evening raised an issue whereby the root password had expired. Unable to login via root, I can still administer the appliance via a vCenter’s SSO domain account (administrator@vsphere.local, for instance), however, attempts to perform any updates will not be possible until the appliance’s root account password is reset. This an easy exercise, however, this is not possible via vSphere UI or console, only bash.
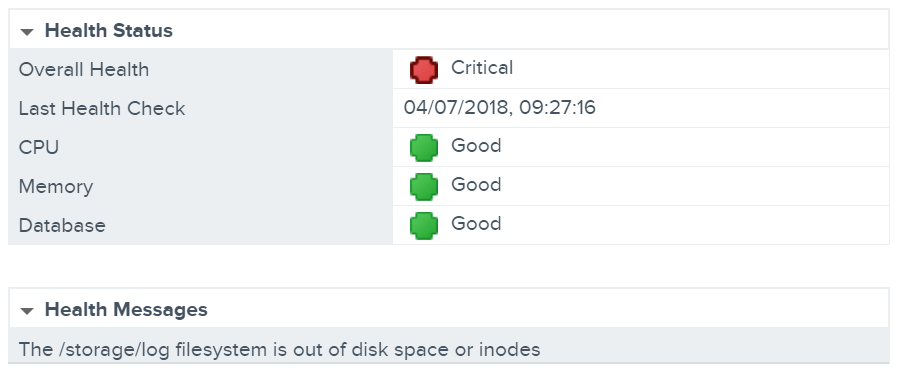
A while back I was welcomed to the office by a vCenter Server Appliance critical health alert, specifically, ‘The /storage/log filesystem is out of disk space or inodes’. This error is usually due to a failed automated log clean-up process, so in this article I detail how to implement a temporary ‘get out of jail’ fix, followed by a more permanent fix with the identification of the offending files and how to tidy them up.
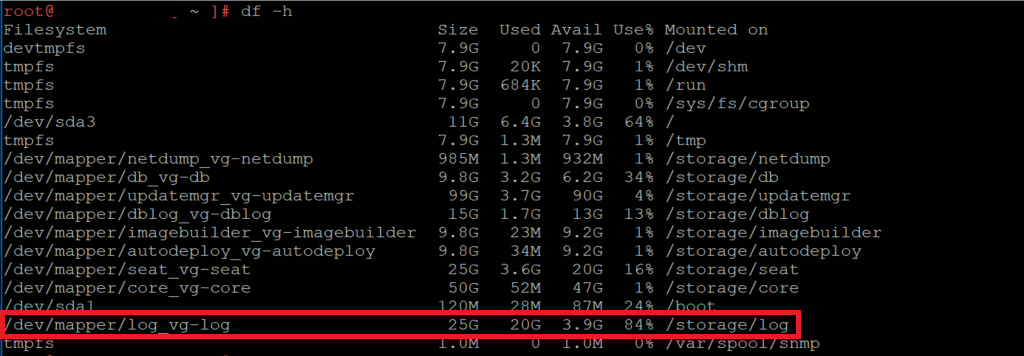
Firstly, let’s take a look at the file system itself in order to confirm our UI findings. SSH onto the VCSA appliance and enter BASH, then list all available file systems via the df -h command. From the below screenshot the UI warning has been confirmed, specifically, the file system in question has been completely consumed.
Confirming the consumed file system.
The ‘Get Out of Jail’ Temporary Fix
In the unfortunate event that this issue is preventing you from accessing vCenter, we can implement a quick fix by extending the affected disk. Note, this is a quick fix only and should be implemented to restore vCenter access only. This should not be relied on as a permanent resolution.
As we have already identified the problematic disk, jump over to the vSphere client and extend the disk in question (you call by how much, but in my environment, I’ve added an additional 5 GB). This leaves us the final task of initiating the extension and enabling the VCSA to see the additional space. Depending on your VCSA version, there are two options:
VCSA v6.0
vpxd_servicecfg storage lvm autogrow
VCSA v6.5 and 6.7
/usr/lib/applmgmt/support/scripts/autogrow.sh
Lastly, list all file systems to confirm the extension has been realised.
The results of the extension…
Permanent Fix
So, we’re out of jail, but we still have an offending consumer. In my instance, checking within the file system identified a number of large log files. These hadn’t been cleared automatically by the VCSA so a manual intervention was required. Specifically, the removal of localhost_access_log, vmware-identity-sts, and vmware-identity-sts-perf logs was required. These can be removed via the below command.
rm log-file-name.*
Purging the offending logs…
Following the removal, another df -h show’s we’re back in business.
…and the results of the purge.
Lastly, and in this instance, restart the Security Token Service to initiate the creation of new log files.
service vmware-stsd restart
Restart the Security Token Service to initiate the creation of new log files.
Further Reading
For this specific issue, please see VMware KB article 2143565, however, if in doubt, do call upon the VMware Support. The team will be able to assist you in identifying the offending files/directories which can be safely removed.
With the release of vSphere 6.7 back in April 2018, a host of new enhancements, features, and goodies had the vCommunity going wild. With enhanced feature parity between the legacy vSphere Web Client and new HTML 5 vSphere Client, as well as the vCenter Server Appliance boasting performance increases of ~2X faster performance in vCenter operations per second, ~3X reduction in memory usage, and ~3X faster DRS-related operations (e.g. power-on virtual machine); these two areas alone made most of us want to upgrade. Nice.
vSphere 6.7 also boasts the new Quick Boot feature for vSphere hosts running the ESXi 6.7 hypervisor and above. This feature allows users to a) reduce maintenance time by removing the number of reboots required during major version upgrades (Single Reboot), and b) allows users to restart the ESXi hypervisor without having to reboot the physical host (essentially skipping the time-consuming hardware initialisation). Very nice!
Since the release of vSphere 5.5 back in September 2013 we have been able to utilise ESXCLI to manually reclaim deleted blocks from VMFS datastores. Essentially, by using the VAAI UNMAP primitive, we can reclaim previously used blocks by releasing them back to the storage array, allowing them to be re-utilised by other devices/virtual machines. It wasn’t until the release of vSphere 6.5 in November 2016 that the much sought-after automation of disk space reclamation was announced with the availability of VMFS 6. More on VMFS 6 and automated reclamation in a future post.
In this article we will cover the manual process of reclaiming deleted blocks from a VMFS 5 (or earlier) file system via a esxcli UNMAP call.
Procedure
We have two options when making an UNMAP call on a VMFS volume:
Option 1 – Reference the Volume Label
1. Identify the volume/datastore label.
2. Via SSH, connect to an ESXi host which has access to the datastore in question.
3. Run the below command to perform an UNMAP call utilising the volume label.
esxcli storage vmfs unmap -l DatastoreName
Option 2 – Reference the Volume UUID
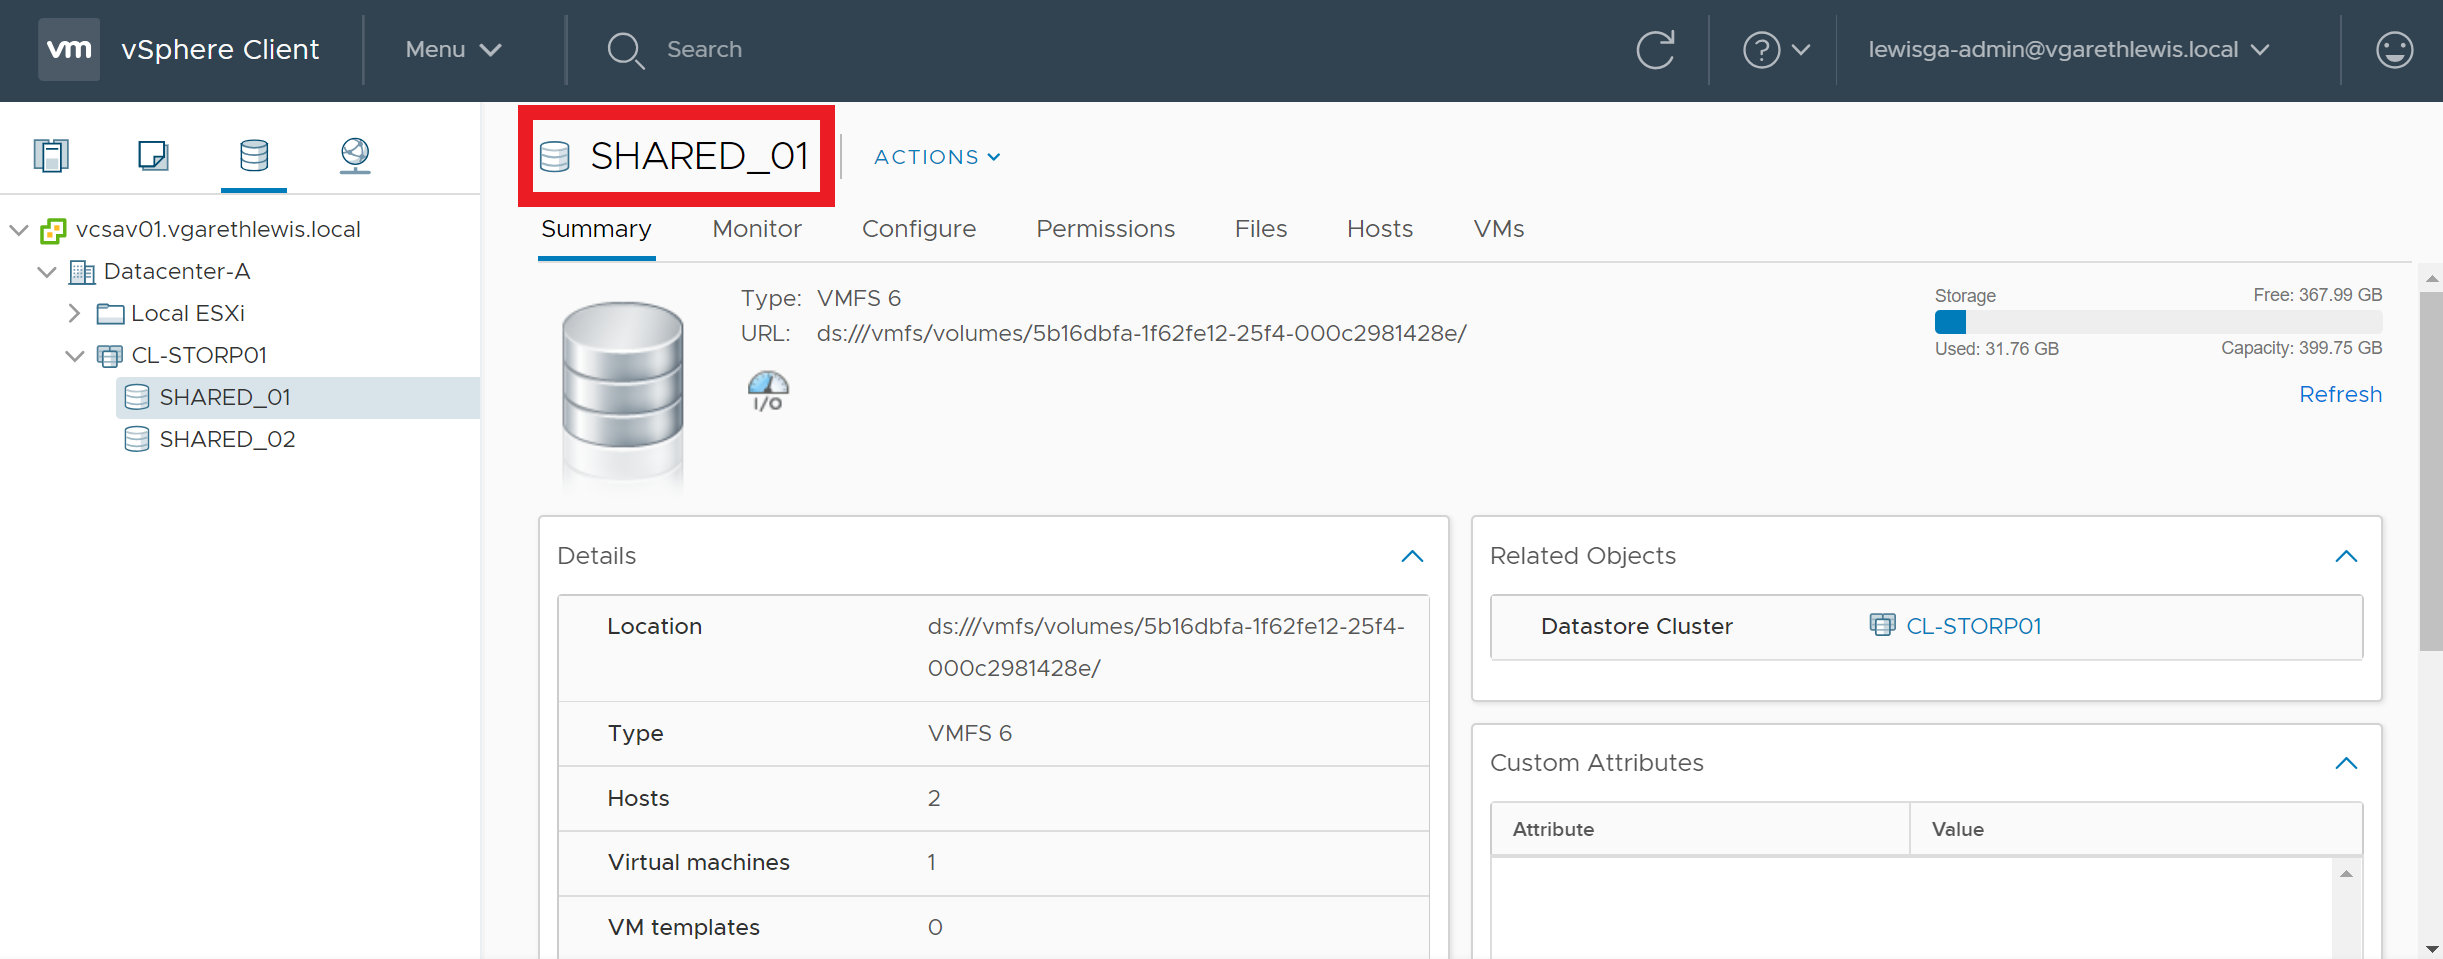
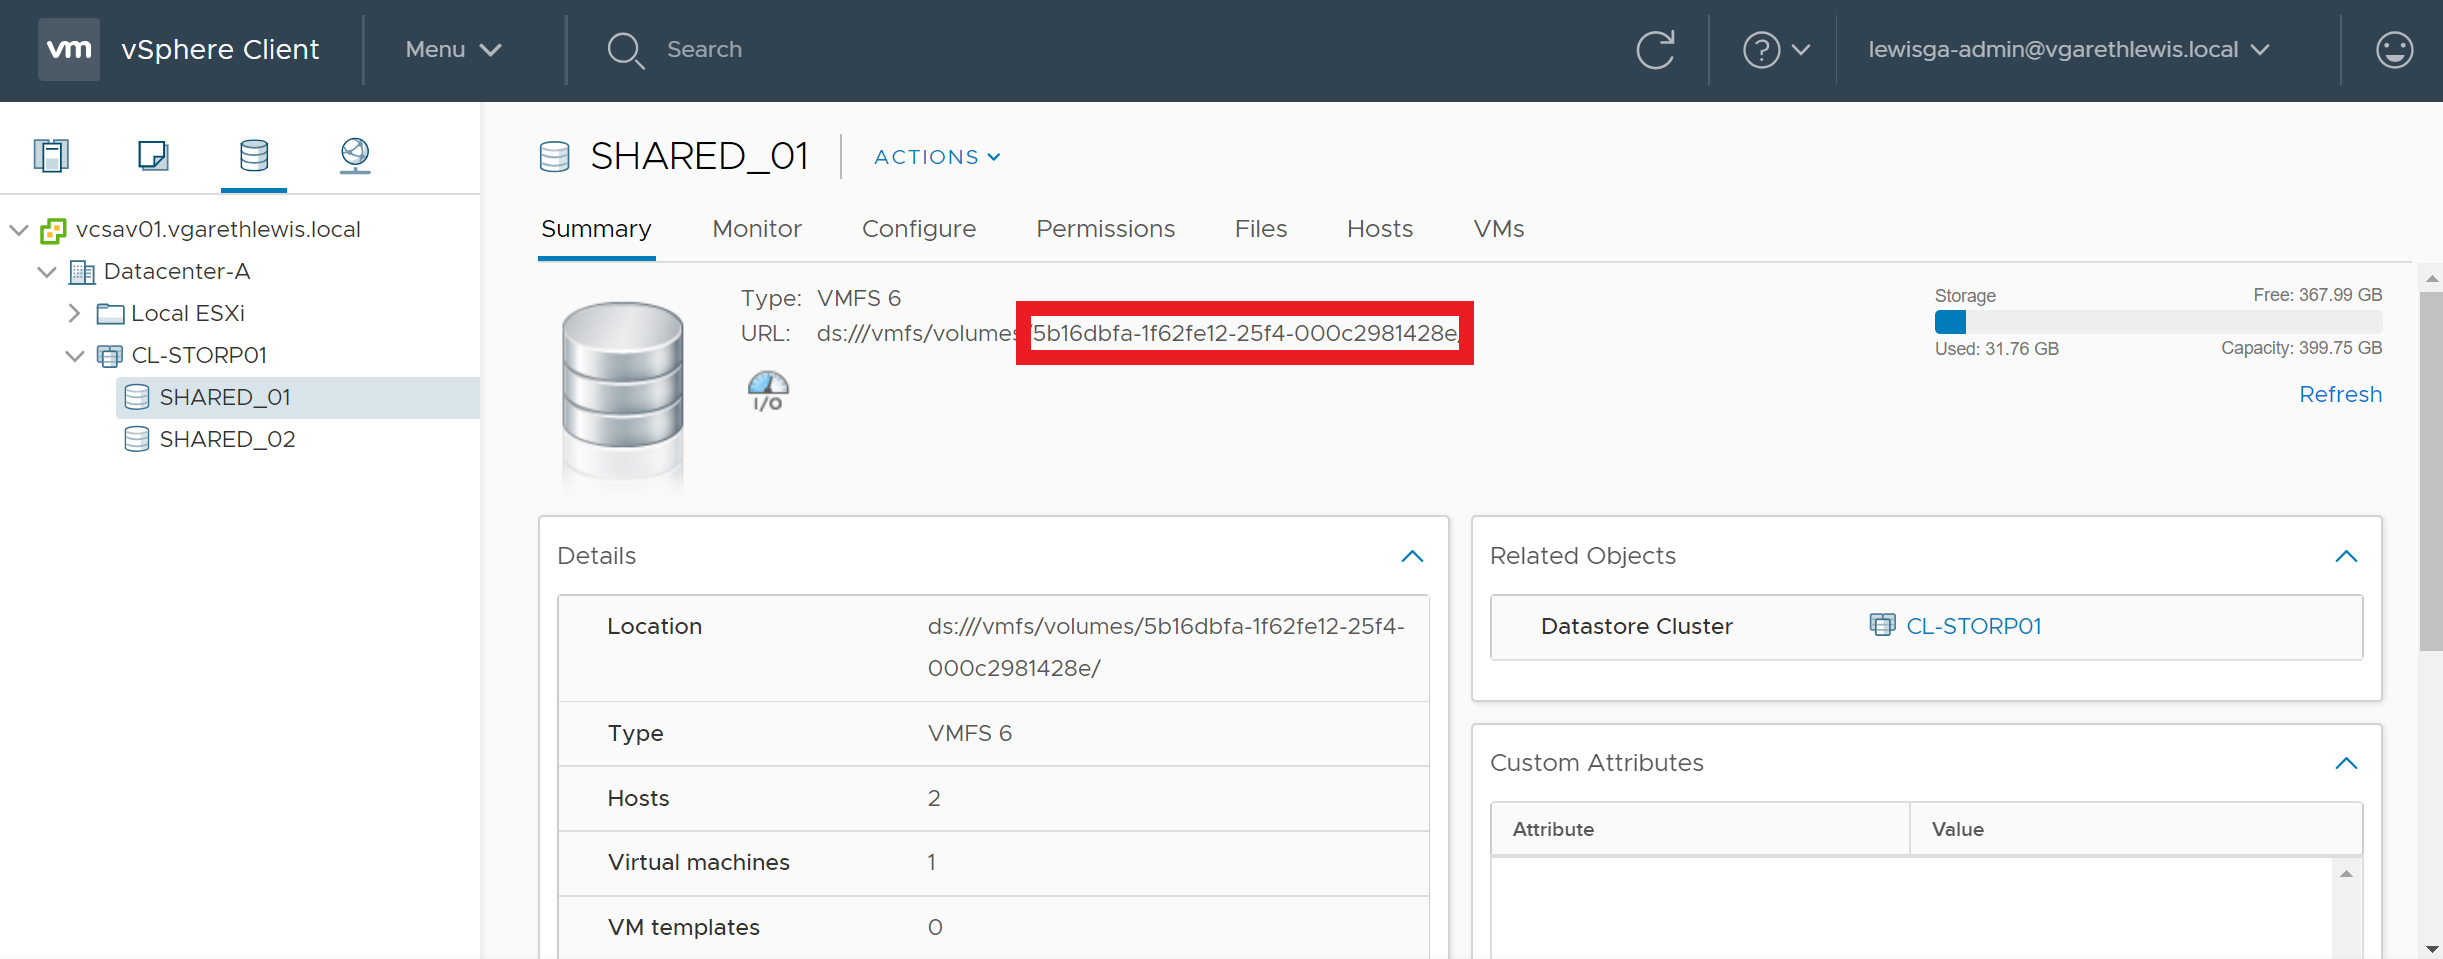
1. Identify the UUID of the datastore/volume in question.
2. Via SSH, connect to an ESXi host which has access to the datastore in question.
3. Run the below command to perform an UNMAP call utilising the volume UUID.
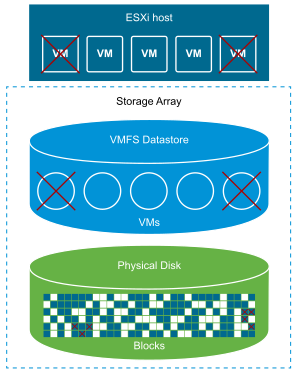
As an example, the below screenshots detail a storage volume before and after an UNMAP call. Over time, the storage volume has experienced a high number of VM deletions and storage vMotions. Following either of the above UNMAP commands, the volume has reclaimed over 2 TB of deleted blocks.
Reclaim VMFS Deleted Blocks via UNMAP – BEFORE
Reclaim VMFS Deleted Blocks via UNMAP – AFTER
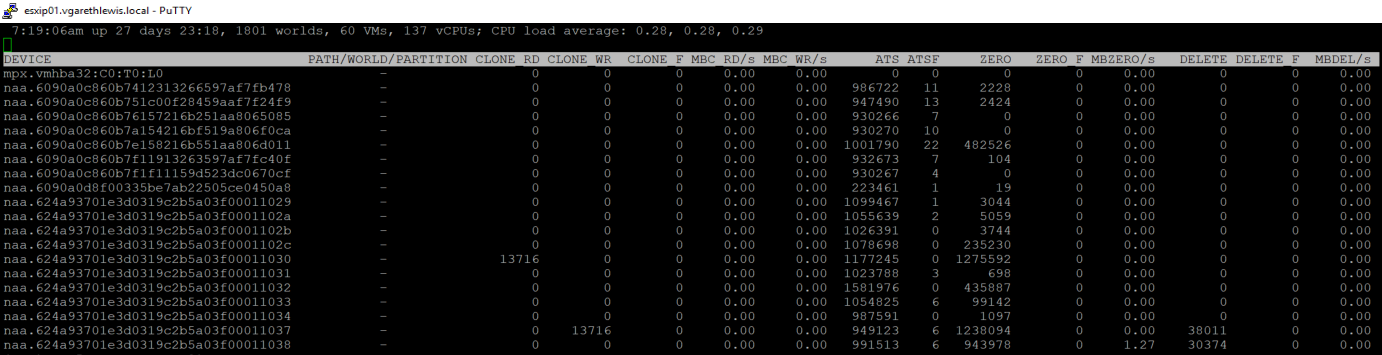
Monitoring UNMAPs via ESXTOP
Finally, it’s nice to be able to monitor such actions and, via ESXTOP, we can. Connect to one of your hosts via SSH and launch ESXTOP. There is going to be a lot of information displayed at this point, so we’ll likely need to toggle-off some of the superfluous information. Press ‘U’ to view disks/devices, and press ‘F’ to launch the currently displayed field order. In the below screenshot I have toggled-off all columns except A, B, and O.
From the below screenshot you can see that, following a little housekeeping on two volumes in my environment, the DELETE counters display the UNMAP I/O count issued to those devices. Note, ESXTOP counters are reset with each host restart.
With VMFS 6 now available, you’ll probably want to leverage it’s automated reclamation capabilities, however, the only upgrade path is to create new datastores, migrate your workloads, and blow away the old VMFS 5 datastores. More on VMFS 6 in a future post.
By design, there are certain virtual machines and/or appliances within vSphere which are protected to prevent editing (this can include NSX Controllers, Edges, Logical Routers, etc.) In a live/production environment, you’d not normally care about editing these appliances, however, in a lab environment (especially one where resource is tight), reducing memory and/or CPU allocation can help a lot. As such, this article will cover the process of removing the lock on protected VM in vSphere, in order to enable editing.
The scenario: a customer needs to reduce the resource allocation of an NSX Controller, however, due to the VM in question being protected/locked, editing the VM’s resources is not possible via UI or PowerCLI.
The process of removing this lock is quick and easy, however, we first need to identify the virtual machine’s Managed Object Reference (moRef ID). Please note, VMware do not support or recommend this procedure in any way. As such, this procedure should not be implemented in a production environment.
Following on from my previous posts (What’s New in vSphere 6.5 and VMware VCSA 6.5: Installation & Configuration), a major area for discussion (and excitement) is the VMware Migration Assistant which, should you wish, is able to easily migrate you away from the Windows-based vCenter Server to the Linux-based vCenter Server Appliance (VCSA).
There are pros and cons to the vCenter appliance of course, as well as a healthy number of supporters in each camp, but if you fancy shaving some licensing costs (Windows Server and SQL Server), would like to enjoy a faster vSphere experience (since 6.0), or would just like to be able to take a quick backup of vCenter without having to either snapshot both Windows and SQL Servers elements, or by utilising your backup product of choice to take a full image of your environment, you might just want to take VCSA for a spin.
A reoccurring issue this one, and usually due to a failed backup. In my case, this was due to a failure of a Veeam Backup & Replication disk backup job which had, effectively, failed to remove it’s delta disks following a backup run. As a result, a number of virtual machines reported disk consolidation alerts and, due to the locked vmdks, I was unable to consolidate the snapshots or Storage vMotion the VM to a different datastore. A larger and slightly more pressing concern that arose (due to the size and amount of delta disks being held) meant the underlying datastore had blown it’s capacity, taking a number of VMs offline.
So, how do we identify a) the locked file, b) the source of the lock, and c) resolve the locked vmdks and consolidate the disks?
Disk consolidation required.
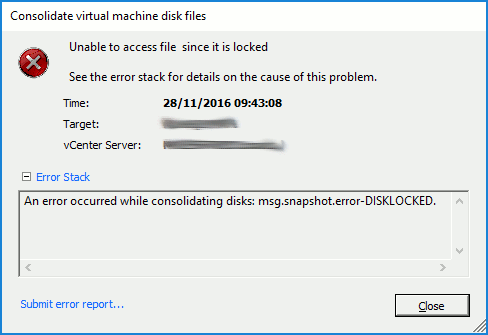
Manual attempts at consolidating snapshots fail with either DISKLOCKED errors…
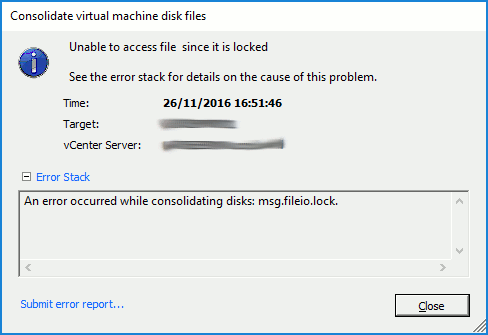
…and/or ‘msg.fileio.lock’ errors.
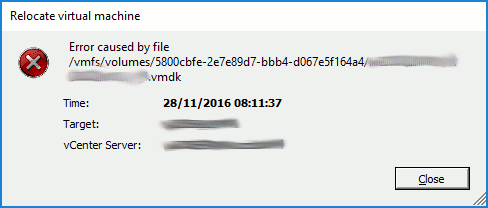
Storage vMotion attempts fail, identifying the locked file.
Identify the Locked File
As a first step, we’ll need to check the hostd.log to try and identify what is happening during the above tasks. To do this, SSH to the ESXi host hosting the VM in question, and launch the hostd.log.
tail -f /var/log/hostd.log
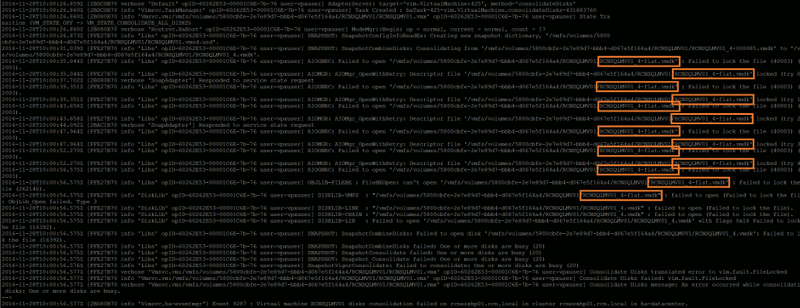
While the log is being displayed, jump back to either the vSphere Client for Windows (C#) or vSphere Web Client and re-run a snapshot consolidation (Virtual Machine > Snapshot > Consolidate). Keep an eye on the hostd.log output while the snapshot consolidation task attempts to run, as any/all file lock errors will be displayed. In my instance, the file-lock error detailed in the Storage vMotion screenshot above is confirmed via the hostd.log output (below), and clearly shows the locked disk in question.
File lock errors, detailed via the hostd.log, should be fairly easy to identify, and will enable you to identify the locked vmdk.
Identify the Source of the Locked File
Next, we need to identify which ESXi host is holding the lock on the vmdk by using vmkfstools.
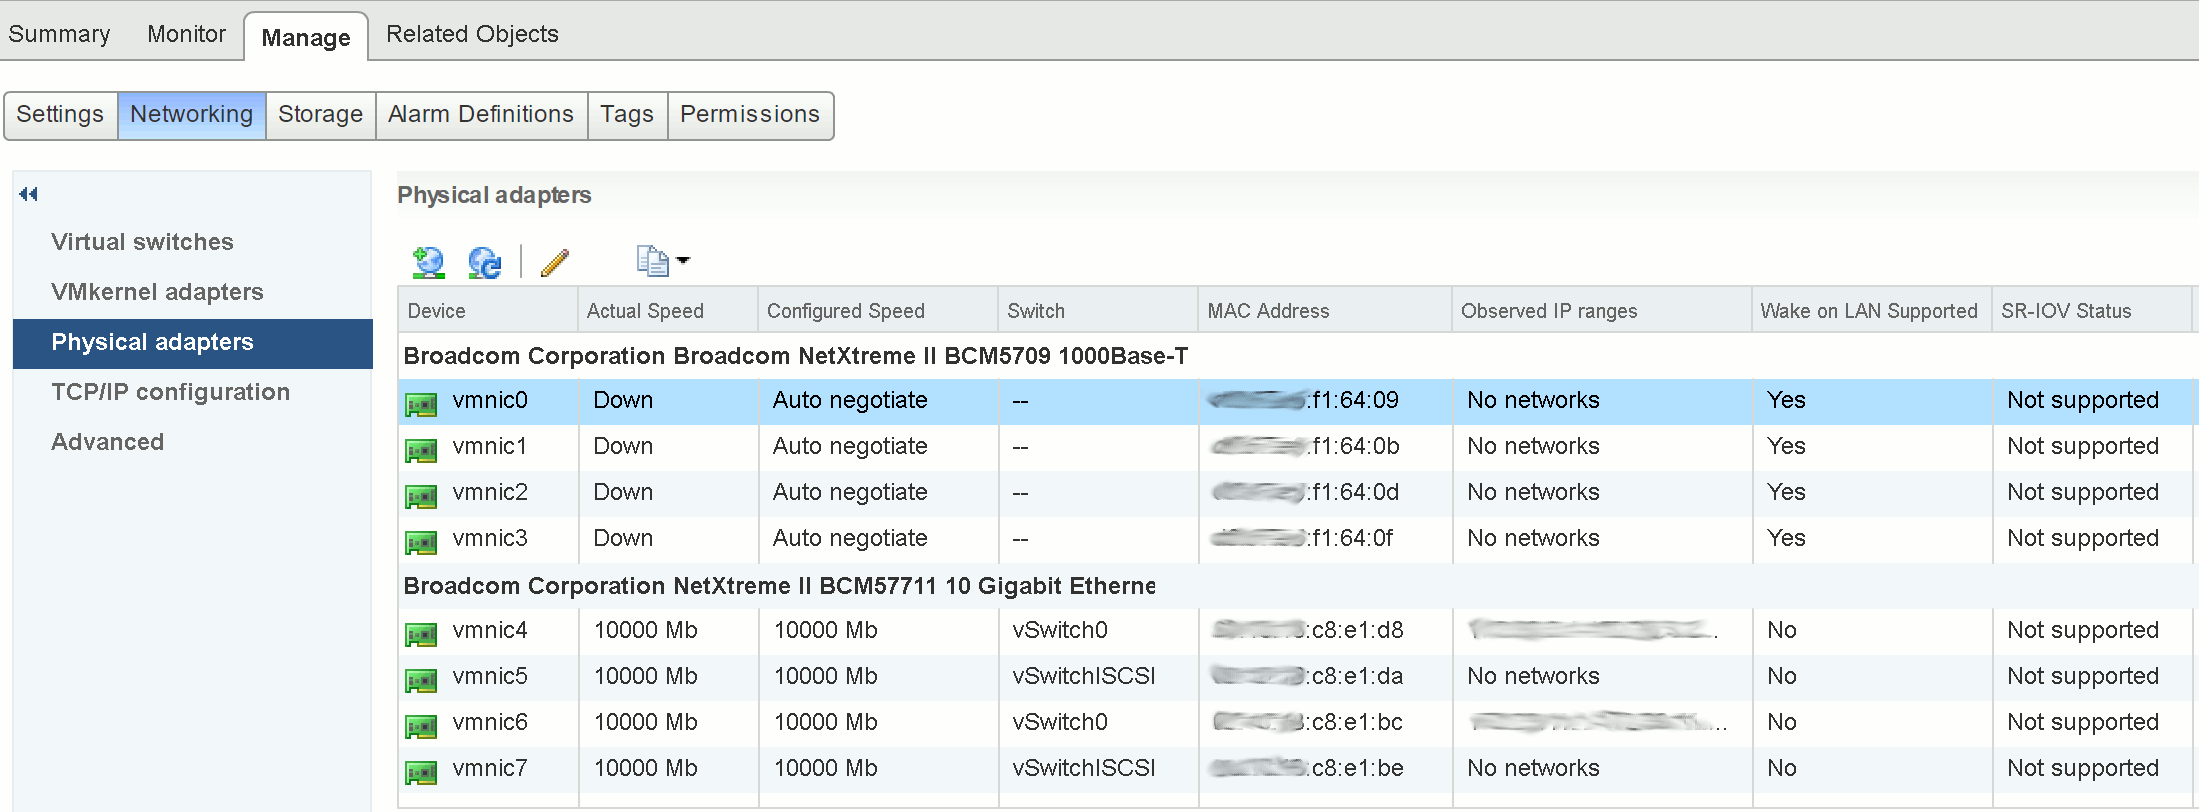
We are specifically interested in the ‘RO Owner’, which (in the below example) shows both the lock itself and the MAC address of the offending ESXi host (in this example, ending ‘f1:64:09’).
The MAC address shown in the above output can be used to identify the ESXi host via vSphere.
Resolve the Locked VMDKs and Consolidate the Disks
Now the host has been identified, place in Maintenance Mode and restart the Management Agent/host daemon service (hostd) via the below command.
/etc/init.d/hostd restart
Following a successful restart of the hostd service, re-run the snapshot consolidation. This should now complete without any further errors and, once complete, any underlying datastore capacity issues (such as in my case) should be cleared.
For more information, an official VMware KB is available by clicking here.
We use cookies to ensure that we give you the best experience on our website. If you continue to use this site we will assume that you are happy with it.