Just like the time I witnessed my first ever vMotion, seeing Veeam replication in the wild had a similar effect. As its name suggests, Veeam Backup & Replication is about more than just backups and offers customers rather neat replication functionality.
This article discusses Veeam Backup & Replication v10 offsite replication jobs. We also protect a business-critical virtual machine by replicating it to a secondary site. In Part 2 (Veeam Backup & Replication – Part 2 – Recovery From Failover), we will migrate the VM’s live operations to the secondary site before reviewing the available failback options.
Firstly, What is a Replica?
A replica is a 1:1 copy of a virtual machine in native hypervisor format. As such, there is no deduplication, compression, or encryption. While a replica can’t be encrypted, the connection between the hosts can be encrypted (in-flight encryption).
Offsite Replication
In our scenario, the source host is located in the production site (Site A), while the target host is located in the DR site (Site B). As such, we will be performing offsite replication.
In the offsite replication scenario, Veeam B&R utilises data compression. The Veeam data mover on the source backup proxy compresses VM data blocks and sends them to the target backup proxy in the compressed format. The Veeam data mover on the target backup proxy uncompresses VM data and stores it to a datastore in a native VMware vSphere format.

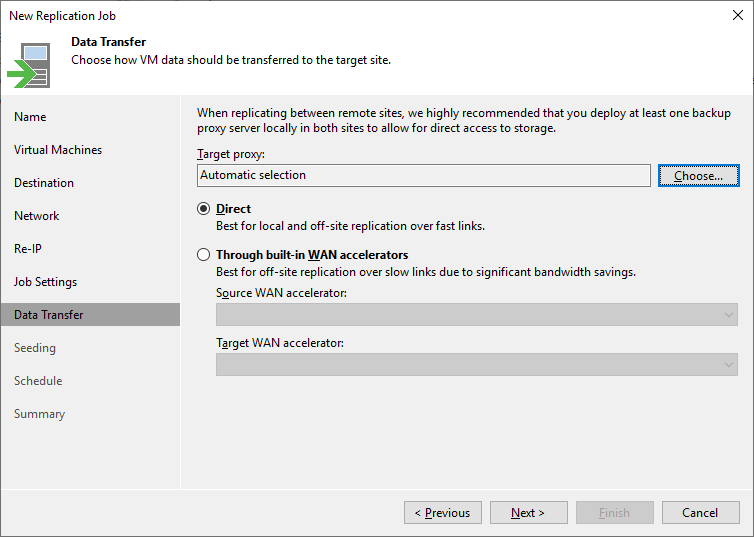
Offsite replication can run over two data paths – Direct data path, or via a pair of WAN accelerators.
Offsite Replication Requirements
- Source and target hosts
- At least one backup proxy in the source site
- At least one backup proxy in the target site
- Backup repository for storing replica metadata. Must be located in the source site, closet to the backup proxy
Customer Use Case
Failover of critical VMs to a secondary site (Site B) in the event of a failure or planned maintenance/downtime at the primary site (Site A).
Design Constraints
- The Customer is performing VM backups within Site A.
- The Customer is performing backup copy jobs from Site A to Site B.
- The virtual networks in Site A and Site B are different.
- The IP addressing schemes in Site A and Site B are different.
| Site A | Site B | |
| Subnet | 10.0.10.0/24 | 10.1.11.0/24 |
| Virtual Network | VL10-Management | VL11-Management |
Design Decisions
- Utilise Veeam Backup & Replication to protect critical VMs by creating a single replication job to replicate a single business-critical VM from Site A to Site B.
- Utilise replica seeding using existing backup copy job data in Site B. After the initial seed, Veeam B&R will synchronise the replica VM with the original VM.
- Utilise network remapping for DR sites with different virtual networks. When a failover is initiated, the replica VM will be connected to the appropriate network(s) in the DR site, removing the need to reconfigure network settings for the replica VM manually.
- Utilise replica re-IP for DR sites with different IP addressing scheme (Windows only). Veeam B&R automates VM IP addresses reconfiguration where the IP addressing scheme in the production site differs from the DR site scheme. This is done by mounting the VM disk(s) of the replica to the backup server and changing the IP address configuration via the Microsoft Windows registry. If the failover is undone for any reason, or if you failback to the original location, replica IP address if changed back to the pre-failover state.
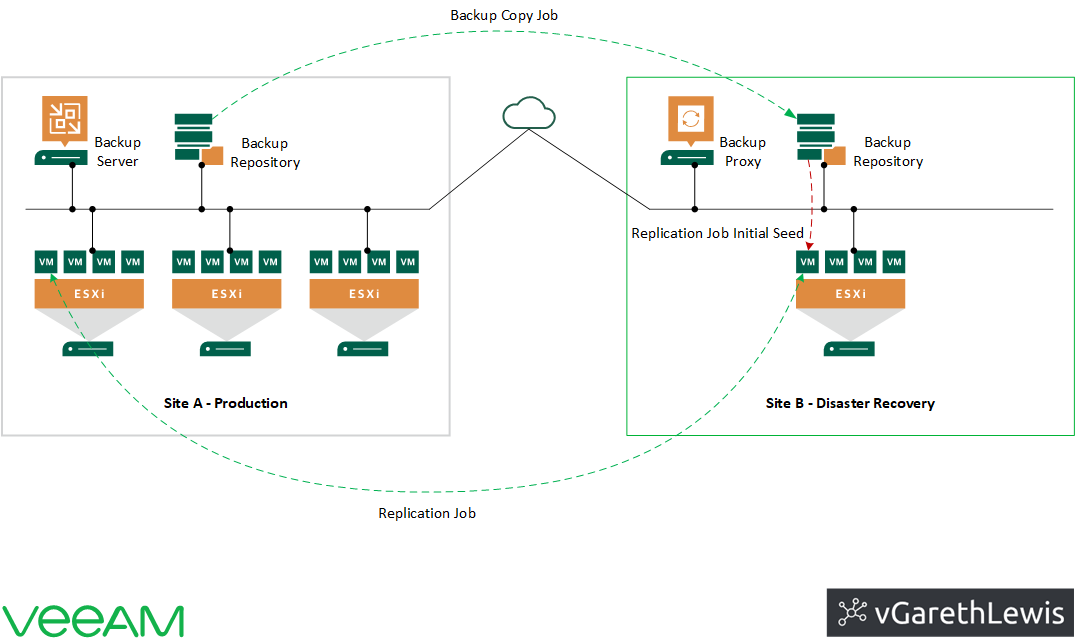
Topology
We can visualise the topology further via the below design diagram.
Note the backup copy job which copies VM backup restore points from the Veeam backup repository in Site A to Site B. The backup copy job restore points in Site B will be used for the replication job’s initial seed, as this helps to reduce the amount of VM data transferred over the network. After the initial seed, Veeam B&R will synchronise the replica VM with the original VM.
Now that we have a clear understanding of our requirements and design decisions let’s look at the procedure of creating a replication job in detail.
Replication Job Procedure
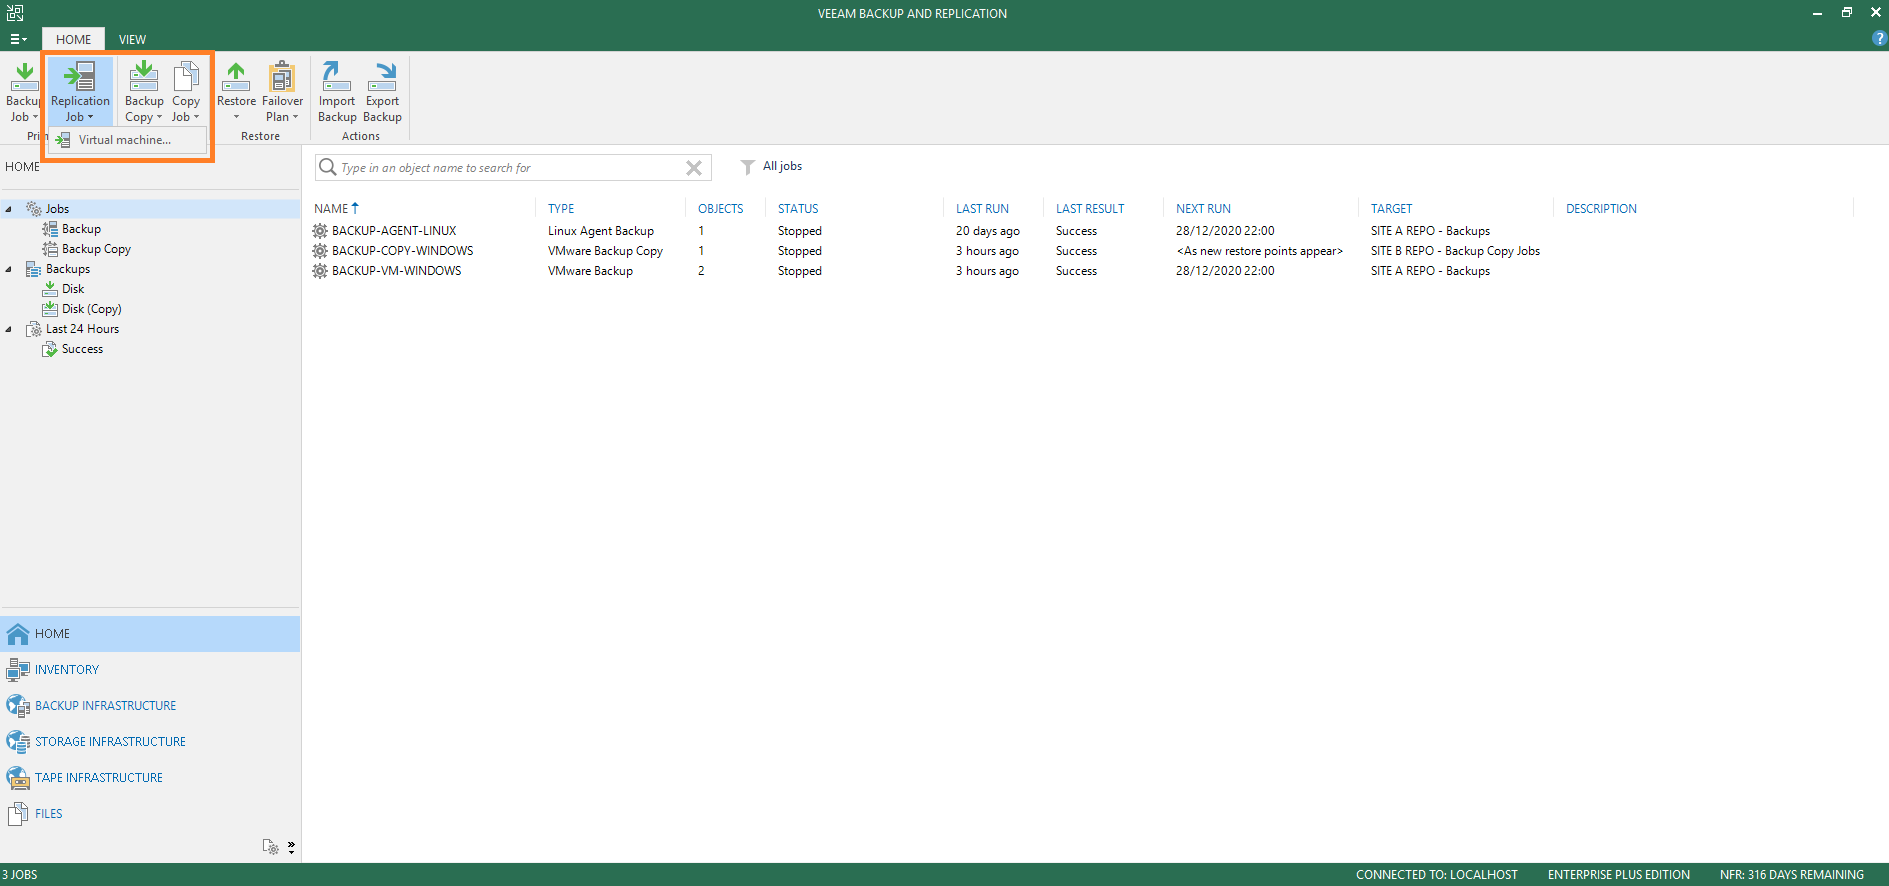
1. Launch the Veeam Backup & Replication console and browse to Home > Replication Job > Virtual Machine.
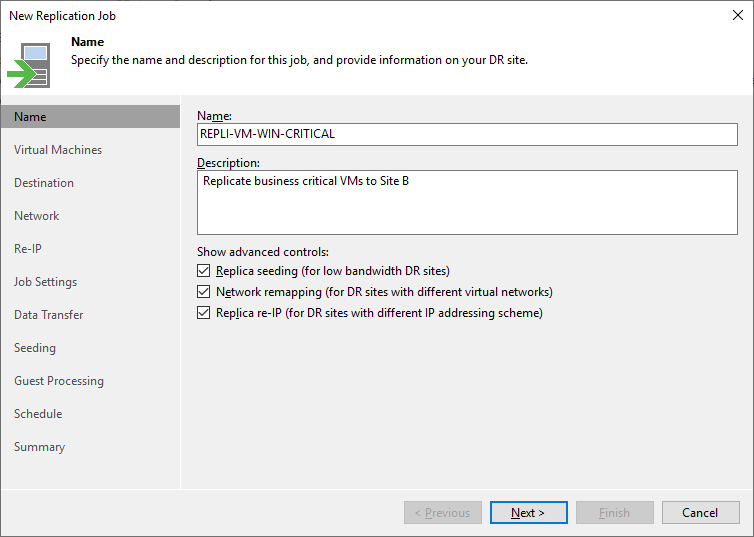
2. Give the new replication job a Name, Description, and (due to the above network constraints) ensure all advanced controls are selected. When ready, click Next >.
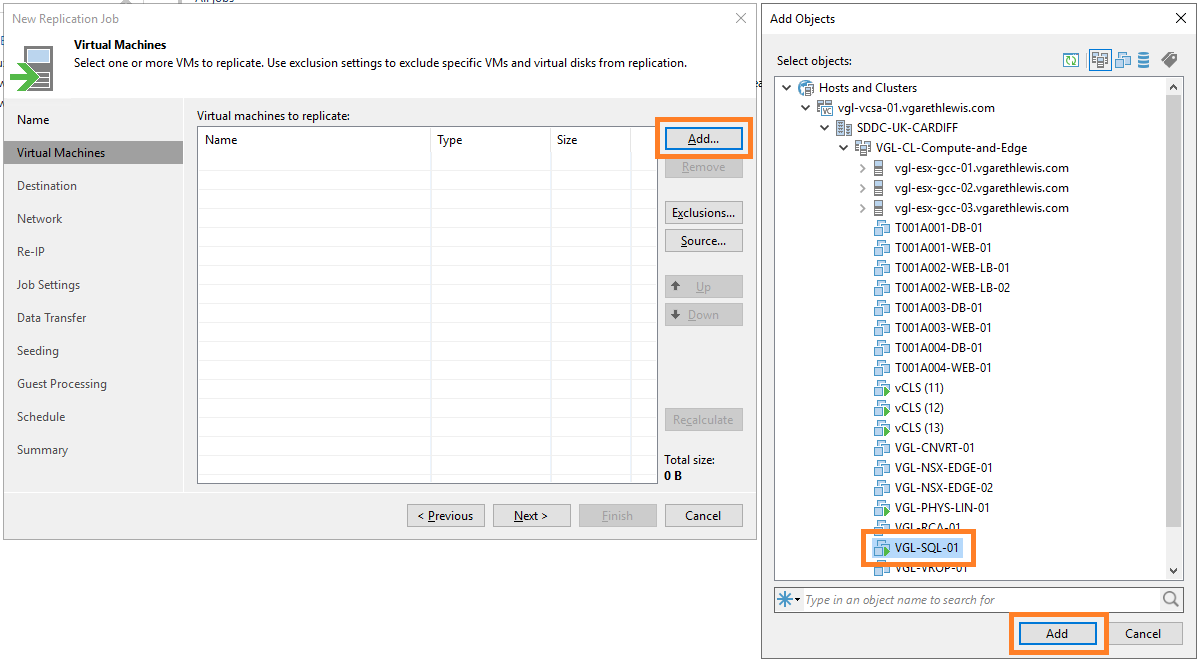
3. From the Virtual Machines tab, click the Add… button, select the required VMs, and click Add.
Note – In a production environment where a requirement would see multiple VMs replicated to the DR site, we would benefit by using vSphere tags.
4. Optional – By default, the source VM is utilised to obtain the most recent VM state from the production storage. However, where bandwidth between sites may be limited, we can utilise backup data located at Site B the replication source.
Where such a constraint is experienced, click Source and select the relevant backup or backup copy job in Site B. When ready, click OK and Next >.

5. From the Destination tab, select the destination Host or Cluster in Site B, the relevant Resource Pool, VM Folder, and Datastore. When ready, click Next >.

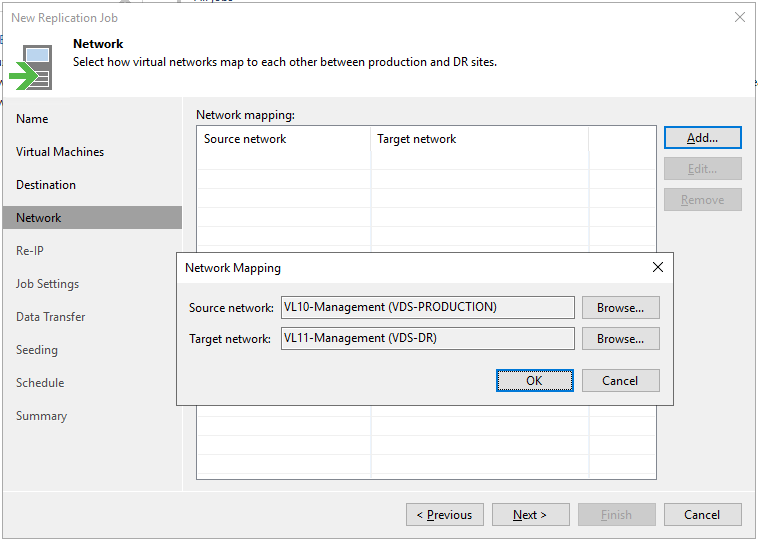
6. From the Network tab, click the Add… button to create a source/target network mapping. Select the relevant source and target virtual networks (see Table 1 above) and, when ready, click OK and Next >.
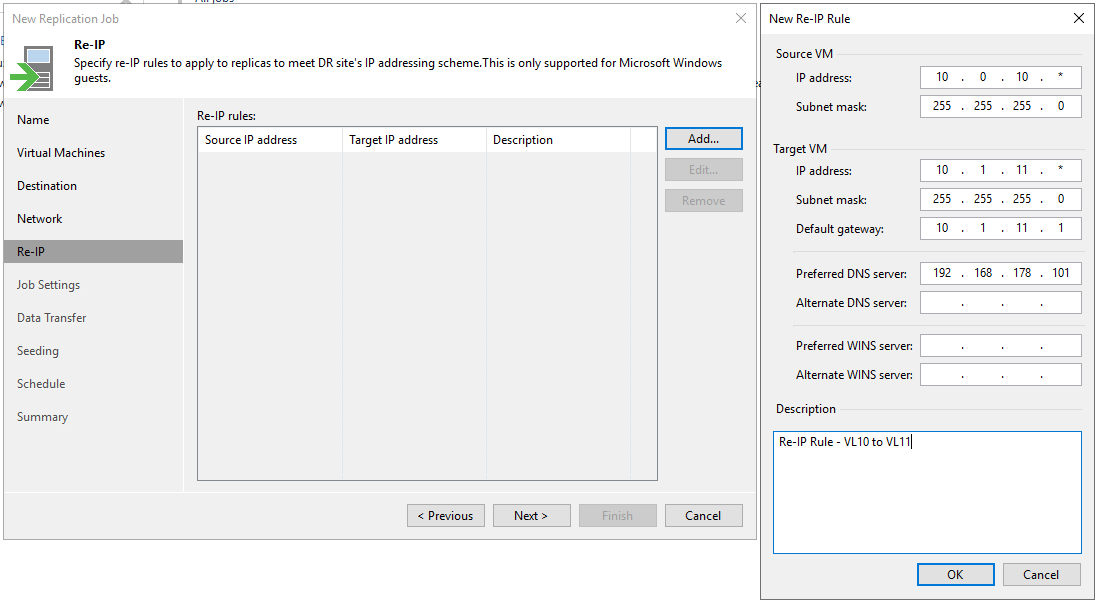
7. From the Re-IP tab, Click the Add… button and configure the source and target IP scheme (see Table 1 above). Note, the fourth octet is retained thanks to the ‘*’. When ready, click OK and Next >.
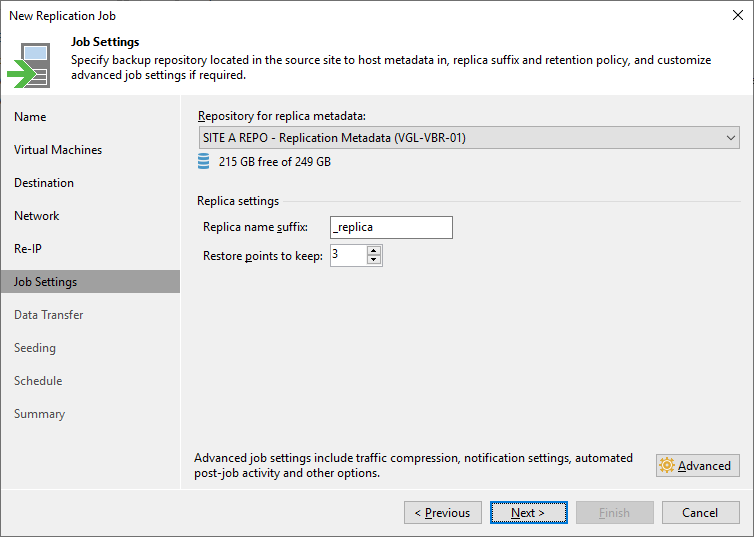
8. From the Job Settings tab, select the relevant repository for the replica metadata (must be located in the source site, closet to the backup proxy). Assign a replica name suffix and configure the restore points to keep. When ready, click Next >.
9. A backup proxy already exists in Site B. Veeam B&R will utilise the most appropriate proxy by default. Accept the defaults, and click Next >.
10. As mentioned earlier, backup copy job restore points containing the VM in question already exist in Site B. As such, this data will be used for the initial seed. All subsequent runs will synchronise the replica VM with the original VM.
Select the appropriate repository containing the backup copy job and click Next >.

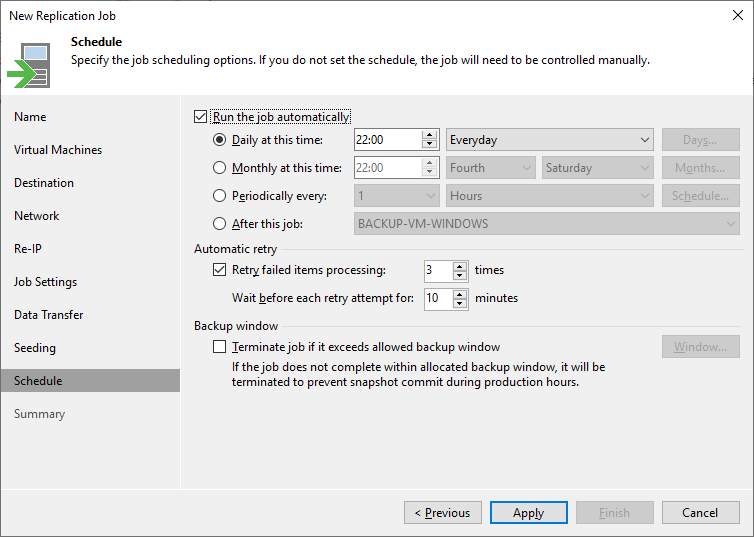
11. Configure the replication job schedule and click Apply.
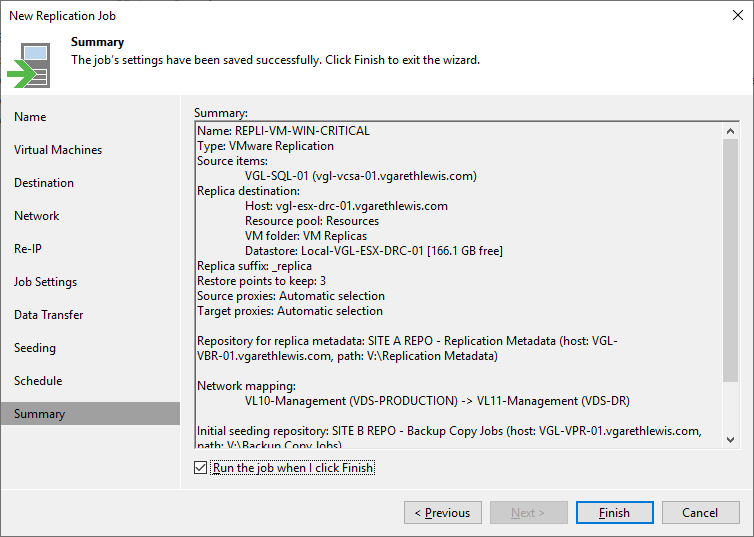
12. Review the Summary tab and, in our example, I enable the Run the job when I click Finish. When ready, click Finish to initiate the replication job.
13. As the new replication job begins, monitor its progress.

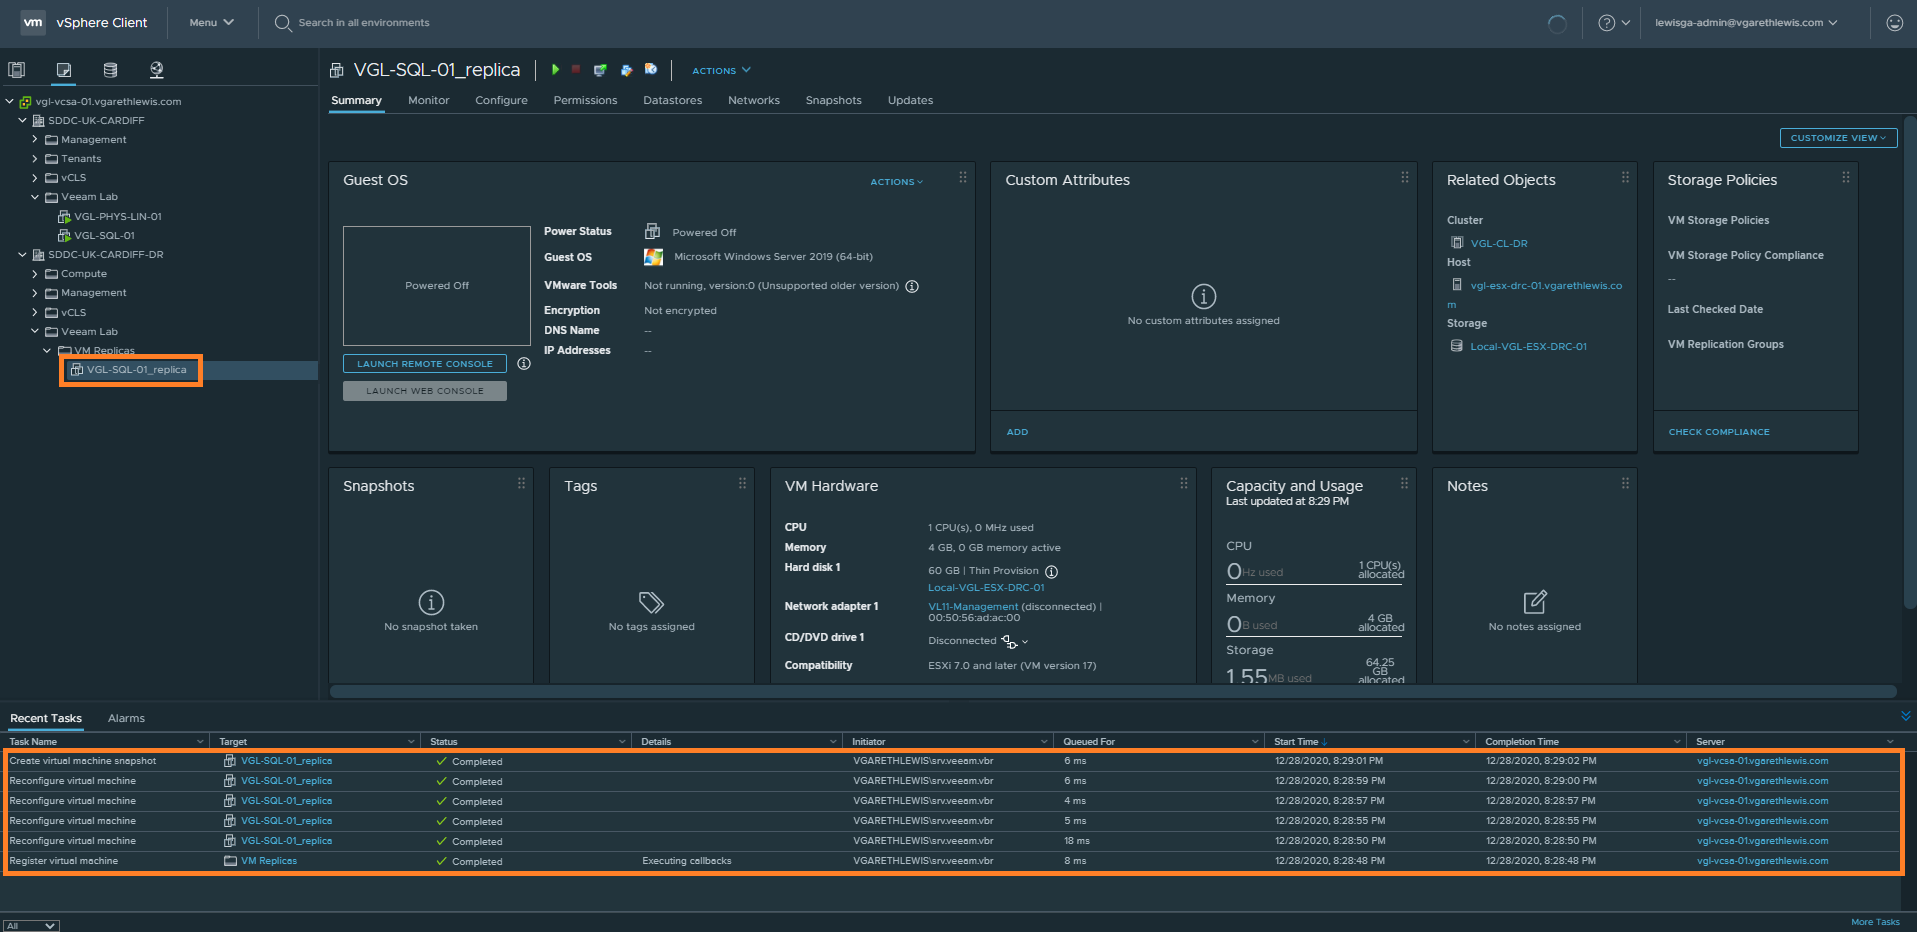
14. If we jump over to the vSphere UI, note the creation of our replica VM, and monitor the vSphere tasks.
15. Back in the Veeam console, launch the replication job’s statistics.
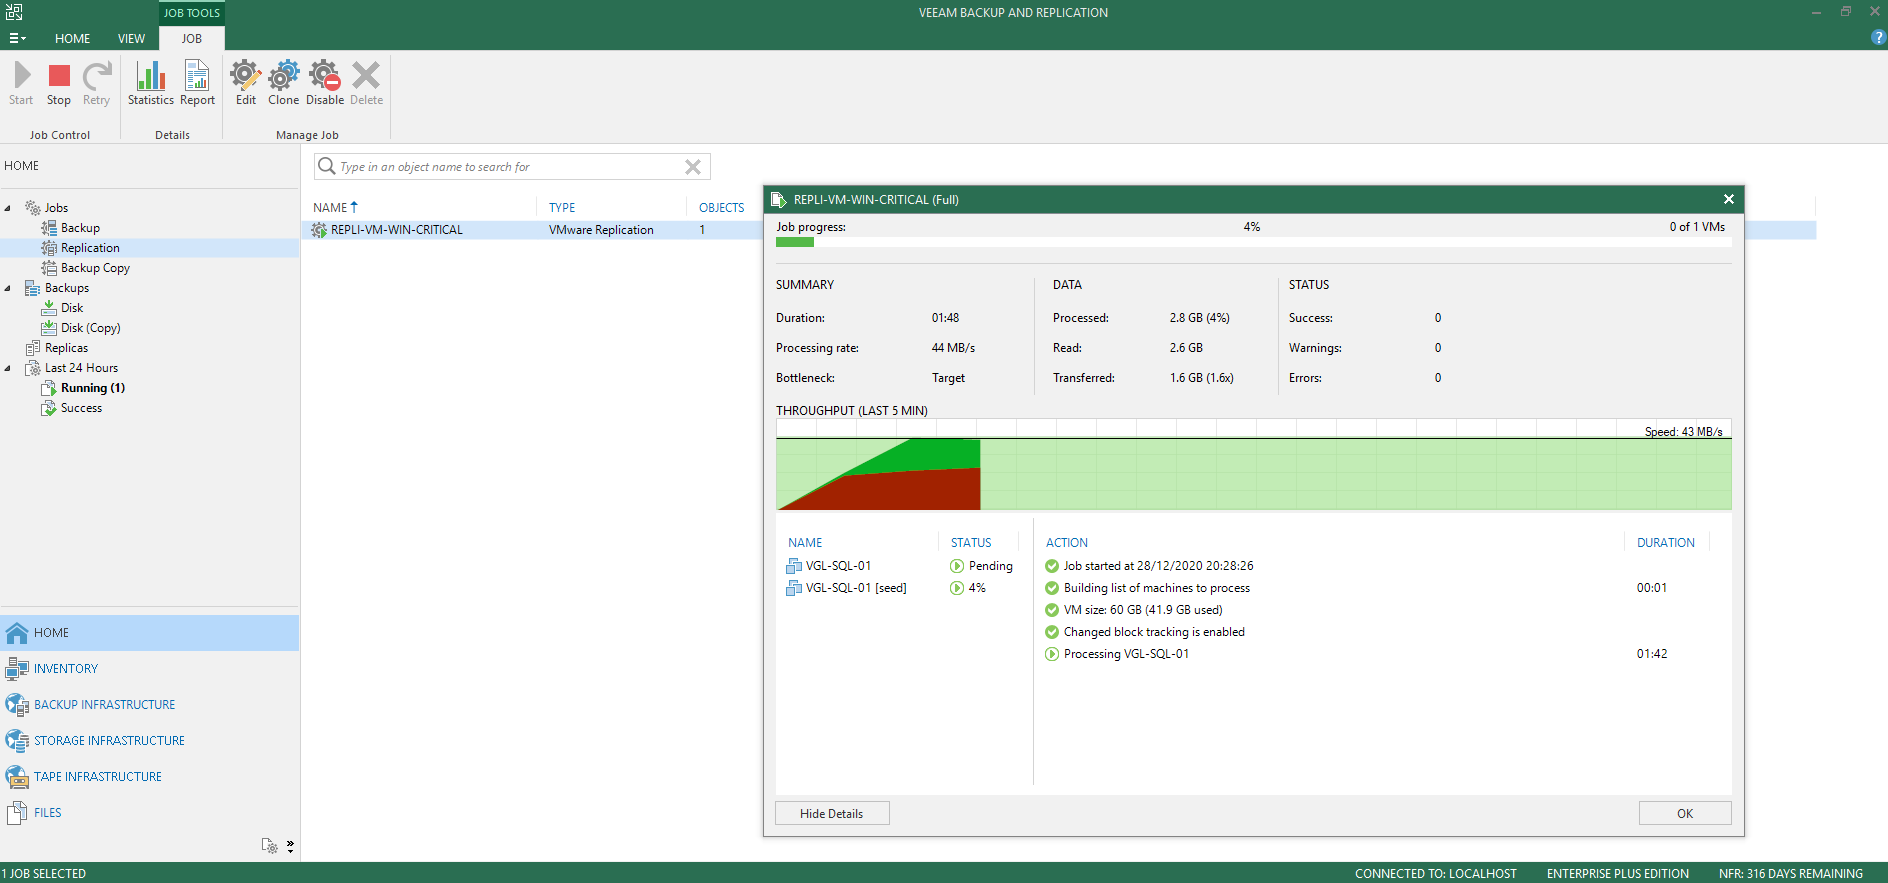
16. As per our configuration, we note the VM is initially seeded from the latest backup copy job restore point in Site B. Once complete, Veeam reviews the VM for any changed blocks and synchronises the VM replica with the source VM.
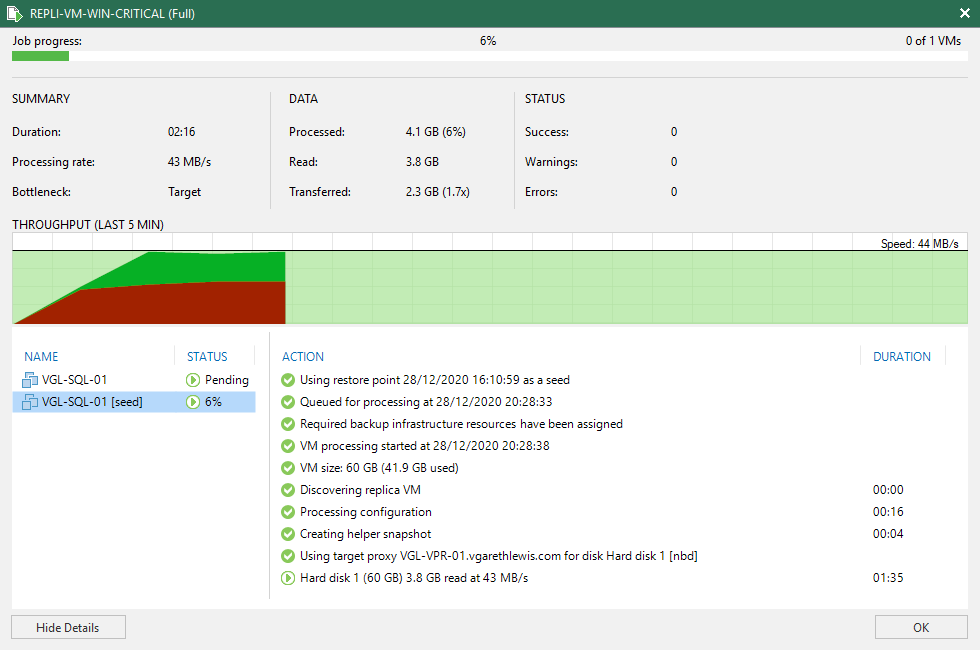
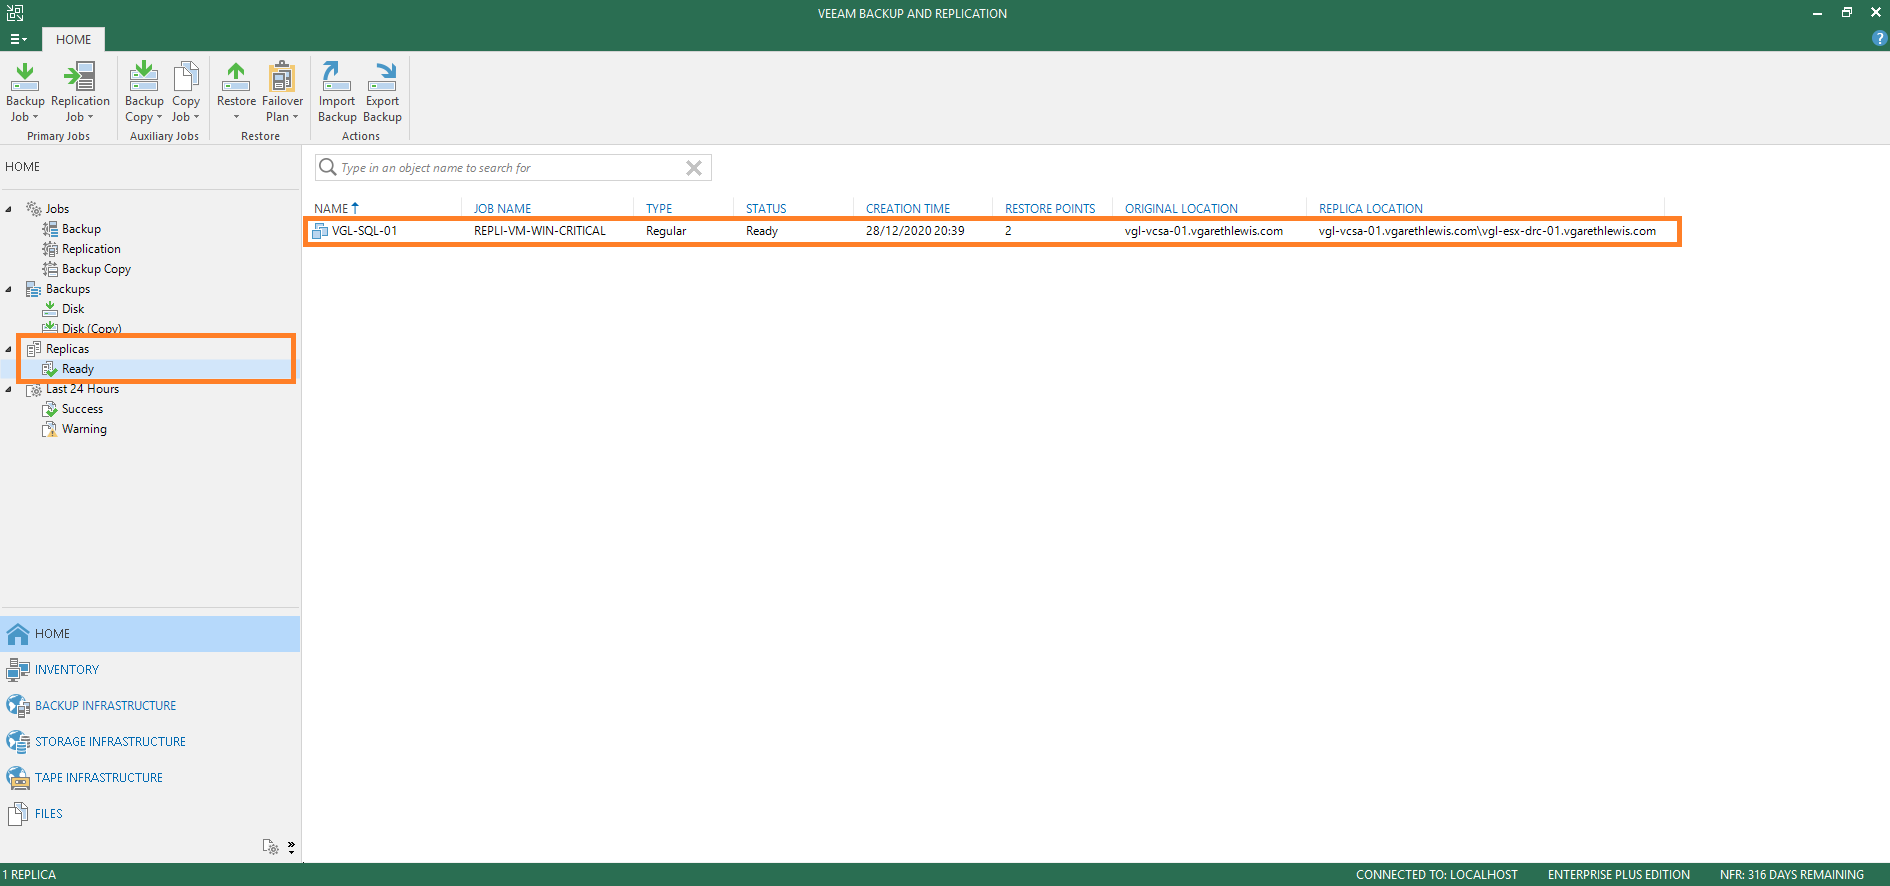
17. Once complete, our replica is ready for failover duties.
In Summary
This article has reviewed offsite replication and its requirements, as well as a Customer’s replication and failover use case. We also created a replication job to ensure a business-critical VM is replicated to a secondary site in readiness for a failure or planned maintenance/downtime at the primary site (Site A).
In Part 2 (Veeam Backup & Replication – Part 2 – Recovery From Failover), I discuss the failover options available to us utilising Veeam Backup & Replication, as well as several failback options and why they differ. I then demo the failover of the business-critical VM’s live operations from Site A to Site B and close by failing back live operations from Site B to Site A.
Hi, maybe i’m wrong but it’s not correct to choose the vm from backup as “Source” if you want to only seed the first replication job. It’s sufficient select the datastore that contain bakcup in the “seed” step of the wizard i thnk. Let me know
Hi Bruno! Great spot, and thanks for pointing this out! Your absolutely right, and this was a paragraph-typo on my part. In step 4, what I meant to say was, in the scenario where site-to-site links have limited bandwidth, we can utilise backup data in Site B as the source repository. Hopefully, that clears things up, but apologies for the mixup. Step 4 amended.