I recently had a great VMware NSX discussion with a contact on Twitter. They had reached out to me wondering if there was a way of restricting a VM’s connectivity to the internet by limiting its access to a set of wildcard addresses, e.g. *.example.com. The specific ask was to restrict access to Microsoft Windows Server Update Services, as the vast list of underlying IP addresses for *update.microsoft.com, *.download.windowsupdate.com, etc., changes regularly. In this scenario, utilising wildcards within the VMware NSX DFW rules would be hugely advantageous.
FQDN filtering within VMware NSX has been available for some time and is a quick and easy task to configure, either to allow or restrict traffic. In this article, we look at the process of implementing FQDN filtering and validate post-implementation.
IT IS IMPORTANT TO NOTE that the FQDN filtering feature works at layer 7 and, as such, does not cover ICMP. Were a user to create a denylist rule for all services to 'example.com', it would be entirely expected for a curl request to fail, whereas ICMP traffic would flow successfully (unless, of course, ICMP is explicitly blocked elsewhere within the DFW).
Importantly, NSX uses DNS Snooping to obtain a mapping between the IP address and the FQDN. As such, we must first create a DNS rule. An FQDN allowlist/denylist can then be created BELOW the DNS rule. To keep the DNS to IP mapping cache entry for the virtual machine, NSX uses DNS TTL (time to live) in the DNS response (coming from the DNS server to the virtual machine). For FQDN filtering to be effective, virtual machines must use a DNS server for domain resolution (no static DNS entries) and need to honour the TTL received in the DNS response.
Prerequisites
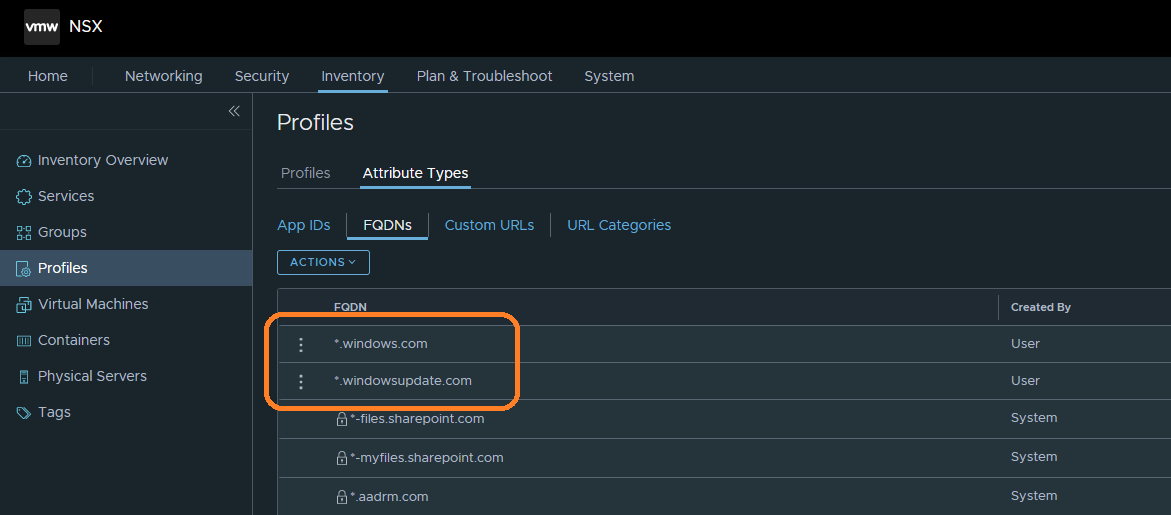
1. Create your FQDNs – Simply browse to Inventory > Profiles > Attribute Types > FQDNs and select Action > Add FQDNs. In the below screenshot, you can see I have created *.windows.com and *.windowsupdate.com. For WSUS, I’ll also need *.microsoft.com, however, this already exists as an out-of-the-box system-created FQDN.
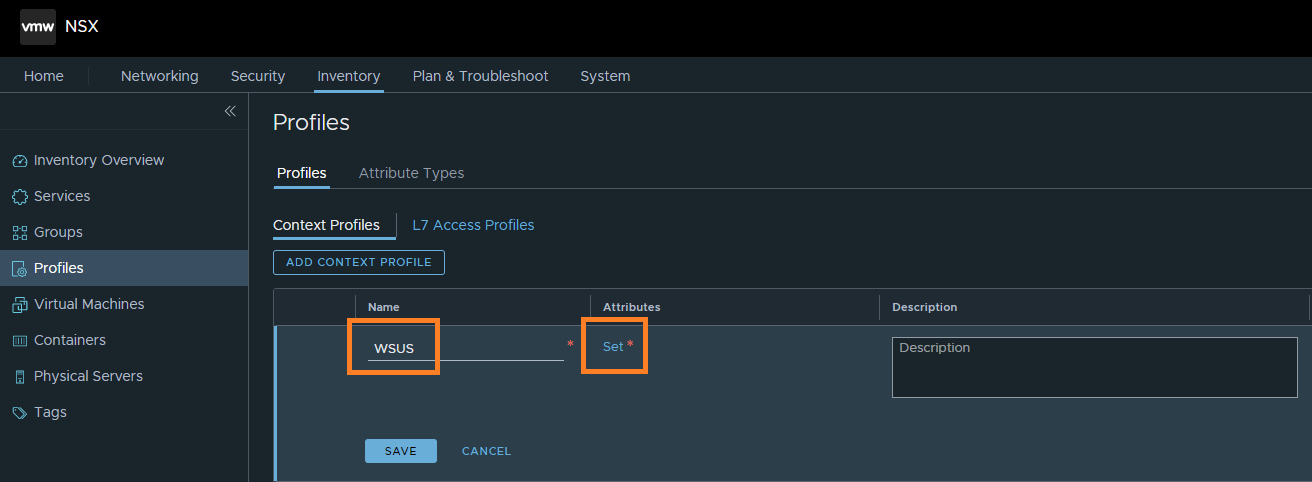
2. Create your Context Profile – Browse to Inventory > Profiles > Profiles > Context Profiles and select Add Context Profile.

3. Give the Context Profile a name, and select Set to add our recently created FQDNs.
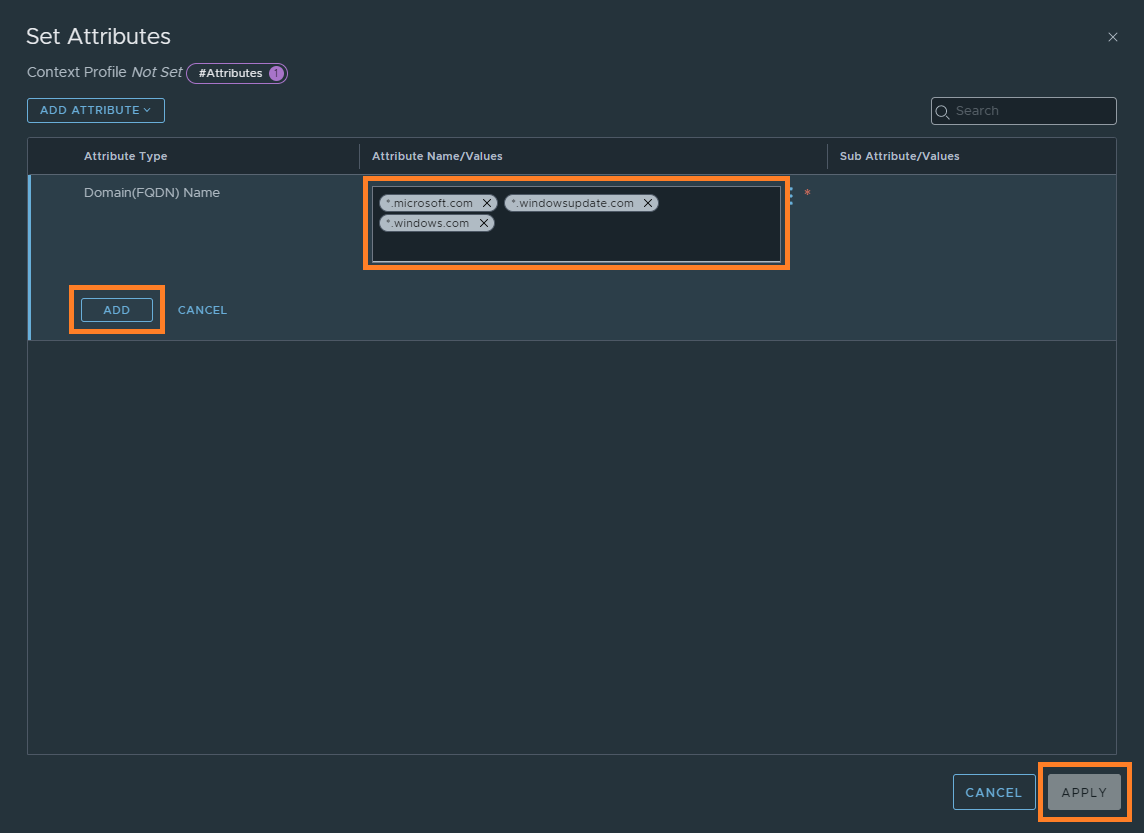
4. Click the Add Attribute drop-down menu and select Domain (FQDN) Name.

5. Select your FQDNs and, when complete, click Add and Apply.
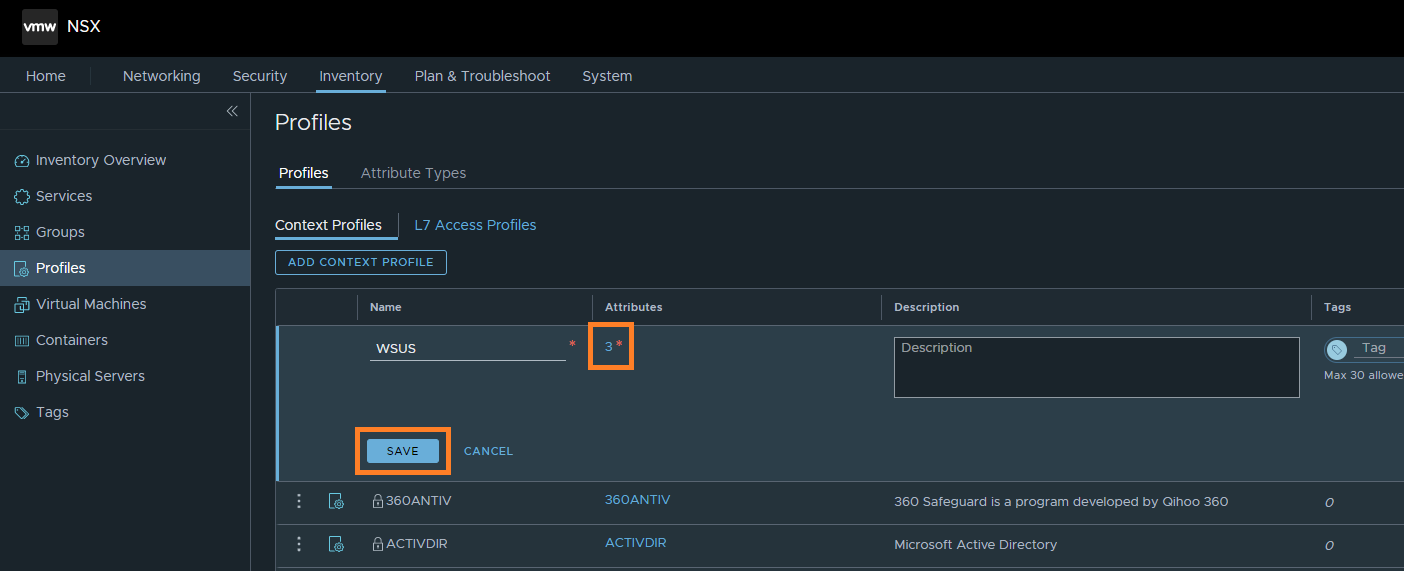
6. Once complete, note that the number of attributes has changed, reflecting the number of FQDNs. When ready, click Save.
Distributed Firewall Rules
Now that we have created our FQDNs and included them within a Context Profile, we are ready to develop our DFW rules. As mentioned earlier, we first need to create a DNS rule and, under the DNS rule, an allow/denylist.
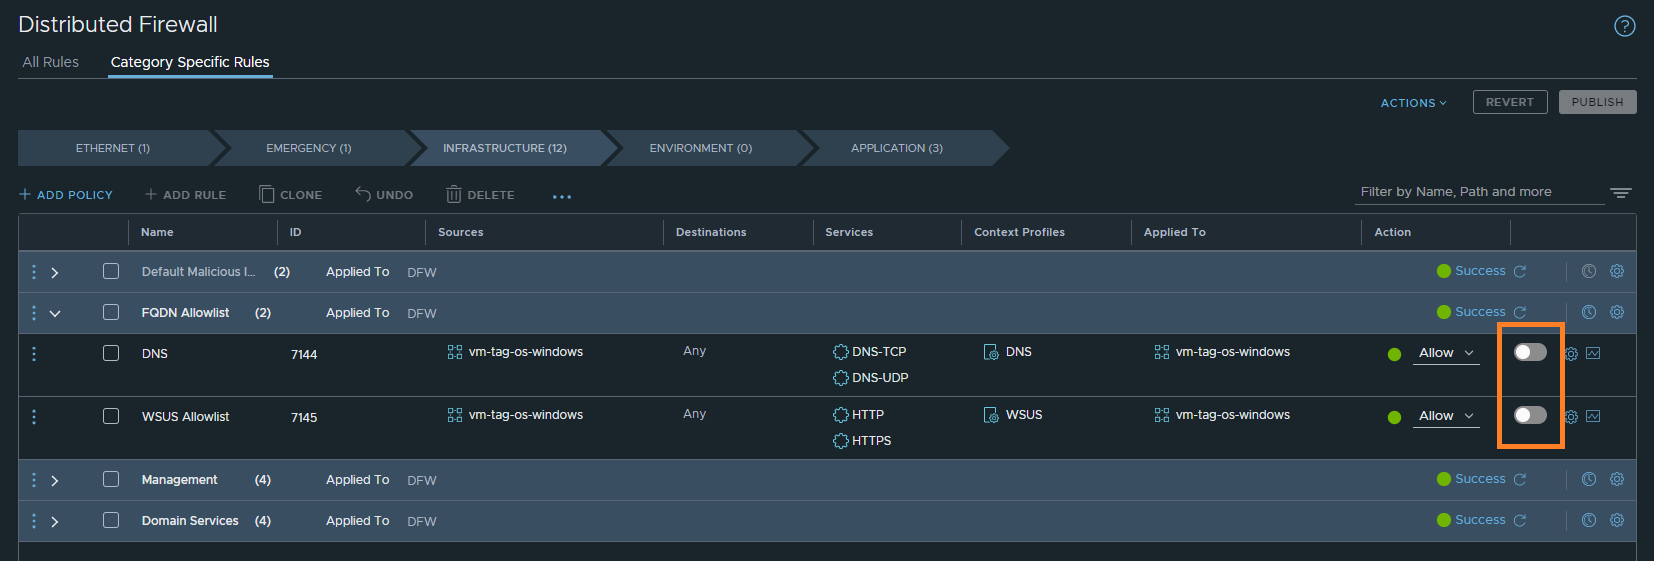
DNS Rule – Firstly, I create a DNS rule (Rule ID: 7144 in the below screenshot), the Source and Applied To for which is a VM group configured to utilise a tag for dynamic membership (in this case, I am applying the tag vm-tag-os-windows to all Windows Server VMs). Note – Services must be set to DNS-TCP and/or DNS-UDP (depending on your environment ), and Context Profile must be configured to use the out-of-the-box DNS Context Profile.
AllowList Rule – Underneath the DNS rule, I create an allow rule (Rule ID: 7145 in the below screenshot), again with the Source and Applied To focusing on the appropriate dynamic group. Note – Services must be configured accordingly (in our scenario, WSUS requires HTTP and HTTPS), and Context Profile must be configured to use our recently created WSUS Context Profile.
In the below screenshot, the Action for both of the DFW rules has been set to Allow (the default DFW rule is set to Drop).

Validation
We can adequately test the new rules by attempting to access *.microsoft.com via a web browser or a simple curl request. The screenshot below shows that both the web browser and curl requests are successful.
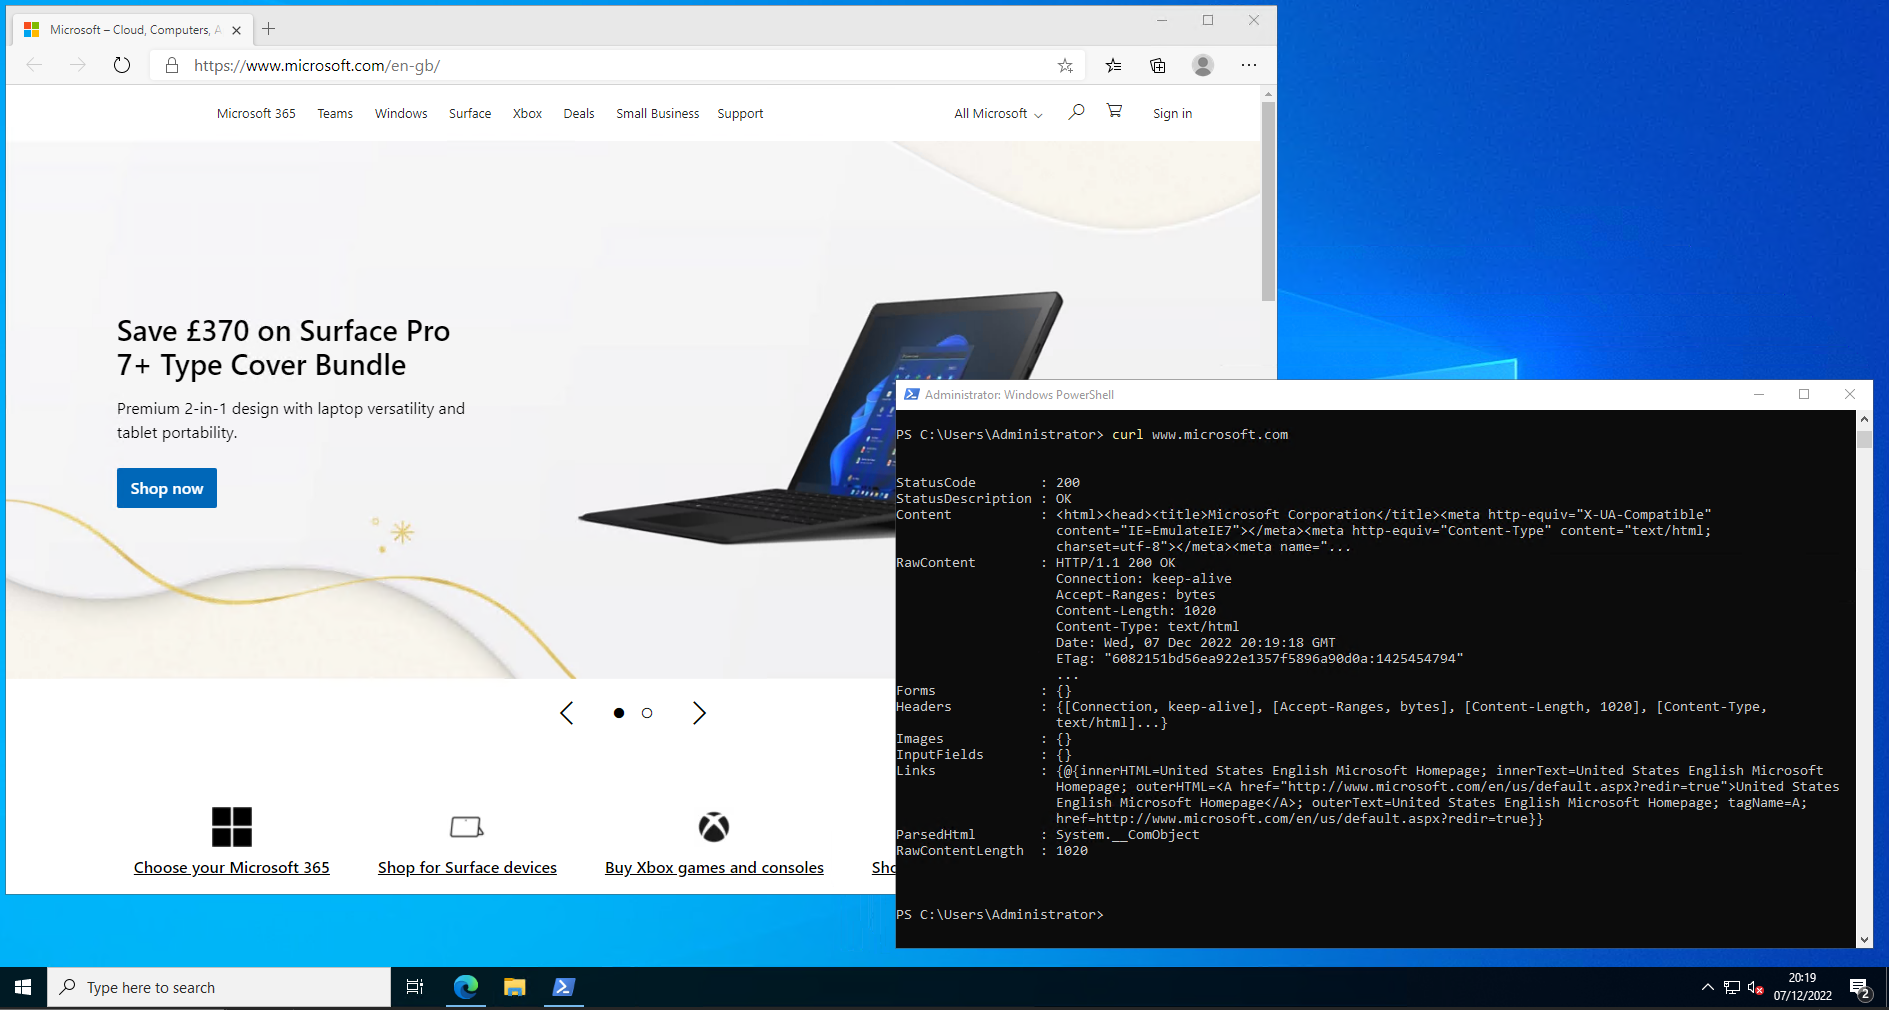
If I were to disable our newly created DFW rules, we would hope to see the previous success fail. In the below screenshots, you can see I have disabled the DFW rules. As expected, the result sees the VM unable to connect to *.microsoft.com via either web browser or curl.

In Summary
In this article, we looked at restricting outbound connectivity from VMs housed within VMware NSX to wildcard addresses, e.g. *.microsoft.com. We achieved this using VMware NSX Distributed Firewall (DFW) FQDN filtering. By following this quick and easy exercise, we have effectively filtered traffic for the VMs in question and further enhanced this by targetting a subset of VMs via a dynamic group.
Leave a Reply