By default, NSX-T transport nodes access NSX-T Manager nodes via their IP address, however, changing this behaviour so that the NSX-T Manager FQDN is used instead can be implemented easily via REST API call.
FQDN registration is an NSX-T Multisite requirement. As such, FQDN registration is not required for single-site deployments.
In the scenario whereby a customer needs to failover NSX-T operations to a secondary site (by deploying a new NSX-T Manager and restoring from backup), the NSX-T Manager(s) and Cluster VIP address will likely change unless they have implemented stretched-L2. As such, the NSX-T Manager(s)/Cluster FQDN needs to be registered with all NSX-T transport nodes, and once a new NSX-T Manager is deployed to the secondary site and restored from backup, DNS can be amended to point at the new NSX-T Manager(s)/Cluster FQDN, and management operations restored.
Prerequisites
FQDN registration MUST be included in your NSX-T Multisite design and, as such, must be implemented before any failover procedures are invoked.
Forward and reverse DNS records for the NSX-T Manager(s) and Cluster VIP must be in place. Ideally, these DNS records will have a low TTL (e.g., 600 seconds).
Pre-Configuration Checks
Firstly, let’s take a look at the current FQDN configuration.
1. Launch your REST API client of choice and run the below API call (providing the appropriate NSX-T credentials).
GET https://<nsx-mgr>/api/v1/configs/managementOur expected response is detailed below and should display the default configuration – ‘”publish_fqdns”: false’.

2. Connect to an Edge Transport node via SSH and check the Controller FQDN via the below command:
get controllersNote the Controller FQDN states NA.

3. Connect to a Host Transport node via SSH and check the Controller FQDN via the below command:
nsxcli
get controllers
Note the Controller FQDN states NA.

Publishing NSX-T FQDN
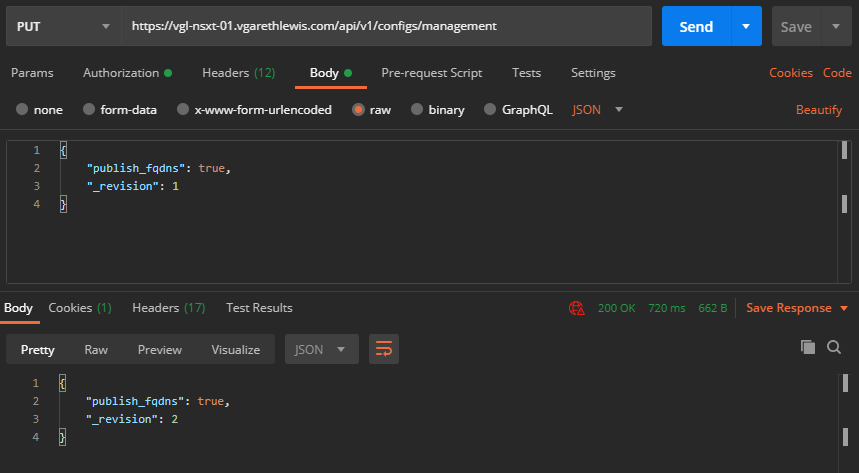
4. Jump back into your API client and copy the response generated by our earlier GET API call. Paste this into the body (raw > JSON) and change false to true.
{
"publish_fqdns": true,
"_revision": 0
}
5. When ready, change GET to PUT, and hit Send. If successful, the API response will now display ‘”publish_fqdns”: true’, and the _revision status will have been incremented by one.
Validating Access via FQDN by Transport Nodes
6. Now that the NSX-T Manager’s FQDN has been registered, let’s revisit the transport nodes and validate the Controller FQDN status. As you can see via the below screenshots, both transport nodes are now displaying the NSX-T Manager FQDN.


This concludes the NSX-T Manager FQDN registration process.
As mentioned at the start of the article, FQDN registration is not a requirement for running NSX-T in a single-site deployment; however, it is required for NSX-T Multisite without stretched-L2.
We will dive into the NSX-T Multisite failover process in a future post. Again, this is a simple process; however, this can be more than a little daunting to deal with in a production environment (as well as a little time-consuming).
Leave a Reply