Page 5 of 7

VMware NSX Edge Load Balancers: Part 1 – One-Armed/Proxy Mode

Reading Time: 7 minutes

Welcome to the first in a series of posts covering VMware NSX Edge load balancers. These posts will dive into the two main flavours – ‘One-Armed’ and ‘In Line’. We will cover use-cases for each option.

NSX Edge load balancers allow us to distribute incoming requests across a number of servers (aka – members) in order to achieve optimal resource utilisation, maximise throughput, minimise response time, and avoid application overload. NSX Edges allow load balancing up to Layer 7.

One-Armed/Proxy Mode

In this first post, we deploy an NSX Edge, enable the load balancer feature, and configure it in One-Armed mode (aka – Proxy, SNAT, non-transparent mode). This One-Armed/Proxy mode is the simplest of the two deployments, and utilises a single internal Logical Interface (LIF) (i.e. – it’s ‘one arm’).

This flavour of NSX Edge load balancer utilises its own IP address as the source address to send requests to back-end/member servers. The member servers see this traffic as originating from the load balancer and not the client and, as a result, all responses are sent directly to the load balancer. So, nice and simple, and this is usually my go-to solution where I have a requirement to load balance across a number of member servers for resilience.

Topology

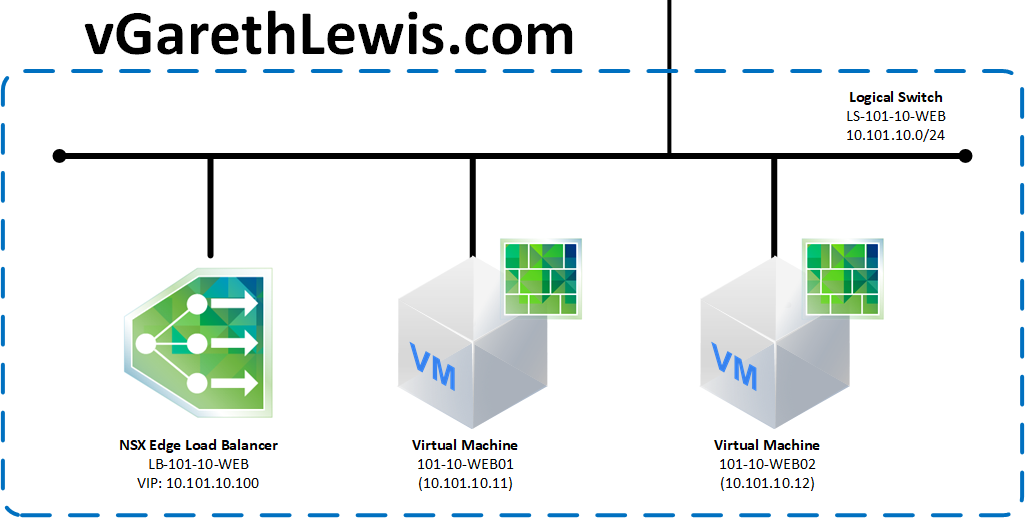
In this article we have a basic topology consisting of a NSX Edge load balancer (LB-101-10-WEB / 10.101.10.100) and two back-end/Member servers (101-10-WEB01 / 10.101.10.11 and 101-10-WEB02 / 10.101.10.12), all of which are housed on the same Logical Switch (10.101.10.0/24).
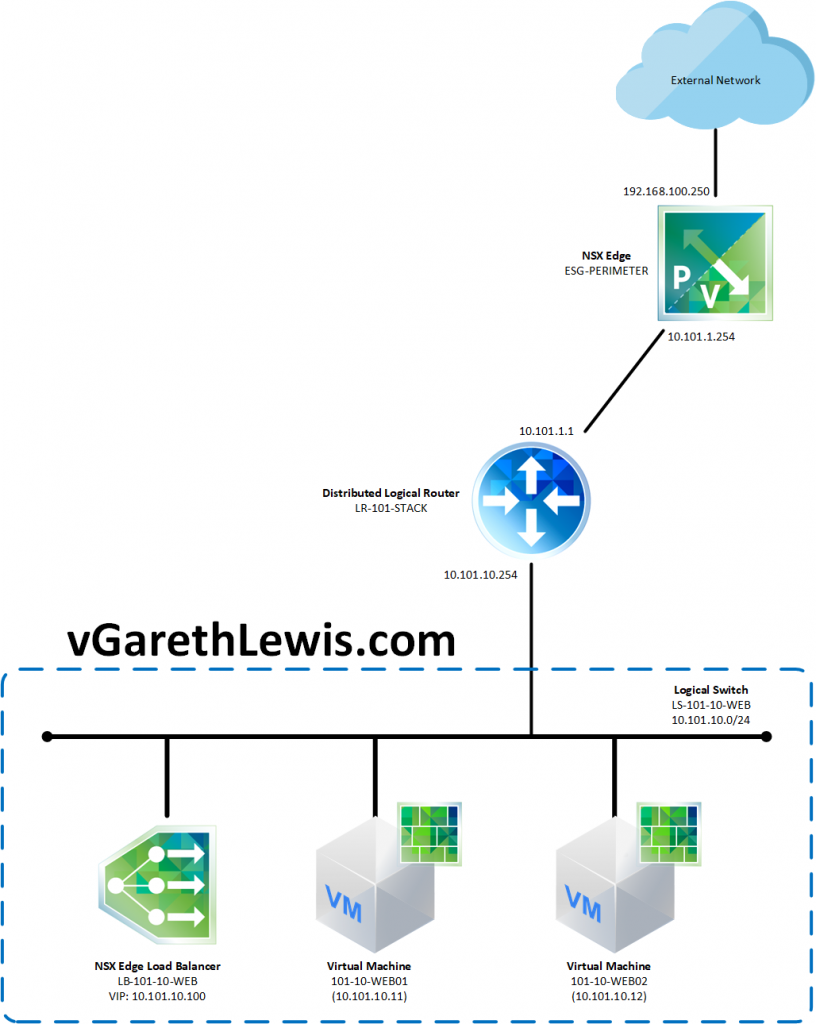
Configure NSX One-Armed Load Balancer
NSX Edge Load Balancers: Part 1 – One-Armed/Proxy Mode

Note, this article assumes your Logical Switches are already in play, traffic is able to route directly to each of the back-end servers, and you have created the necessary NSX Distributed Firewall rules. In this example, I will be configuring the NSX Edge load balancer to pass HTTP traffic to the back-end/Member servers.

NSX Edge – Deployment

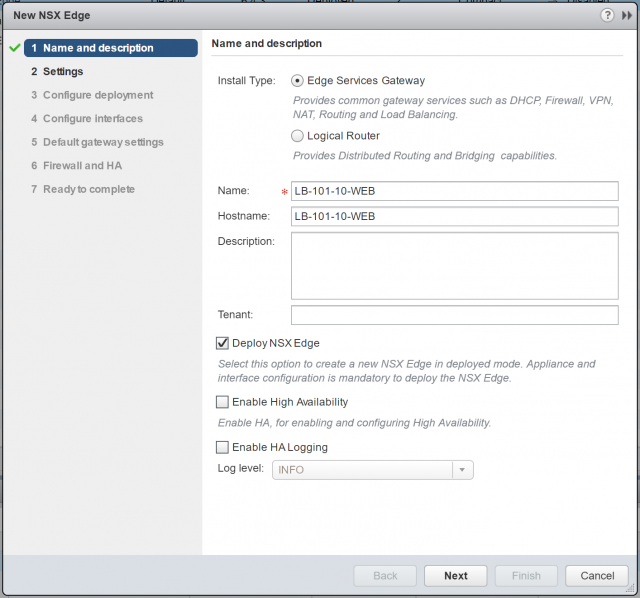
1. Create a new NSX Edge Services Gateway. Note, for my lab environment I will not enable High Availability. When ready, click Next.

Configure VMware NSX One-Armed Load Balancer

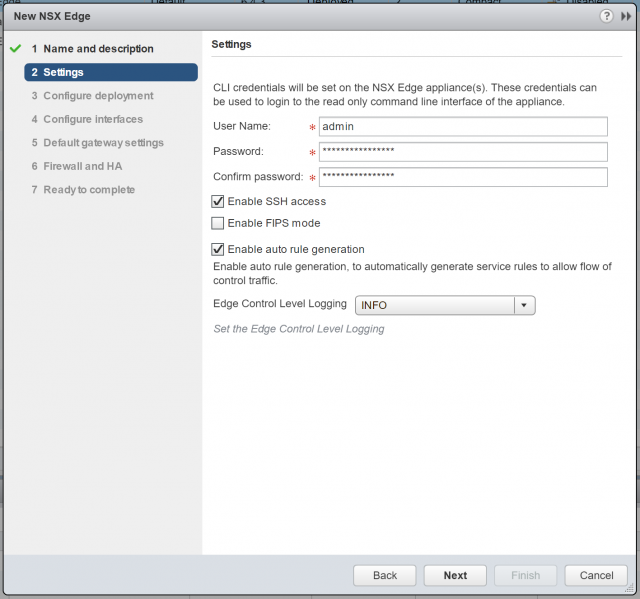
2.Configure the CLI credentials and click Next.

Configure VMware NSX One-Armed Load Balancer

3. Configure the appliance size and resources. Again, for lab purposes, the Compact appliance size is appropriate. When ready, click Next.Configure VMware NSX One-Armed Load Balancer
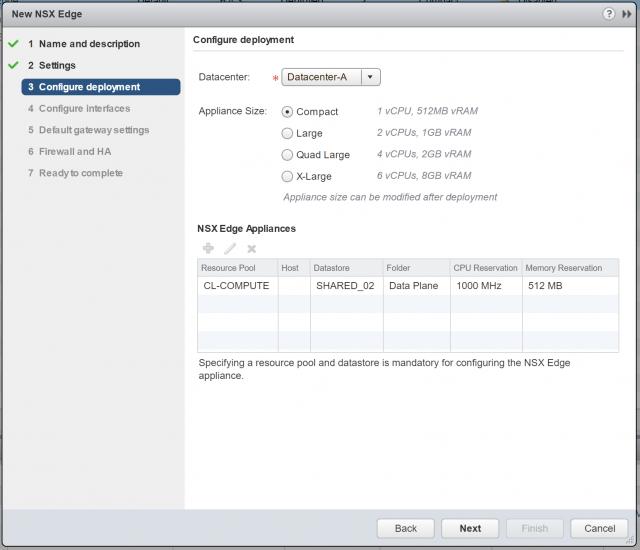
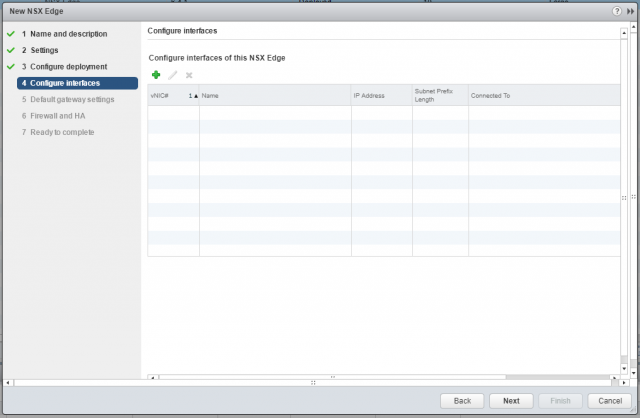
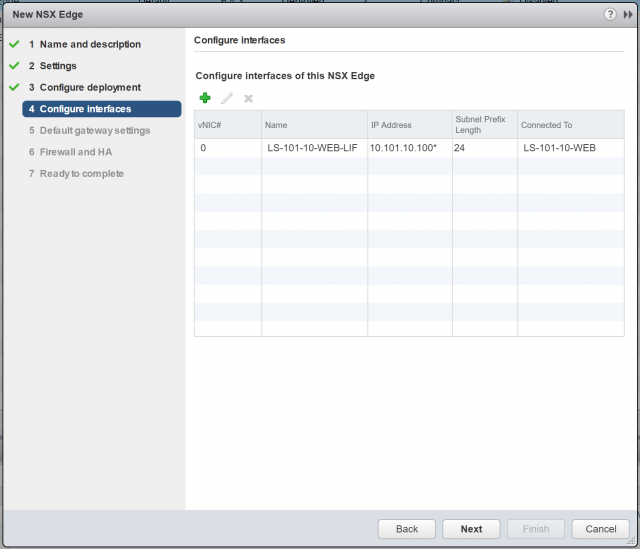
4. Next up, we need to configure a single (one-armed) interface. Click the + button to begin.

Configure VMware NSX One-Armed Load Balancer

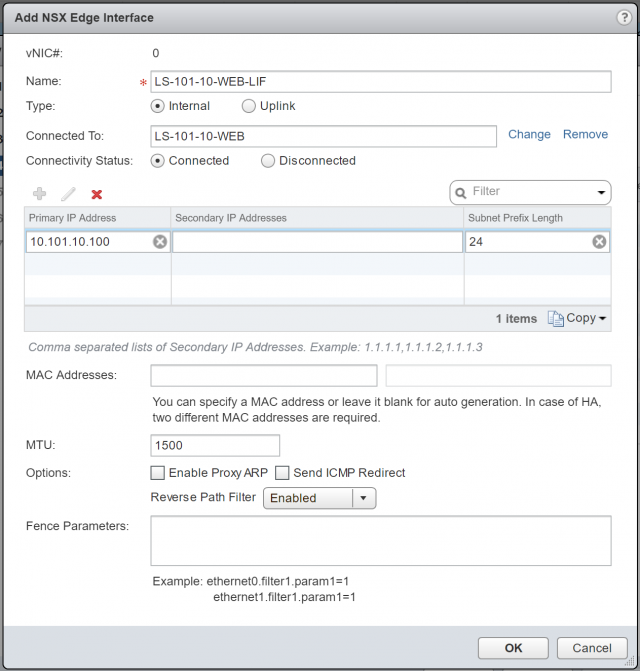
5. Give the interface a name, select Internal, and connect it to the same Logical Switch which houses both back-end web servers. Assign a primary IP address (this will be used as the load balancer’s virtual IP address) and, when ready, click OK.

Note – 10.101.10.100 has been assigned to the internal LIF and will be utilised in a future step as the virtual IP address of our new application pool. Additional/secondary IP addresses can be added and assigned to additional application pools (more on this on a later step), meaning one load balancer is capable of load balancing multiple applications.

Configure VMware NSX One-Armed Load Balancer

6. Confirm the configuration and click Next.

Configure VMware NSX One-Armed Load Balancer

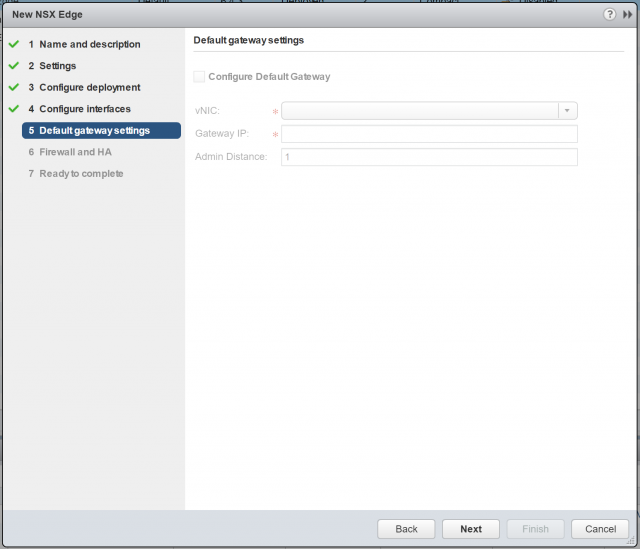
7. As the NSX Edge will not have an Uplink LIF, we will not be able to configure a default gateway. Click Next.

Configure VMware NSX One-Armed Load Balancer

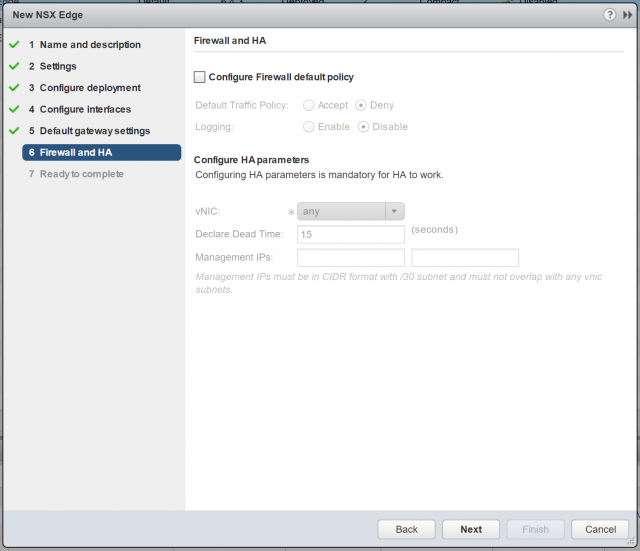
8. For lab purposes, I will not configure any firewall policies. Also, as we are not deploying the appliance in HA mode, all HA parameters will be greyed-out. Click Next.

Configure VMware NSX One-Armed Load Balancer

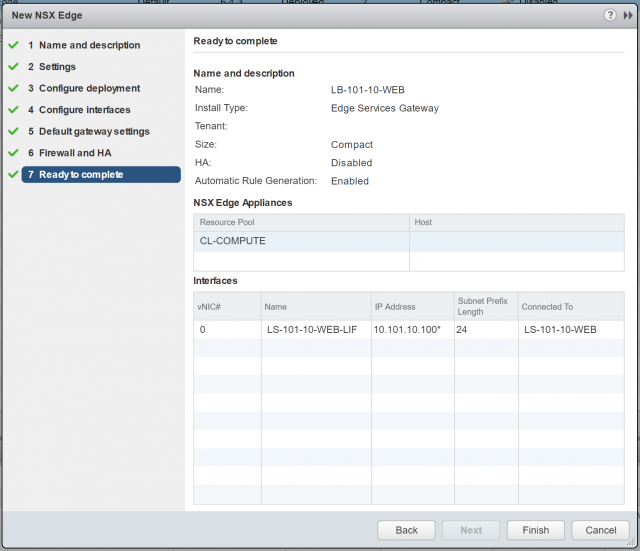
9. Confirm the NSX Edge configuration, and click Finish to deploy.

Configure VMware NSX One-Armed Load Balancer

NSX Edge – Routing

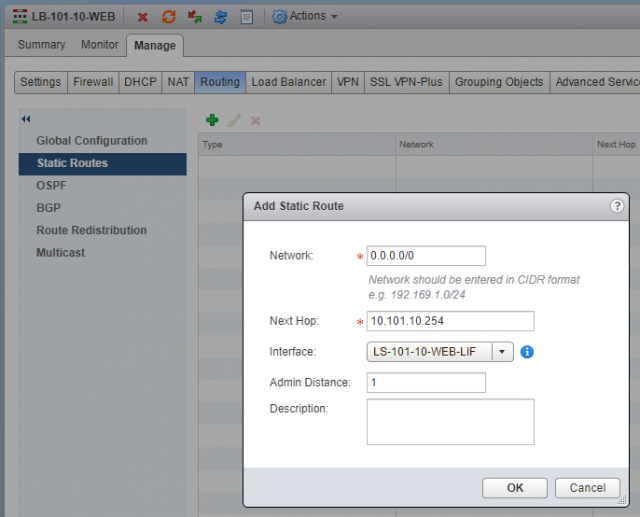
Here in Lab World, I don’t have OSPF/BGP configured, so we’ll create a static route to enable traffic to flow upstream. Looking at the topology a little more closely, you’ll note the NSX Edge load balancer has a next hop of 10.101.10.254 (the internal LIF of the DLR ).
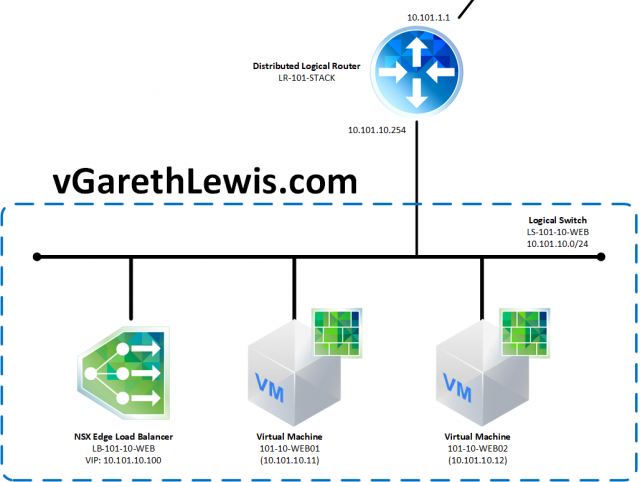
Configure VMware NSX One-Armed Load Balancer
Configure a VMware NSX Edge Static Route

To configure the static route, simply jump into the configuration console of the newly created NSX Edge, browse to Manage > Routing > Static Routes, and click +. Configure accordingly and click OK.

Configure VMware NSX One-Armed Load Balancer

NSX Edge – One-Armed Load Balancer Configuration

Now that our new NSX Edge has been deployed, we will enable the load balancer feature and configure in One-Armed/Proxy Mode.

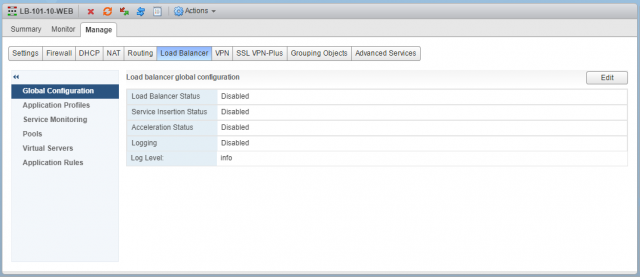
1. Browse to Manage > Load Balancer > Global Configuration and click Edit.

Configure VMware NSX One-Armed Load Balancer

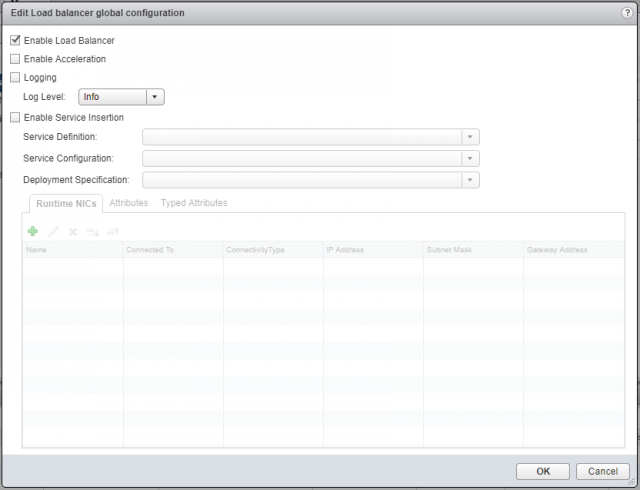
2. Ensure Enable Load Balancer is ticked, and click OK.

Configure VMware NSX One-Armed Load Balancer

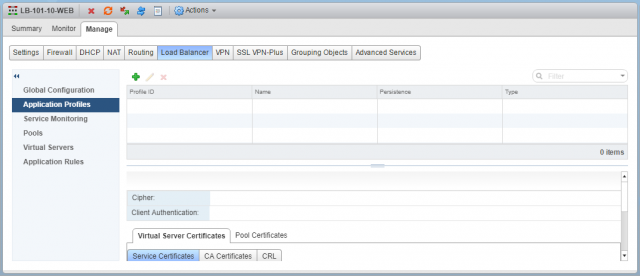
3. Browse to Manager > Load Balancer > Application Profiles and click +.

Application Profiles – An Application Profile is used to define the behaviour of a particular type of network traffic, and is associated with a virtual server (virtual IP address). The virtual server then processes traffic according to the values specified in the Application Profile. This allows us to perform traffic management tasks with greater ease and efficiency.

Configure VMware NSX One-Armed Load Balancer

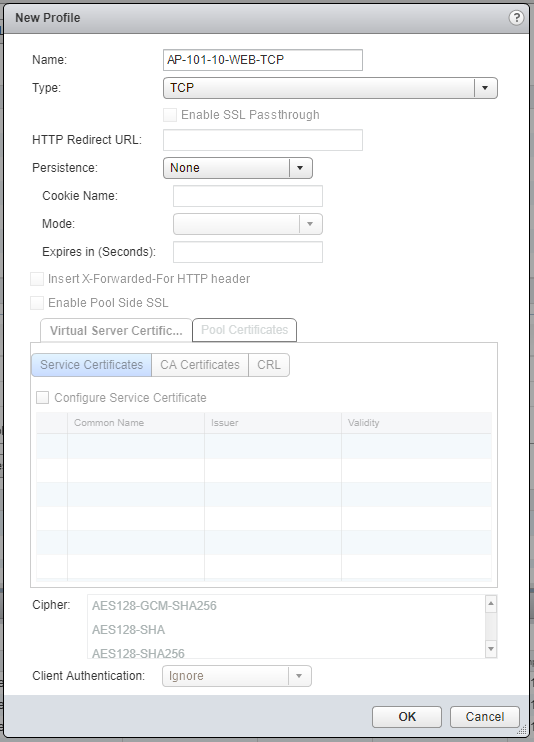
4. As mentioned at the start of this post, we are only interested in load balancing for resilience. As such (and as detailed below), we will set the Application Profile Type to TCP.

Configure VMware NSX One-Armed Load Balancer

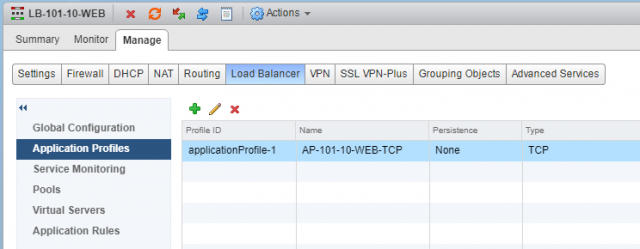
5. Confirm creation of the new Application Profile.

Configure VMware NSX One-Armed Load Balancer

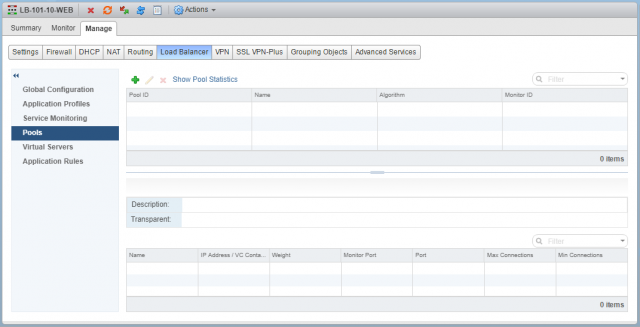
6. Browse to Manager > Load Balancer > Pools and click +.

Pools – A Pool is simply a group of back-end servers (aka, Members), and is configured with a load-balancing distribution method/algorithm. A service monitor (optional) can also be configured and, as this suggests, is used to perform health checks on its Members.

Configure VMware NSX One-Armed Load Balancer

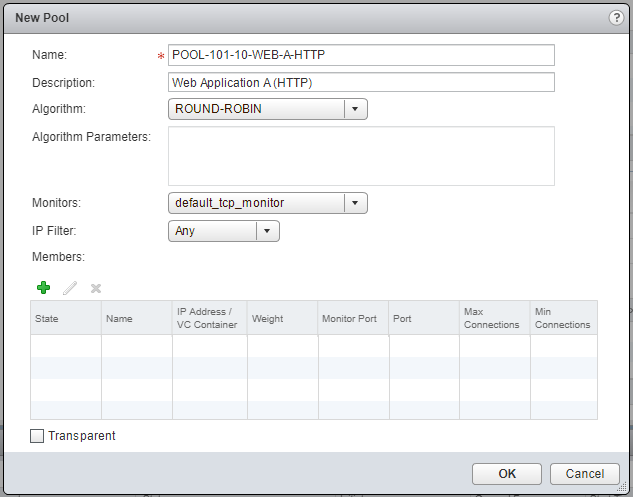
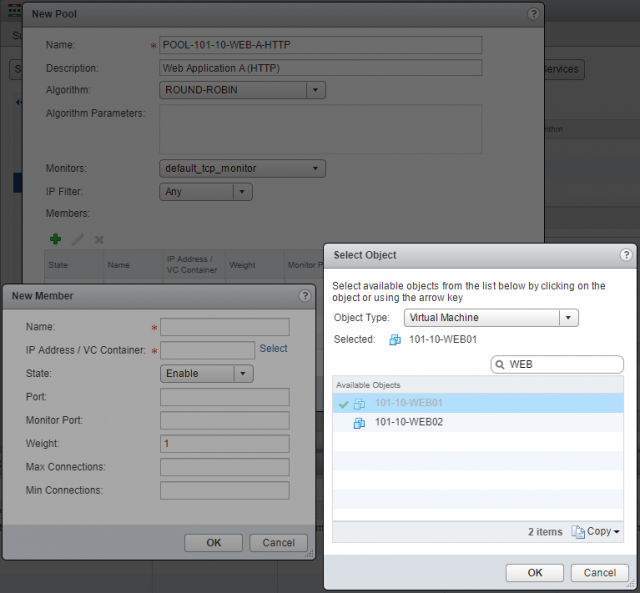
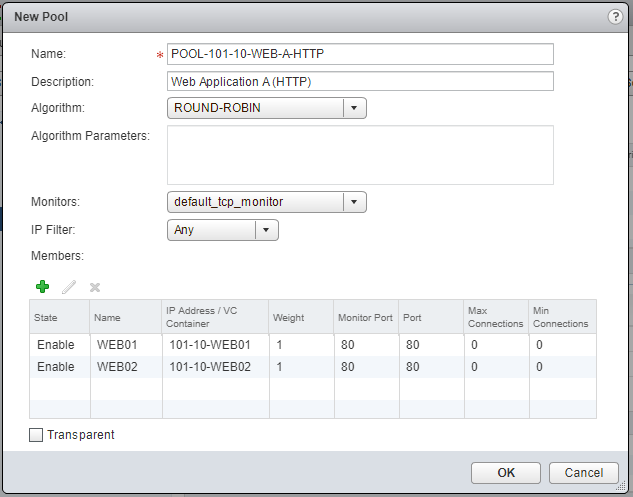
7. Give your new Pool a Name, Description, choose its distribution method/Algorithm, and Monitors.

Configure VMware NSX One-Armed Load Balancer

8. When ready, click + to add your back-end/member servers. For this either click Select to choose a vSphere Object, or simply type the destination’s IP address.

Configure VMware NSX One-Armed Load Balancer

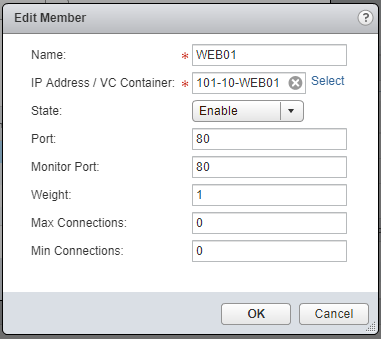
9. Define the Port (in this instance I am load-balancing HTTP/80 traffic), as well as the Monitor Port (here I use port 80 again). When done, click OK.

Configure VMware NSX One-Armed Load Balancer

10. Confirm your configuration by clicking OK.

Configure VMware NSX One-Armed Load Balancer

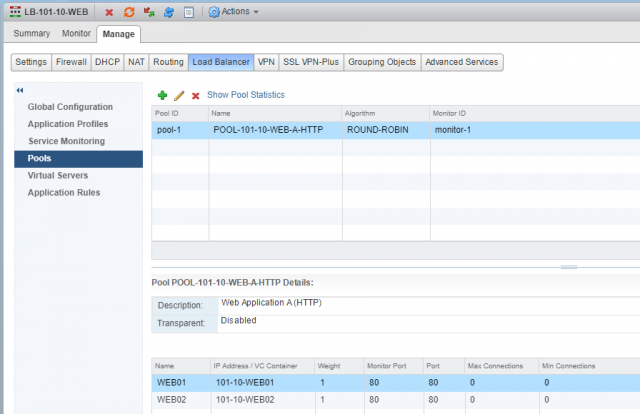
11. Confirm creation of the new Pool.

Configure VMware NSX One-Armed Load Balancer

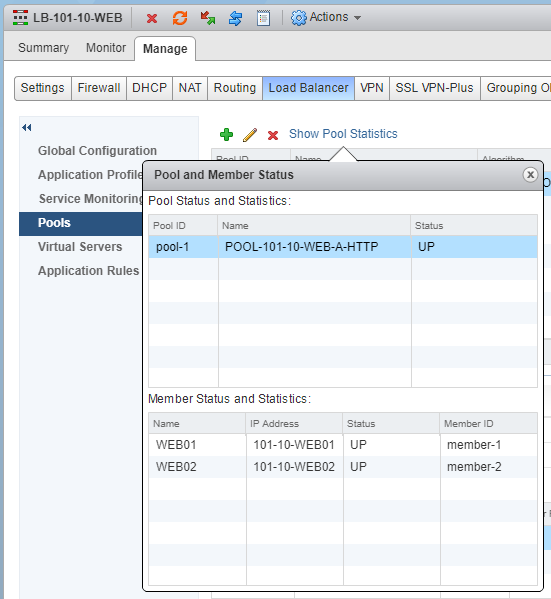
12. Check your newly created Pool’s health status by clicking Show Pool Statistics. The Status of both the Pool and it’s Members should show UP.

Configure VMware NSX One-Armed Load Balancer

13. Browse to Virtual Servers and click +.

Configure VMware NSX One-Armed Load Balancer

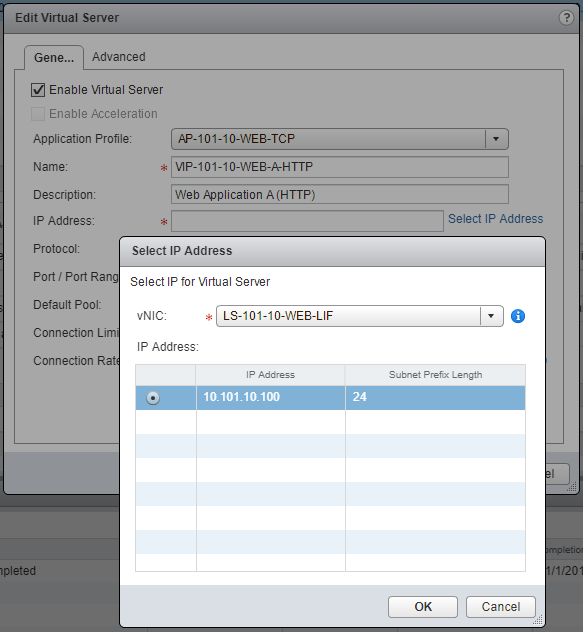
14. From the Application Profile drop-down menu, select the recently created Application Profile, give the Virtual Server a Name and Description, and click Select IP Address to select the IP address which we allocated to the internal LIF when we created the load balancer.

Configure VMware NSX One-Armed Load Balancer

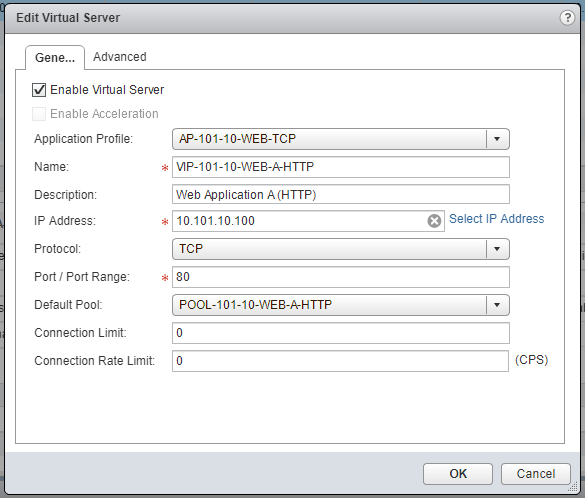
15. Lastly, set the Protocol to TCP, Port/Port Range to 80, and set the the Default Pool to the pool we created in step 6.

Configure VMware NSX One-Armed Load Balancer

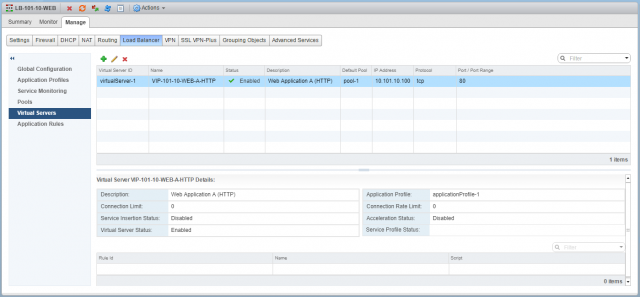
16. Confirm creation of the new Virtual Server.

Configure VMware NSX One-Armed Load Balancer

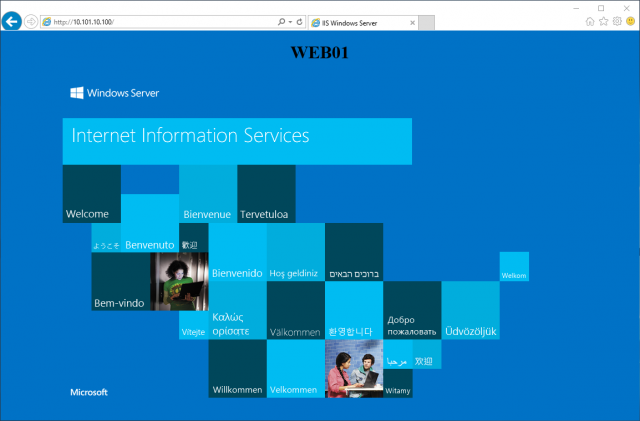
17. Finally, browse to the Virtual Server IP address to confirm load-balancing to each of the Pool Members is successful. In the below screenshot, traffic is routed to the VM, 101-10-WEB01.

Configure VMware NSX One-Armed Load Balancer

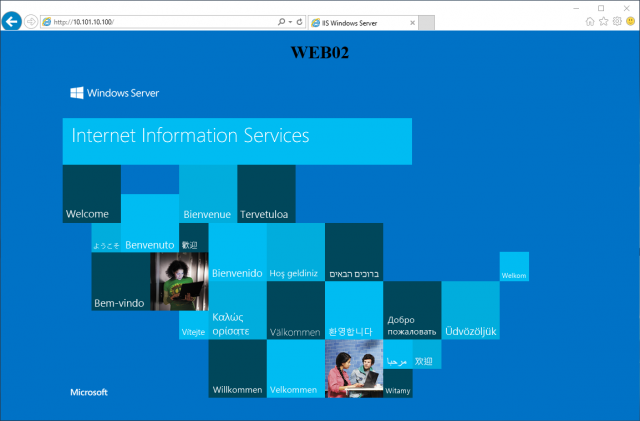
18. After Refreshing the browser, I am directed to 101-10-WEB02.

Configure VMware NSX One-Armed Load Balancer

Conclusion

In the next post we’ll cover the second flavour of NSX Edge load balancer, In-Line mode (aka, Transparent mode) and, in future posts, we’ll look at use cases for both, as well as troubleshooting tips.

vSphere 6.7 Update 1 and Veeam Compatibility Issues

Reading Time: < 1 minute

Yesterday, Tuesday 16th October saw the much anticipated release of VMware’s vSphere 6.7 Update 1, however, shortly after the announcement a number of Veeam users decried the release due to compatibility issues with Veeam’s Backup & Replication suite. None other than Veeam’s Anton Gostev first announced the issue with the below tweet:

The very next day the Veeam team announced a workaround in the form of Veeam KB2784, as well as ‘out-of-the-box’ support being included with highly awaited (and much delayed) next release, Update 4.

Where the fault lies with such release/compatibility issues is not the goal of this post (which Twitter seems to be more focused on). However, with a high number of pros likely raising internal changes to upgrade their vCenter(s) and ESXi hosts, you’ll want to implement the Veeam workaround in-line with this upgrade, as well as a number of solid backup/restore tests.

VMworld Europe 2018

VMworld 2018 Europe – Customer Panel on NSX Data Center (NET3042PE)

Reading Time: < 1 minute

Not only will this year mark my first ever visit to VMworld Europe, I’ll also be taking part in a Customer Panel session.

If you are interested in hearing my VMware NSX Data Center journey, how we implemented and operationalised NSX; how NSX continues to increase security and application performance, while simplifying troubleshooting and improving network provisioning time, then join me on Thursday, 8th November at 12:00-13:00 to hear more.

To register for the session, simply visit the VMworld 2018 Europe Content Catalogue – Customer Panel on NSX Data Center (NET3042PE).

VMworld Europe 2018

VMware NSX Role Based Access via Active Directory

Reading Time: 3 minutes

You may have noticed that your usual Active Directory user account (which might afford you full administrative access in vCenter) doesn’t get you very far when attempting to manage NSX for vSphere. This is by design, as NSX access is not governed or controlled by vCenter Server roles.

NSX utilises it’s own predefined security roles for role based access, all of which can be assigned to Active Directory Users and/or Security Groups. This is great for larger teams with clearly defined areas of demarcation and responsibilities, smaller teams of administrators and read-only support teams, and even one-off auditor visits.
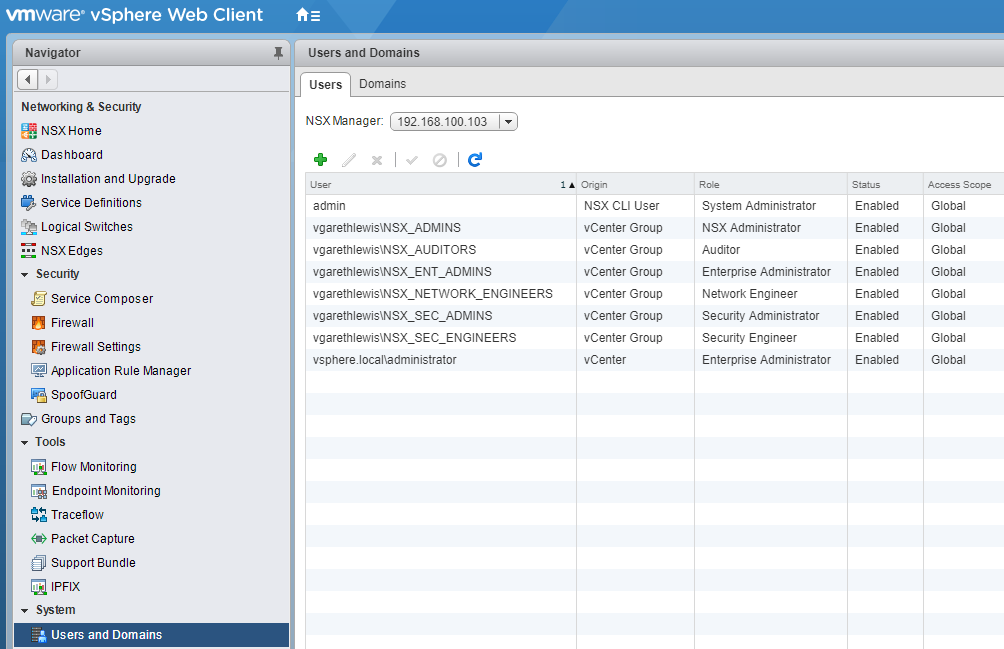
In this post, I detail the procedure for implementing AD integration in VMware NSX for vSphere 6.4.2, however, the procedure is the same for NSX 6.X. Before we start, let’s take a look at the six NSX Security Roles:
NSX Security Roles

  • Auditor – Users in this role can only view system settings and auditing, events and reporting information and will not be able to make any configuration change.
  • Security Engineer – Users in this role can perform all security tasks, such as configuring policies and firewall rules. Users have read access to some networking features, but no access to host preparation and/or user account management.
  • Network Engineer – Users in this role can perform all networking tasks, such as routing, DHCP, bridging, etc. Users have read access to endpoint security features, but no access to other security features.
  • Security Administrator – Users in this role can configure security compliance policies in addition to viewing the reporting and auditing information in the system.
  • NSX Administrator – Users in this role can perform all tasks related to deployment and administration of this NSX Manager instance.
  • Enterprise Administrator (God Mode) – Users is this role can perform all tasks related to deployment and configuration of NSX products and administration of this NSX Manager instance.

Procedure

Please note, due to current feature parity differences between the vSphere Web Client (Flex) and vSphere Client (HTML 5), the below procedure will need to be performed utilising the vSphere Web Client (Flex).

1. Create your required AD Security Groups, naming accordingly.

Manage-NSX-via-Active-Directory-User-01

2. Log in to the vSphere Web Client (Flex) as administrator@vsphere.local.

3. Browse to Networking & Security > System > Users and Domains.

4. Via the Users tab, click the Add icon.

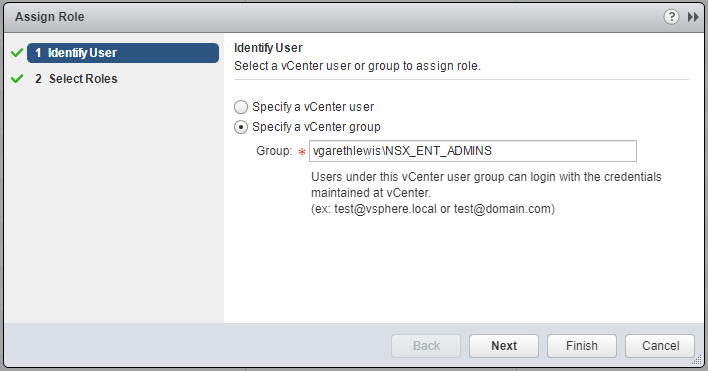
5. Select Specify a vCenter group and enter the AD Security Group name as per above AD Objects. When ready, click Next.

Manage-NSX-via-Active-Directory-User-02

6. Select the appropriate NSX Security Role to associate with the AD Security Group and click Finish.

Manage-NSX-via-Active-Directory-User-03

7. Repeat steps 4 – 6 until all required AD Security Groups have been added.

8. Confirm successful addition of all NSX Security Roles. At this point, you can assign further AD Users/Security Groups, disable or enable accordingly, and delete.

Manage-NSX-via-Active-Directory-User-04

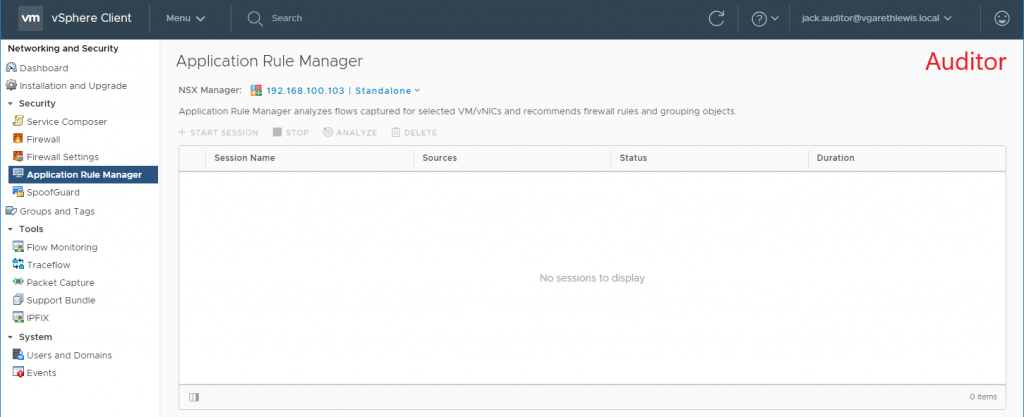
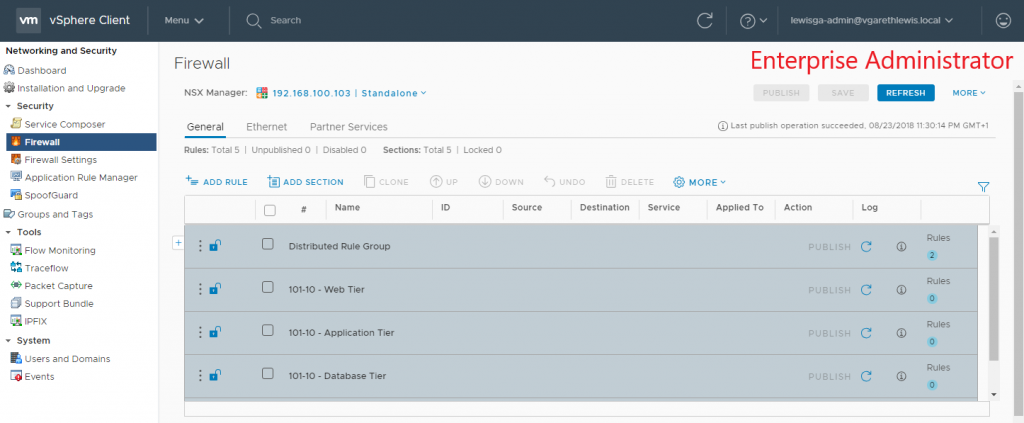
9. Log in to either the vSphere Web Client or vSphere HTML5 Client as a user associated to one of the newly added AD Security Groups and test access. Below I detail an example of both Auditor and Enterprise Administrator roles.

Manage-NSX-via-Active-Directory-User-Auditor-Functionality
Here, the user is assigned the NSX Auditor Security Role.
Manage-NSX-via-Active-Directory-User-Auditor-Functionality
Here, the user is assigned the NSX Enterprise Administrator Security Role.

Further Reading

London VMUG - LonVMUG

London VMUG – 14th June 2018

Reading Time: 5 minutes

Thursday 14th June saw the latest London VMUG take place at Tech UK, London, with the User Group marking it’s third outing for 2018 in just six months! Rarely does any event see such heavy hitters as Duncan Epping, Frank Denneman, and Niels Hagoort in one place, but today, we got to see all three in attendance. Add to that line-up further awesomeness in the form of  vCommunity member, Chris Porter, and this was one truly great London VMUG indeed! I’ve been to a number of VMUGs around the UK, however, this was to be my first time joining the London gang.

London VMUG - 14th June 2018 Agenda
London VMUG 14th June 2018 Agenda

Continue reading → London VMUG – 14th June 2018

VMware NSX for vSphere 6.4.1 - One Click Upgrade

VMware NSX for vSphere 6.4.1 – One Click Upgrade

Reading Time: 4 minutes

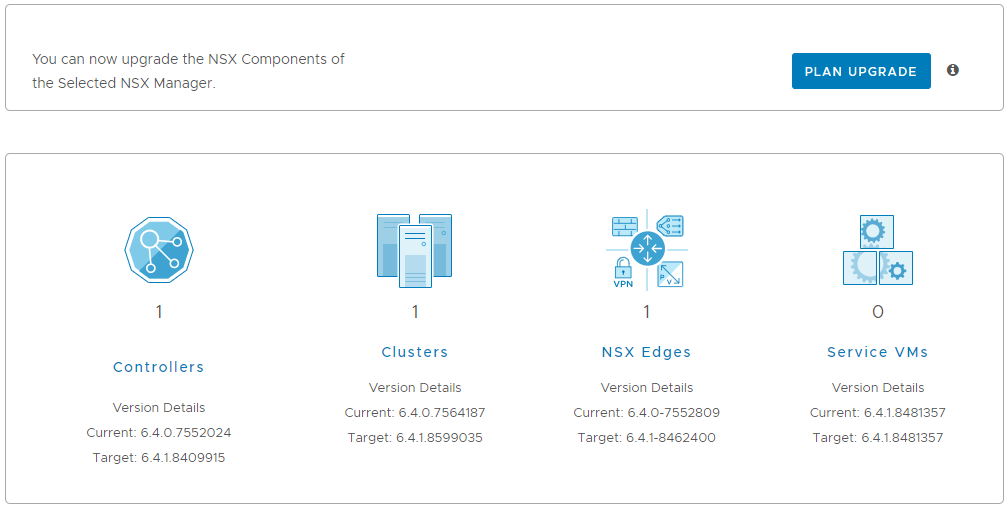
With the release of VMware NSX for vSphere 6.4.1 on May 24th 2018, interoperability/compatibility between VMware vSphere 6.7 and NSX was achieved. In addition to this, a number of nice new features were also included in the update.

In this article we will upgrade a 6.4.0 (build 7564187) lab environment to 6.4.1 (build 8599035) utilising the One Click upgrade process.

Continue reading → VMware NSX for vSphere 6.4.1 – One Click Upgrade

201804_Editing_Protected_VMs_in_vCenter_01

Editing Protected VMs in vSphere

Reading Time: 3 minutes

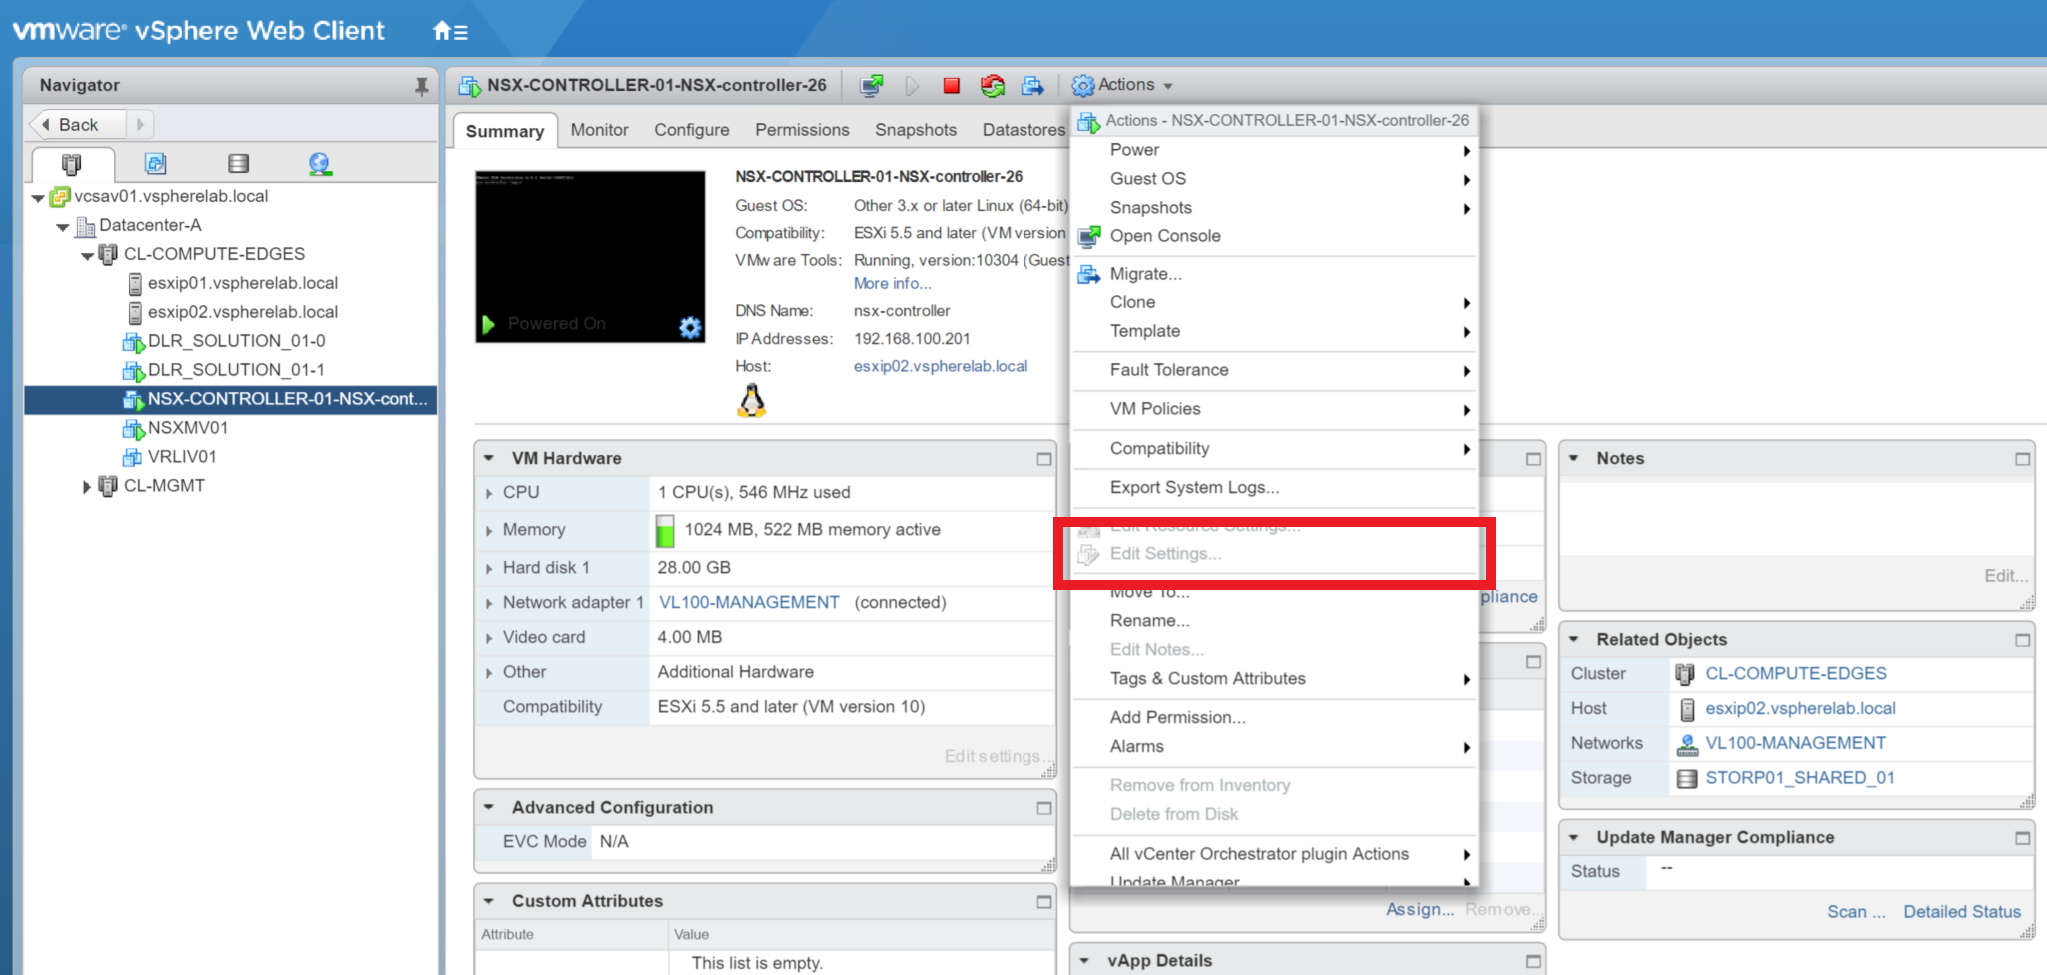
By design, there are certain virtual machines and/or appliances within vSphere which are protected to prevent editing (this can include NSX Controllers, Edges, Logical Routers, etc.) In a live/production environment, you’d not normally care about editing these appliances, however, in a lab environment (especially one where resource is tight), reducing memory and/or CPU allocation can help a lot. As such, this article will cover the process of removing the lock on protected VM in vSphere, in order to enable editing.

The scenario: a customer needs to reduce the resource allocation of an NSX Controller, however, due to the VM in question being protected/locked, editing the VM’s resources is not possible via UI or PowerCLI.

The process of removing this lock is quick and easy, however, we first need to identify the virtual machine’s Managed Object Reference (moRef ID). Please note, VMware do not support or recommend this procedure in any way.  As such, this procedure should not be implemented in a production environment.

Continue reading → Editing Protected VMs in vSphere

vRealize Log Insight Logo

VMware vRealize Log Insight: Part 2 – VMware NSX Integration via Content Packs

Reading Time: 4 minutes

In Part 1 of this series we covered the simple installation and configuration of VMware vRealize Log Insight. In Part 2 we will cover how we can further configure and customise Log Insight via Content Packs in order to leverage further logging capabilities.

As mentioned in Part 1, one of the caveats of utilising this ‘free’ version of Log Insight (or more aptly, the 25 OSI license available to all vCenter Server licensees), is the ability to use VMware-only Content Packs. This is far from a bad thing and, as a result, enables us to integrate with other VMware products including NSX, Horizon, SRM, etc. In this article we will focus on the former product.

Continue reading → VMware vRealize Log Insight: Part 2 – VMware NSX Integration via Content Packs

NSX Manager – Replacing the SSL Certificate

Reading Time: 3 minutes

Applying a new SSL certificate to your NSX Manager really couldn’t be easier and, as the NSX Manager is part of a wider, security orientated product, we might as well do things properly and apply one!

First of all, and if already not in place, we’ll need to create a new Microsoft CA Template for SSL in vSphere. To do this, please take a look at VMware KB article 2112009. The procedure itself is a simple one, and I make reference below to a vSphere 6.x SSL certificate template, so it’s worth pointing out. This template was created using the aforementioned VMware KB.

To replace the NSX Manager SSL certificate, and to cert against your CA of choice, simply follow the below process.

Continue reading → NSX Manager – Replacing the SSL Certificate

vRealize Log Insight Logo

VMware vRealize Log Insight: Part 1 – Install & Configuration

Reading Time: 5 minutes

If, like most of us, you forward vCenter and ESXi host Syslog data to centralised Syslog targets (and if you don’t, then I’d advise you do), then you’ll be pleased to hear that (as long as you have a valid vCenter Server license) you’ll be able to utilise the power of VMware vRealize Log Insight to interrogate this data.

This article will be the first in a two part VMware vRealize Log Insight series, the first of which will detail the simple installation and configuration process, with the second article focusing on advanced configuration and integration with VMware NSX via vRealize Log Insight Content Packs (vRealize Log Insight add-ins enabling further integration with both VMware and 3rd party products).

Continue reading → VMware vRealize Log Insight: Part 1 – Install & Configuration