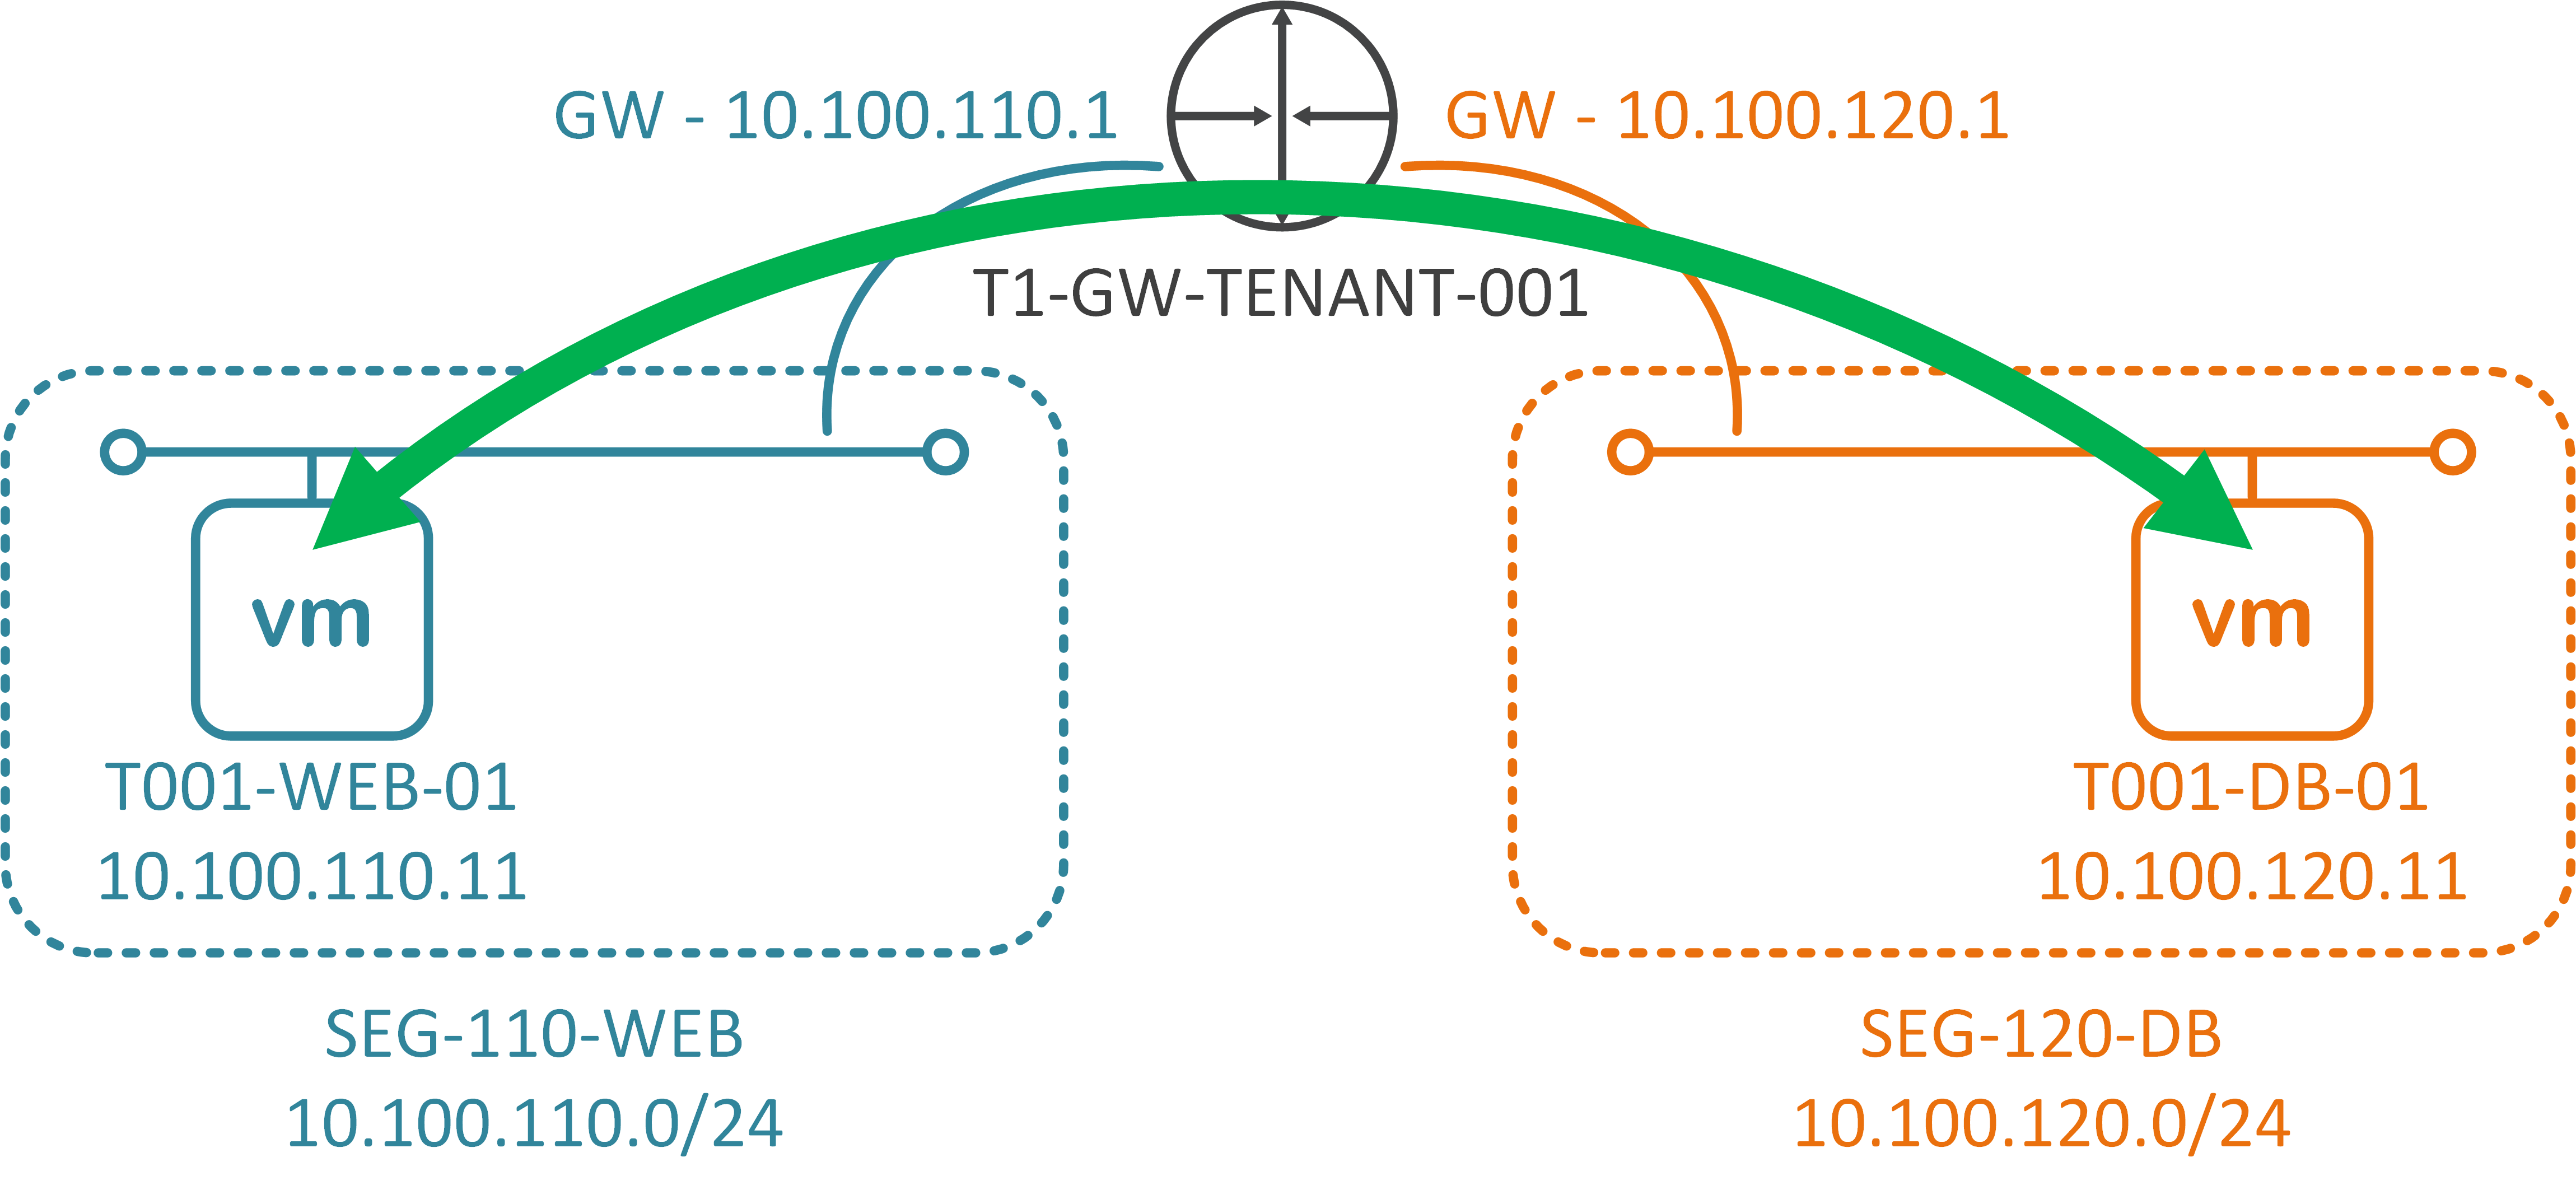
For those coming from an NSX-V background, you’ll remember how we enabled east-west traffic by deploying Distributed Logical Routers (DLR). This has changed ever so slightly in NSX-T, with earlier versions using Tier-1 Logical Routers, and in 2.4, Tier-1 Gateways.
VMware NSX Data Center for vSphere (NSX-V) has been able to leverage dynamic routing via Open Shortest Path First (OSPF) and Border Gateway Protocol (BGP) for some time and, in this article, I detail the process of configuring OSPF on both an Edge Services Gateway (ESG) and a downstream Distributed Logical Router (DLR).
OSPF, a Link State Protocol and member of the Interior Gateway Protocol (IGP) family (which also includes Routing Information Protocol (RIP), Intermediate System to Intermediate System (IS-IS), and Enhanced Internal Gateway Routing Protocol (EIGRP)), enables all participating routers to dynamically exchange network topology information to calculate the best shortest path (cost) of a route’s destination.
Welcome to the second article in the series detailing a migration of VMware NSX Data Center for vSphere (NSX-V) to NSX-T Data Center. In this article I focus on the preliminary checks to ensure the NSX-V environment is fit for migration.
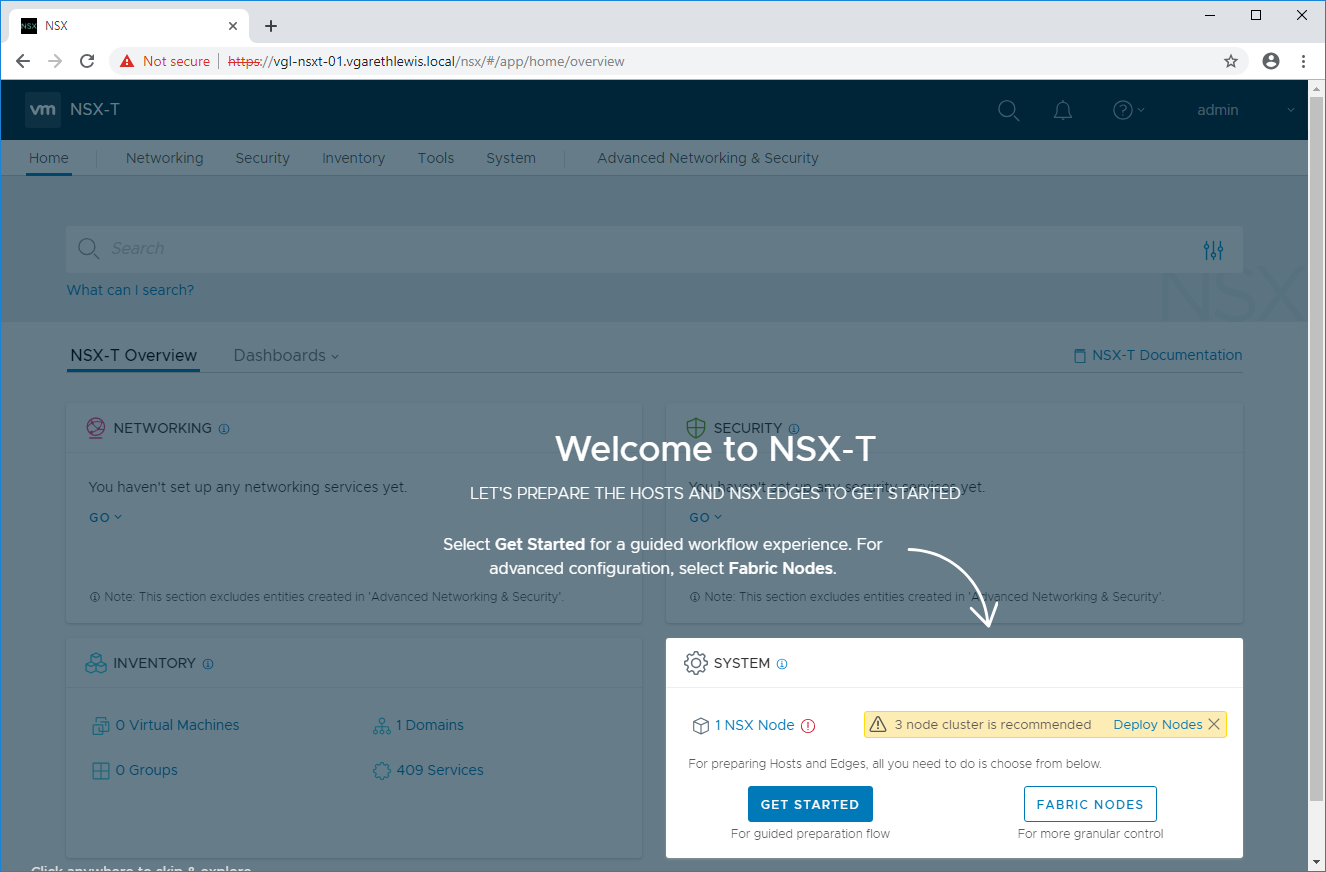
In part 1 (VMware NSX-T Data Center Migration – Part 1 – Deploy Manager Appliance) I covered the process of deploying the NSX -T Data Center Manager Appliance, as well as a number of prerequisite tasks required to prepare the new NSX-T environment for the eventual migration (coming in part 3).
In this article I detail a number of preliminary checks within the NSX-V environment (including ESXi hosts, vSphere Distributed Switches, VXLAN configuration, VTEP, NSX Controllers, Edge Services Gateways, etc.) to ensure all is well prior to the migration process itself. Where any issues are identified, these must be resolved prior to the migration process.
Welcome to the first in a new series of articles detailing the migration process of VMware NSX Data Center for vSphere to NSX-T Data Center. The migration to NSX-T will be split into three steps:
Part 1 (this article) – Deploy NSX -T Data Center Manager Appliance, and prepare this new NSX-T environment for the migration of NSX Data Center for vSphere by adding a Compute Manager, and creating an IP Pool for Edge Tunnel End Points (TEPs).
Part 3 – Migrate NSX Data Center for vSphere to NSX-T Data Center.
Note – In this article, the process of deploying the VMware NSX-T Data Center Manager Appliance can be considered the same as whether you are a) deploying into a greenfield environment void of any NSX, or b) migrating NSX Data Center for vSphere to NSX-T.
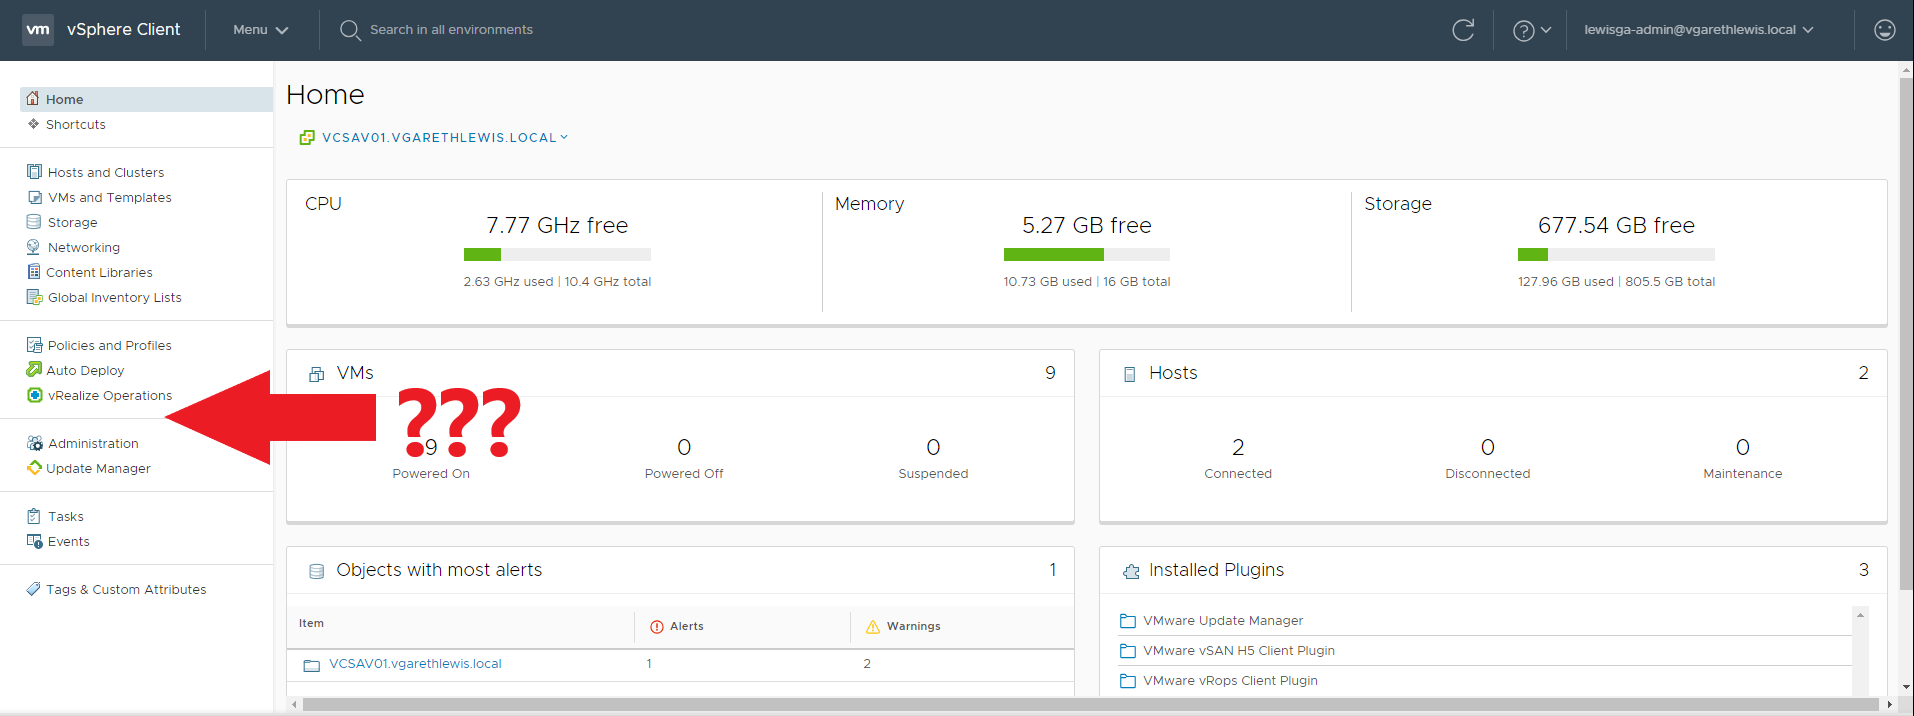
Following a recent upgrade of VMware NSX Data Centre for vSphere from 6.4.1 to 6.4.4, the option to access NSX’s Networking and Security extension from within the vSphere Client (HTML 5) had simply disappeared. This left me scratching my head a little, more so as I’ve completed this upgrade (what seems) a million times.
Scenario-wise, I had completed the initial NSX Manager upgrade, but after logging in to the vSphere Client, I noted the Networking and Security extension failed to display.
With the release of VMware NSX 6.3.0 back in February 2017, we saw the introduction of the Application Rule Manager (ARM). The Application Rule Manager allows us to a) simplify the process of creating grouping objects and distributed firewall rules for the micro-segmentation of existing workloads, and b) deploy applications within a zero-trust environment with greater speed and efficiency.
In this second post we take a look at the alternative load balancer mode – In-Line/Transparent mode. First of all, unlike the One-Armed/Proxy mode, In-Line load balancers require two logical interfaces (LIFs); one Uplink LIF (connected to either a DLR or upstream Edge) and one Internal LIF. The Internal LIF is directly connected to the network segment housing the back-end servers requiring load-balancing. In addition to this (and unlike the One-Armed/Proxy load balancer), In-Line load balancers are required to act as the default gateway for all back-end servers.
Welcome to the first in a series of posts covering VMware NSX Edge load balancers. These posts will dive into the two main flavours – ‘One-Armed’ and ‘In Line’. We will cover use-cases for each option.
NSX Edge load balancers allow us to distribute incoming requests across a number of servers (aka – members) in order to achieve optimal resource utilisation, maximise throughput, minimise response time, and avoid application overload. NSX Edges allow load balancing up to Layer 7.
One-Armed/Proxy Mode
In this first post, we deploy an NSX Edge, enable the load balancer feature, and configure it in One-Armed mode (aka – Proxy, SNAT, non-transparent mode). This One-Armed/Proxy mode is the simplest of the two deployments, and utilises a single internal Logical Interface (LIF) (i.e. – it’s ‘one arm’).
This flavour of NSX Edge load balancer utilises its own IP address as the source address to send requests to back-end/member servers. The member servers see this traffic as originating from the load balancer and not the client and, as a result, all responses are sent directly to the load balancer. So, nice and simple, and this is usually my go-to solution where I have a requirement to load balance across a number of member servers for resilience.
Topology
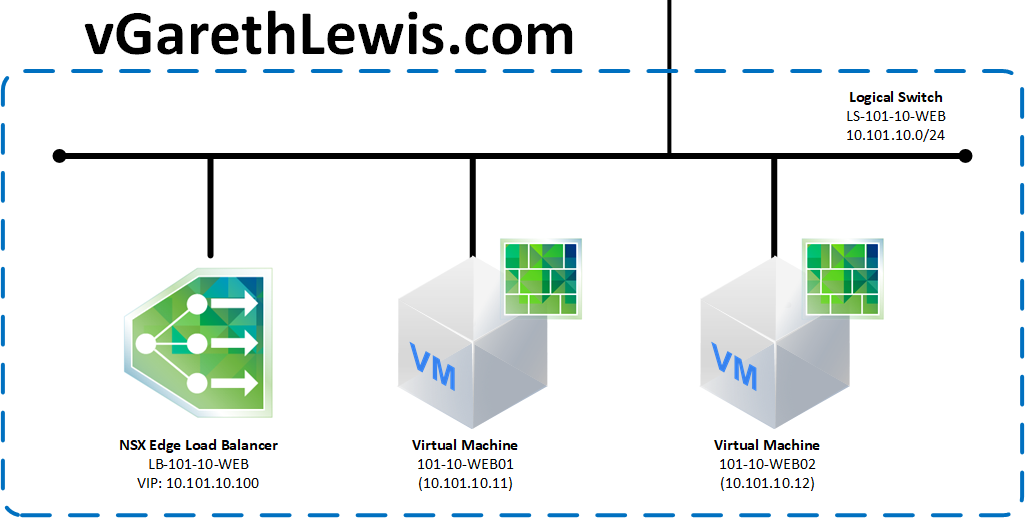
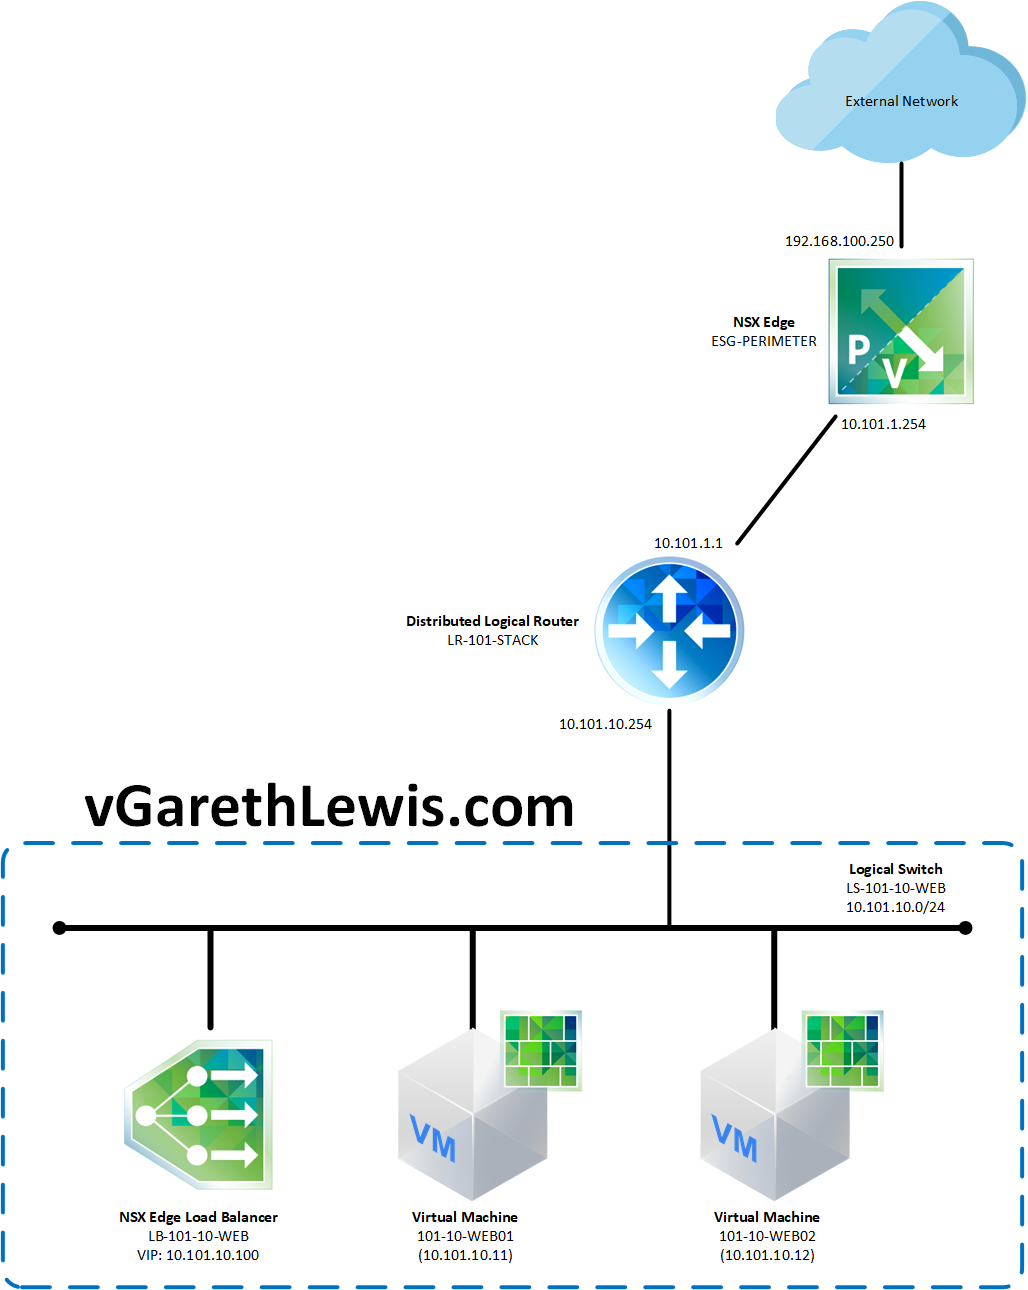
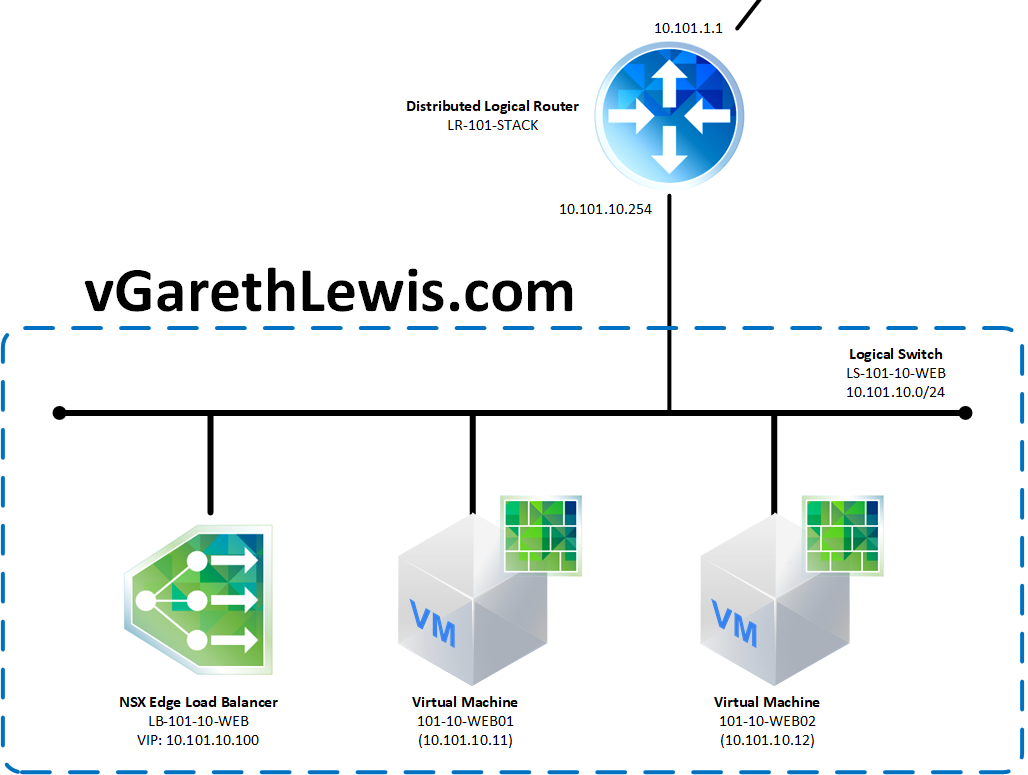
In this article we have a basic topology consisting of a NSX Edge load balancer (LB-101-10-WEB / 10.101.10.100) and two back-end/Member servers (101-10-WEB01 / 10.101.10.11 and 101-10-WEB02 / 10.101.10.12), all of which are housed on the same Logical Switch (10.101.10.0/24).
NSX Edge Load Balancers: Part 1 – One-Armed/Proxy Mode
Note, this article assumes your Logical Switches are already in play, traffic is able to route directly to each of the back-end servers, and you have created the necessary NSX Distributed Firewall rules. In this example, I will be configuring the NSX Edge load balancer to pass HTTP traffic to the back-end/Member servers.
NSX Edge – Deployment
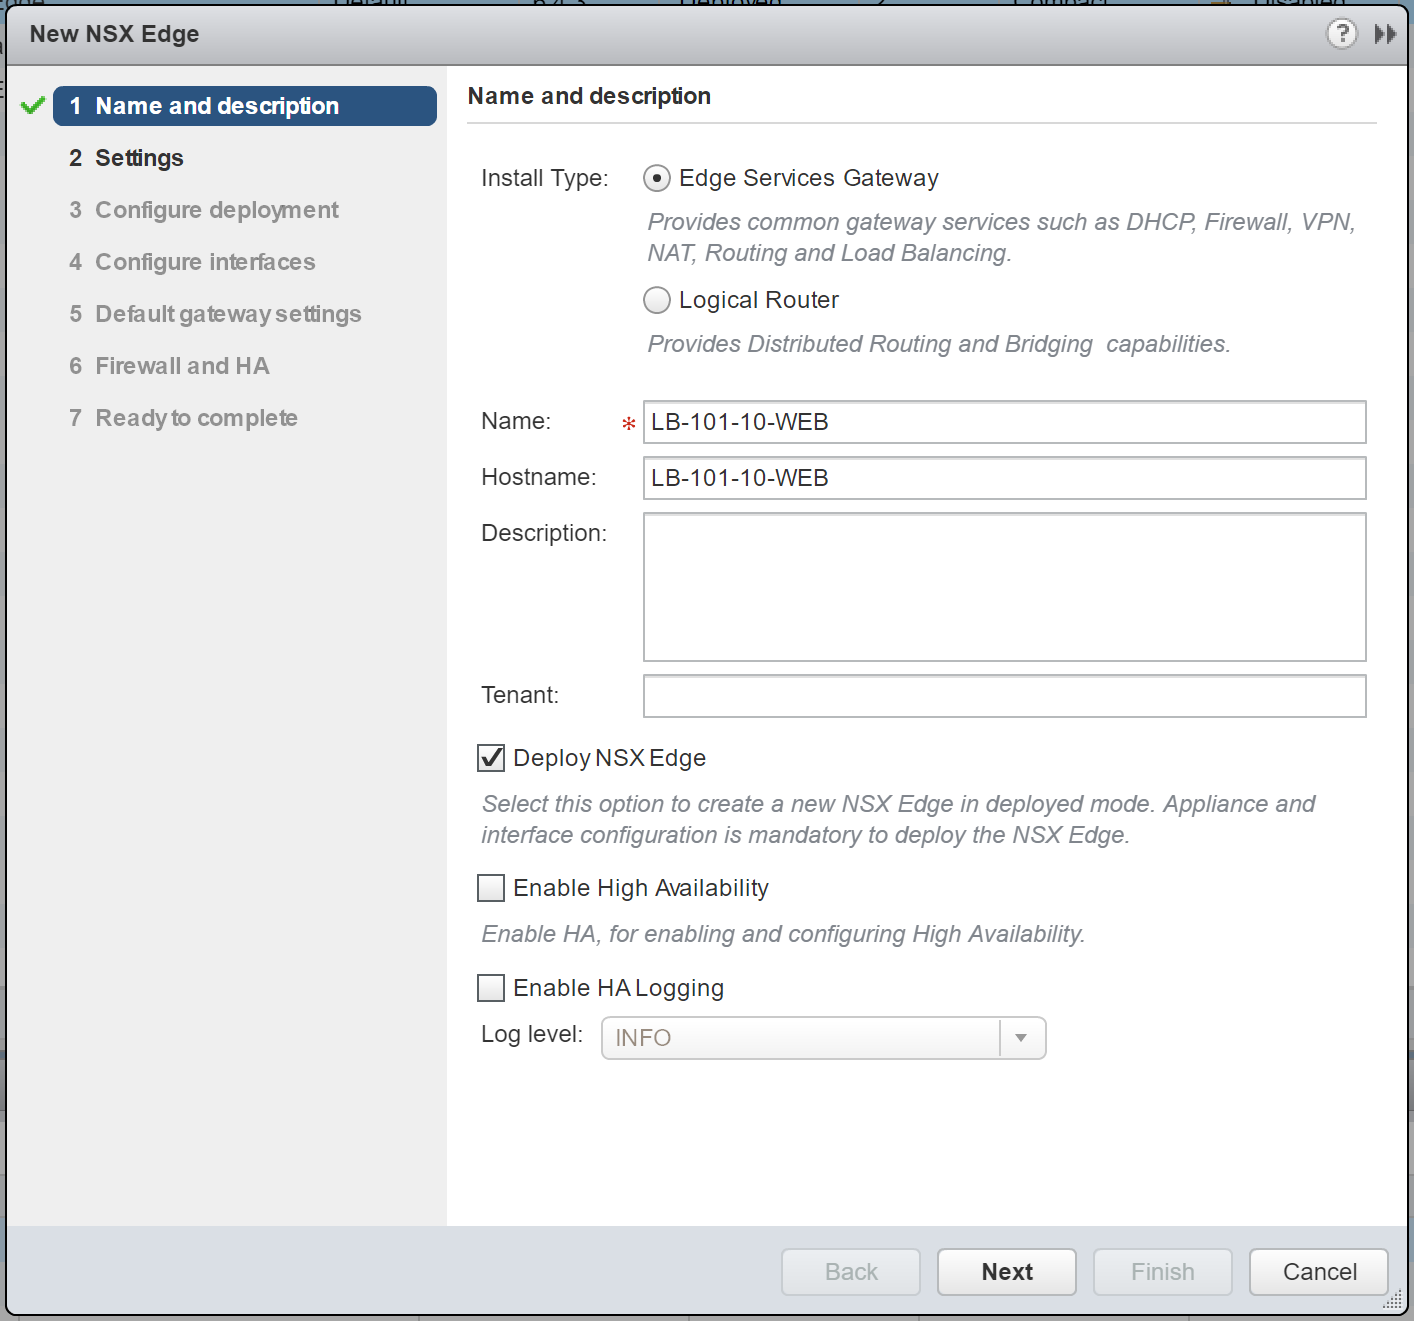
1. Create a new NSX Edge Services Gateway. Note, for my lab environment I will not enable High Availability. When ready, click Next.
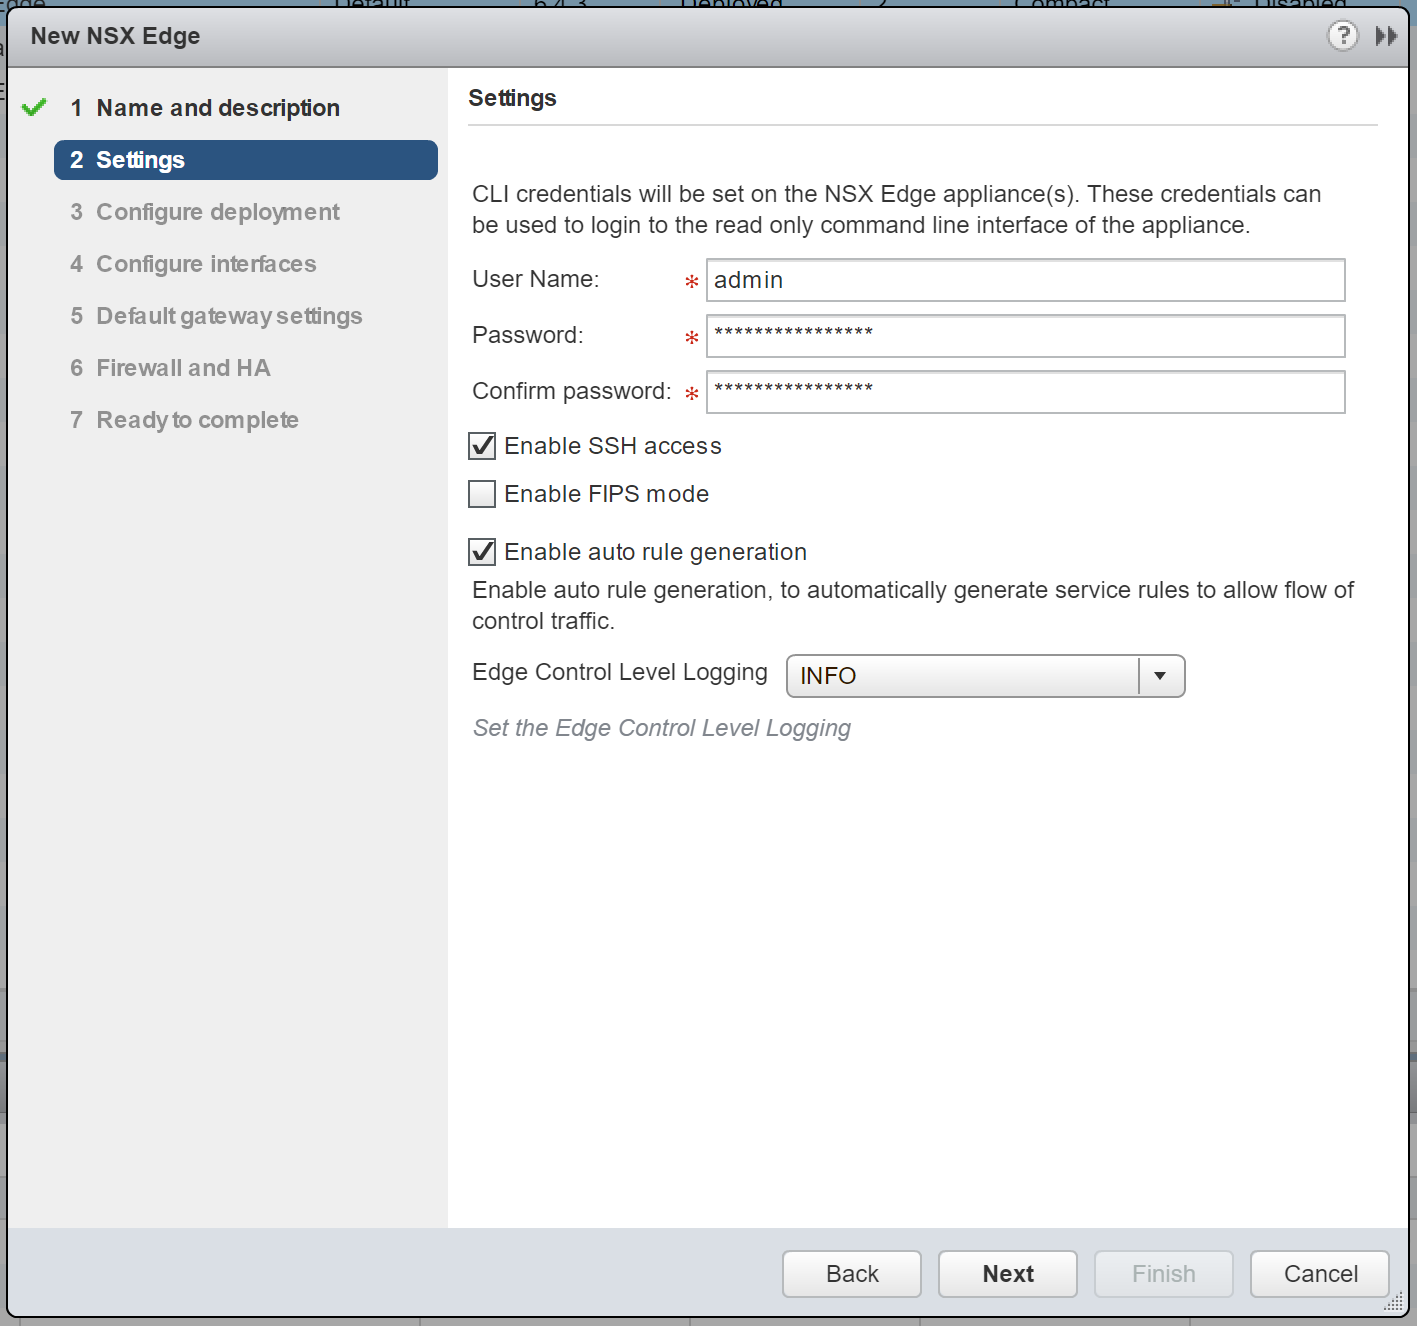
2.Configure the CLI credentials and click Next.
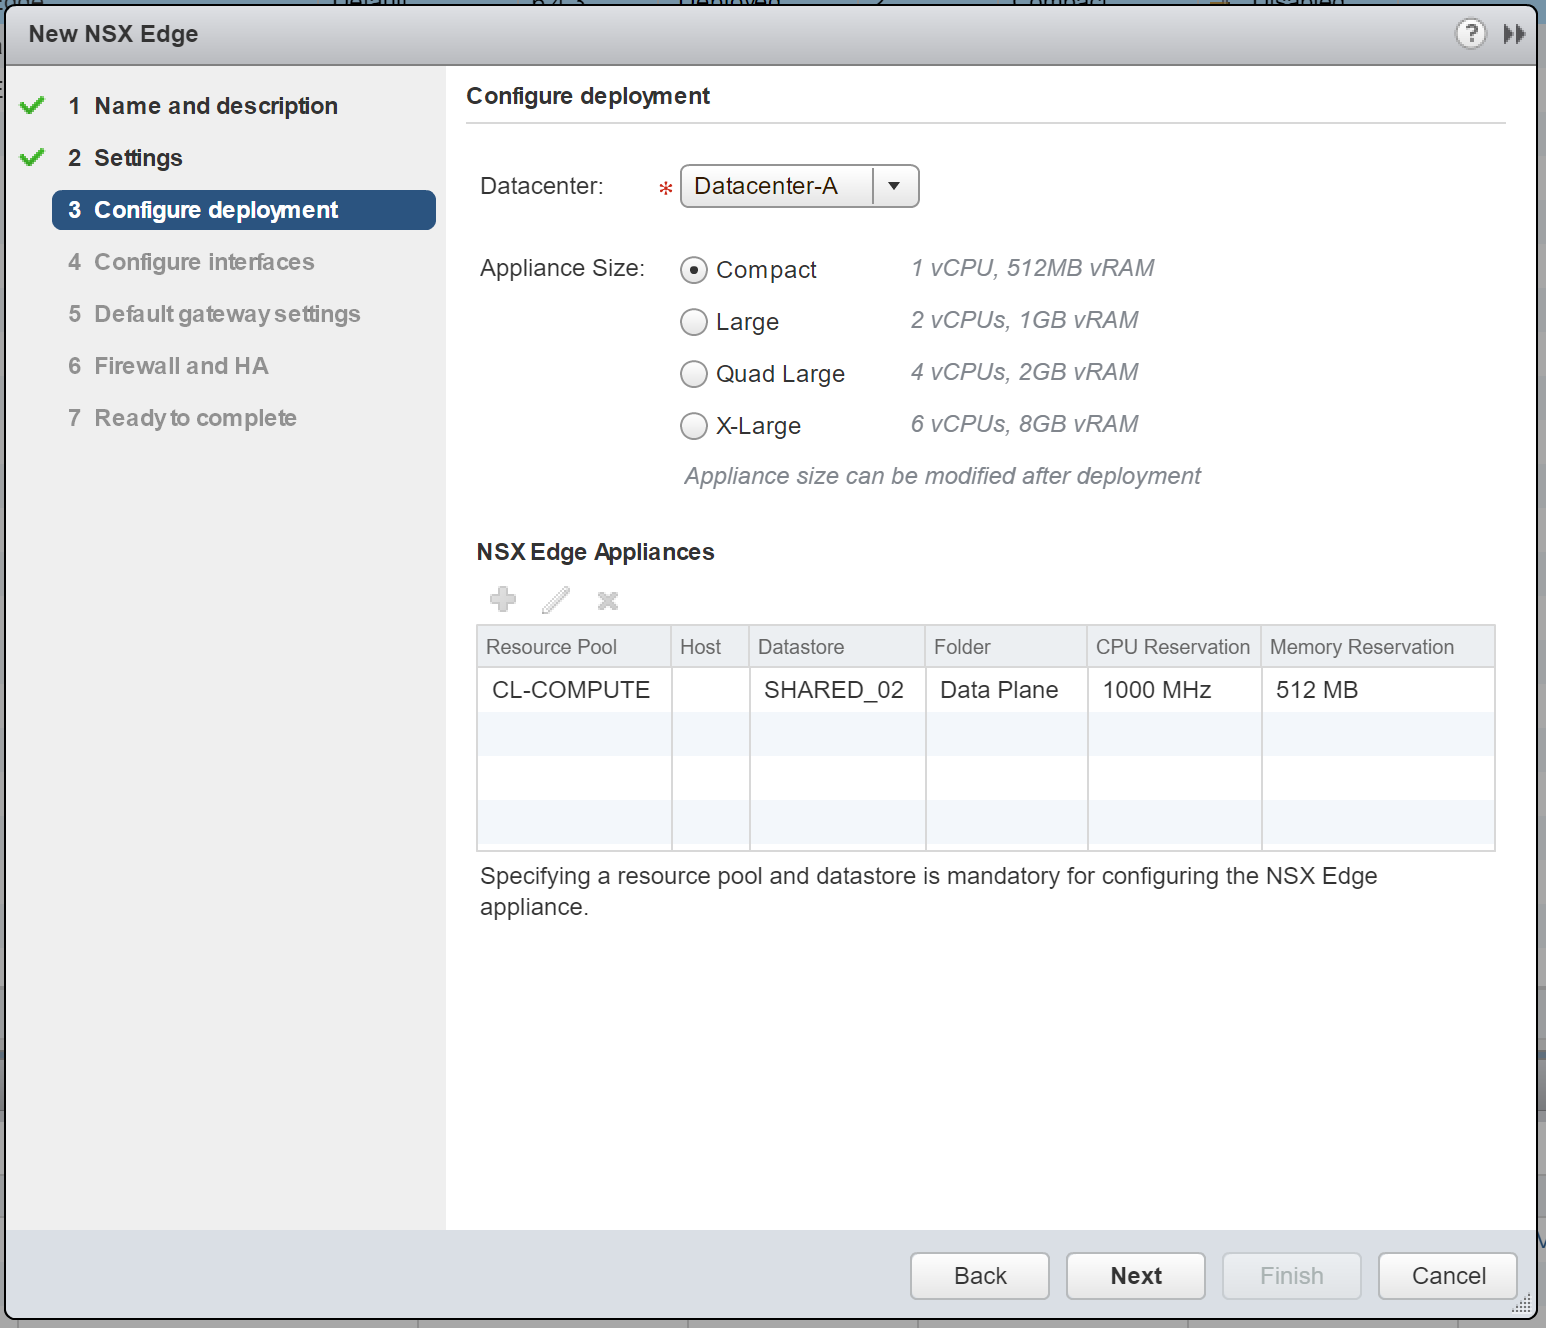
3. Configure the appliance size and resources. Again, for lab purposes, the Compact appliance size is appropriate. When ready, click Next.
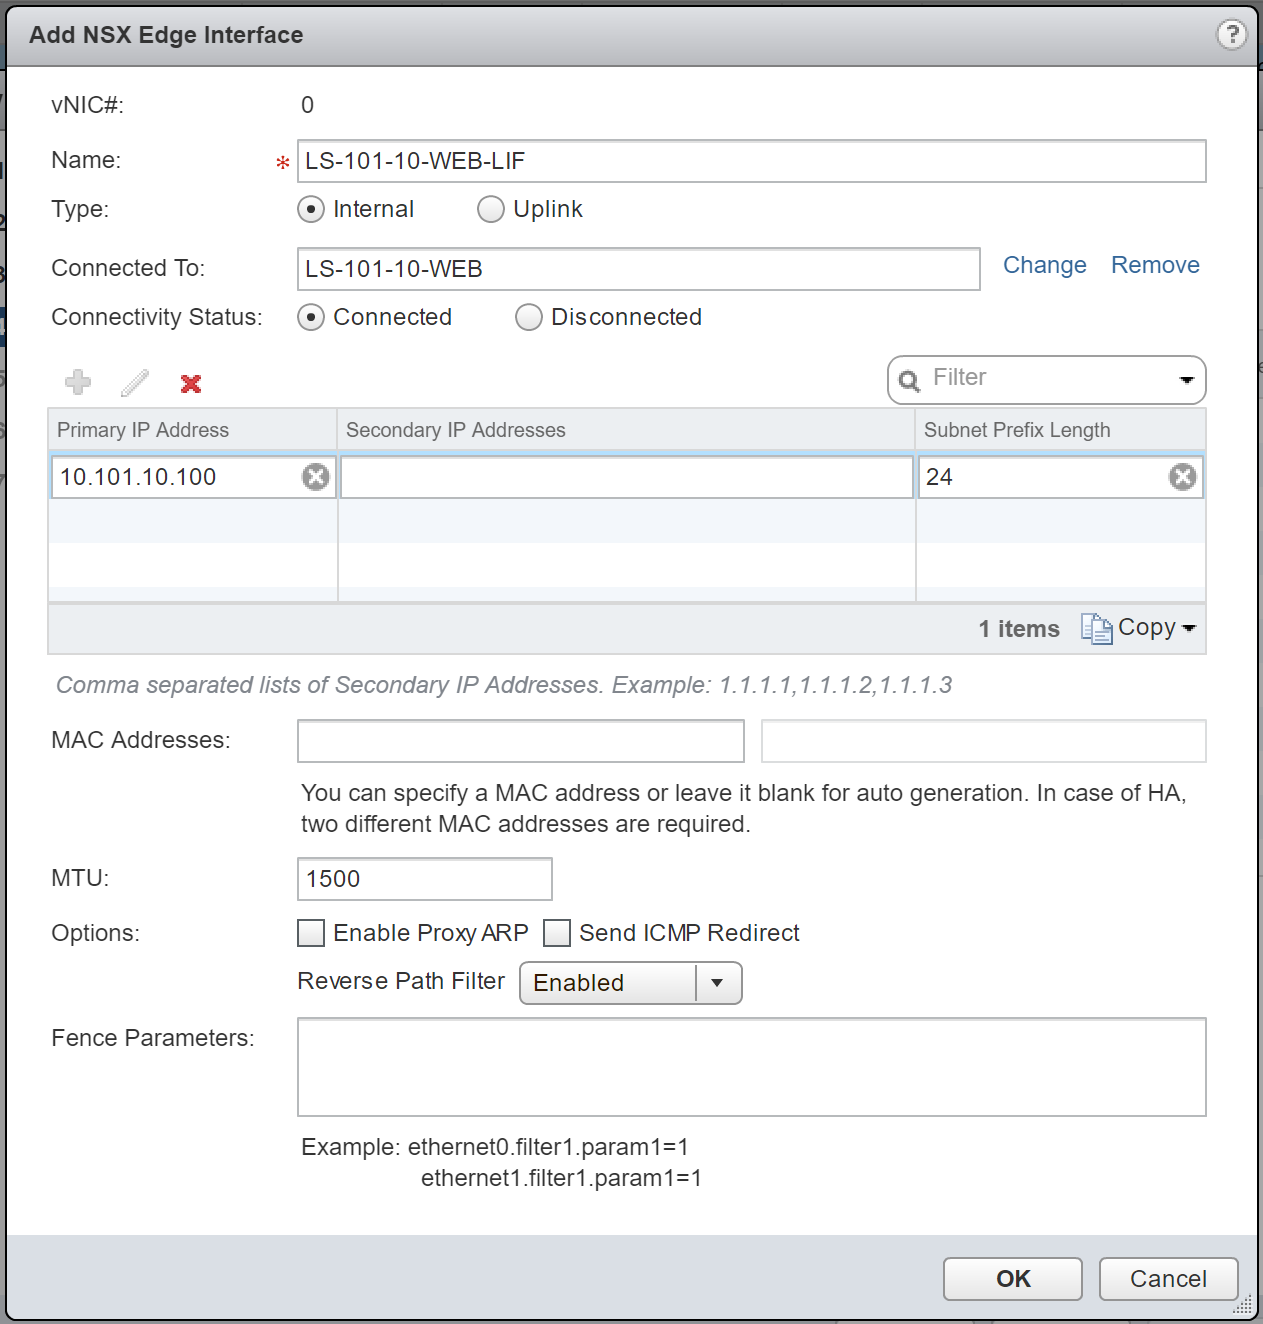
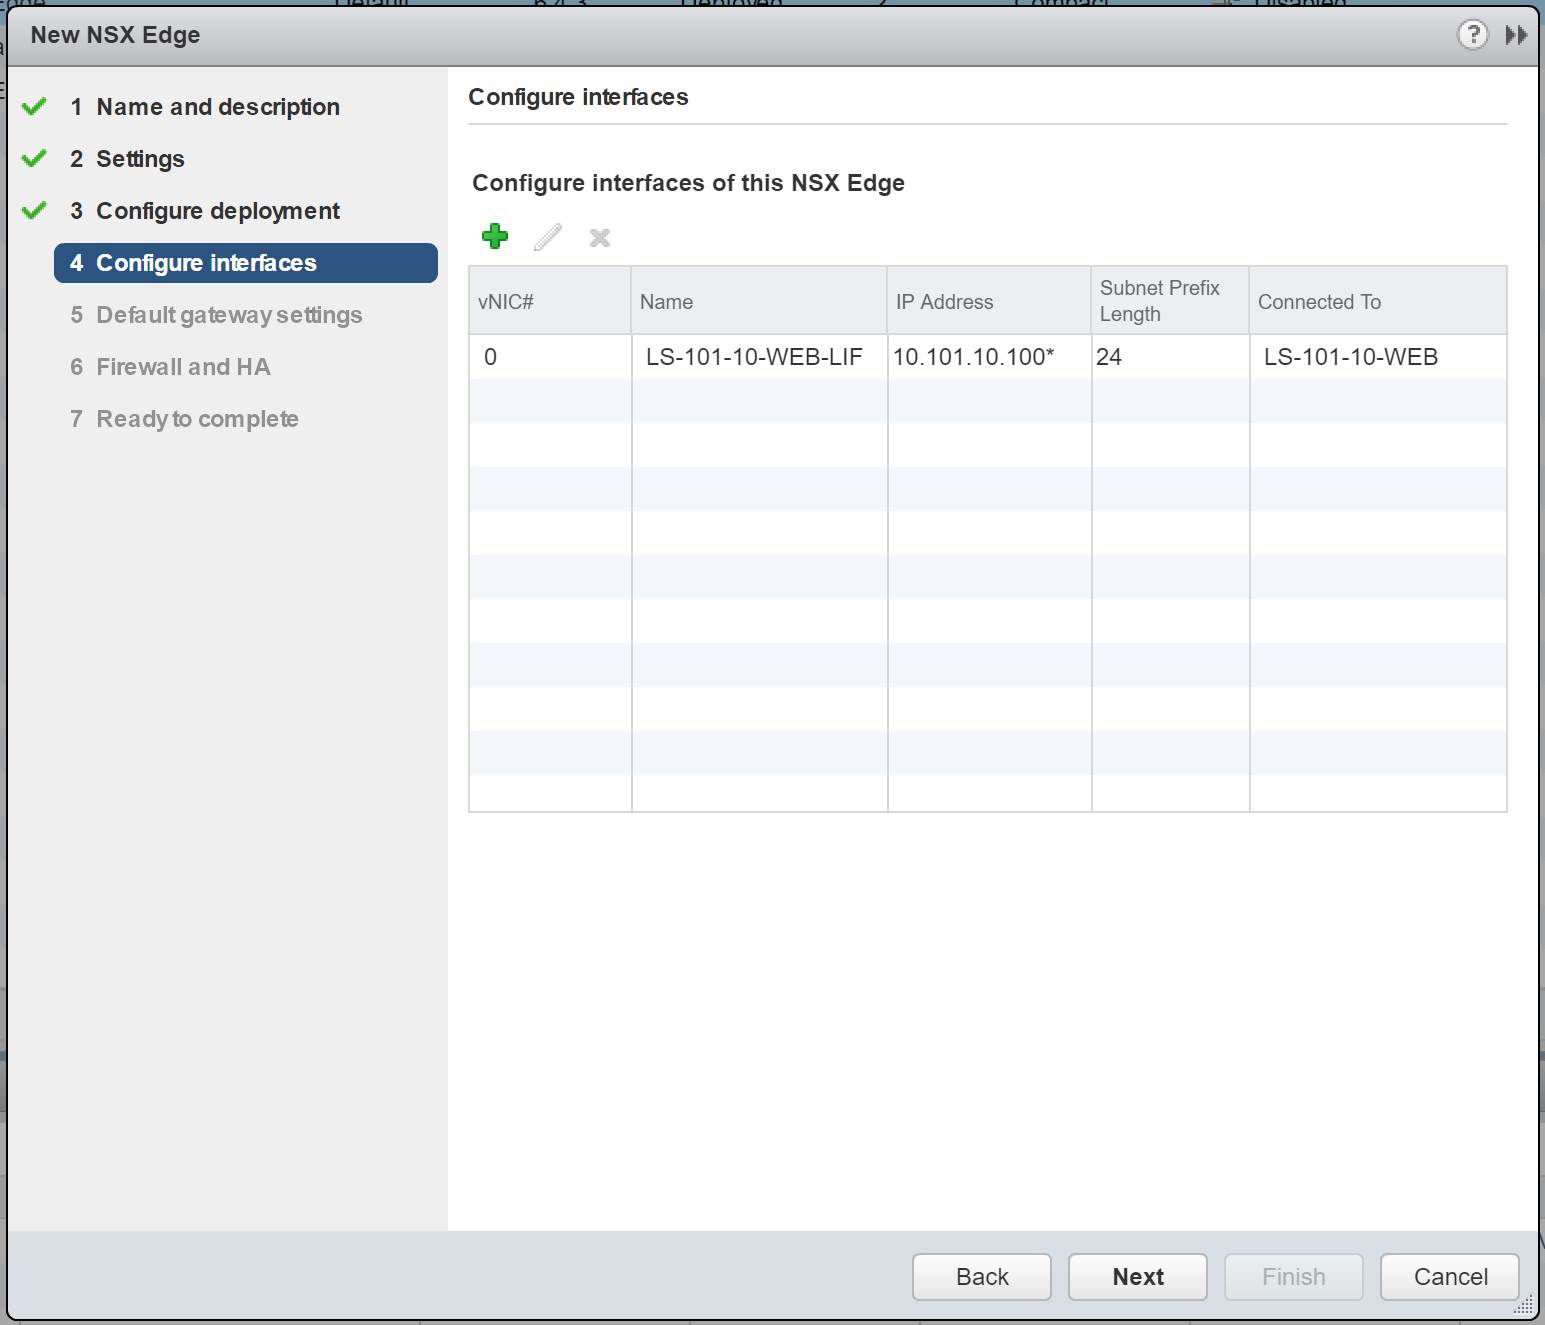
4. Next up, we need to configure a single (one-armed) interface. Click the + button to begin.
5. Give the interface a name, select Internal, and connect it to the same Logical Switch which houses both back-end web servers. Assign a primary IP address (this will be used as the load balancer’s virtual IP address) and, when ready, click OK.
Note – 10.101.10.100 has been assigned to the internal LIF and will be utilised in a future step as the virtual IP address of our new application pool. Additional/secondary IP addresses can be added and assigned to additional application pools (more on this on a later step), meaning one load balancer is capable of load balancing multiple applications.
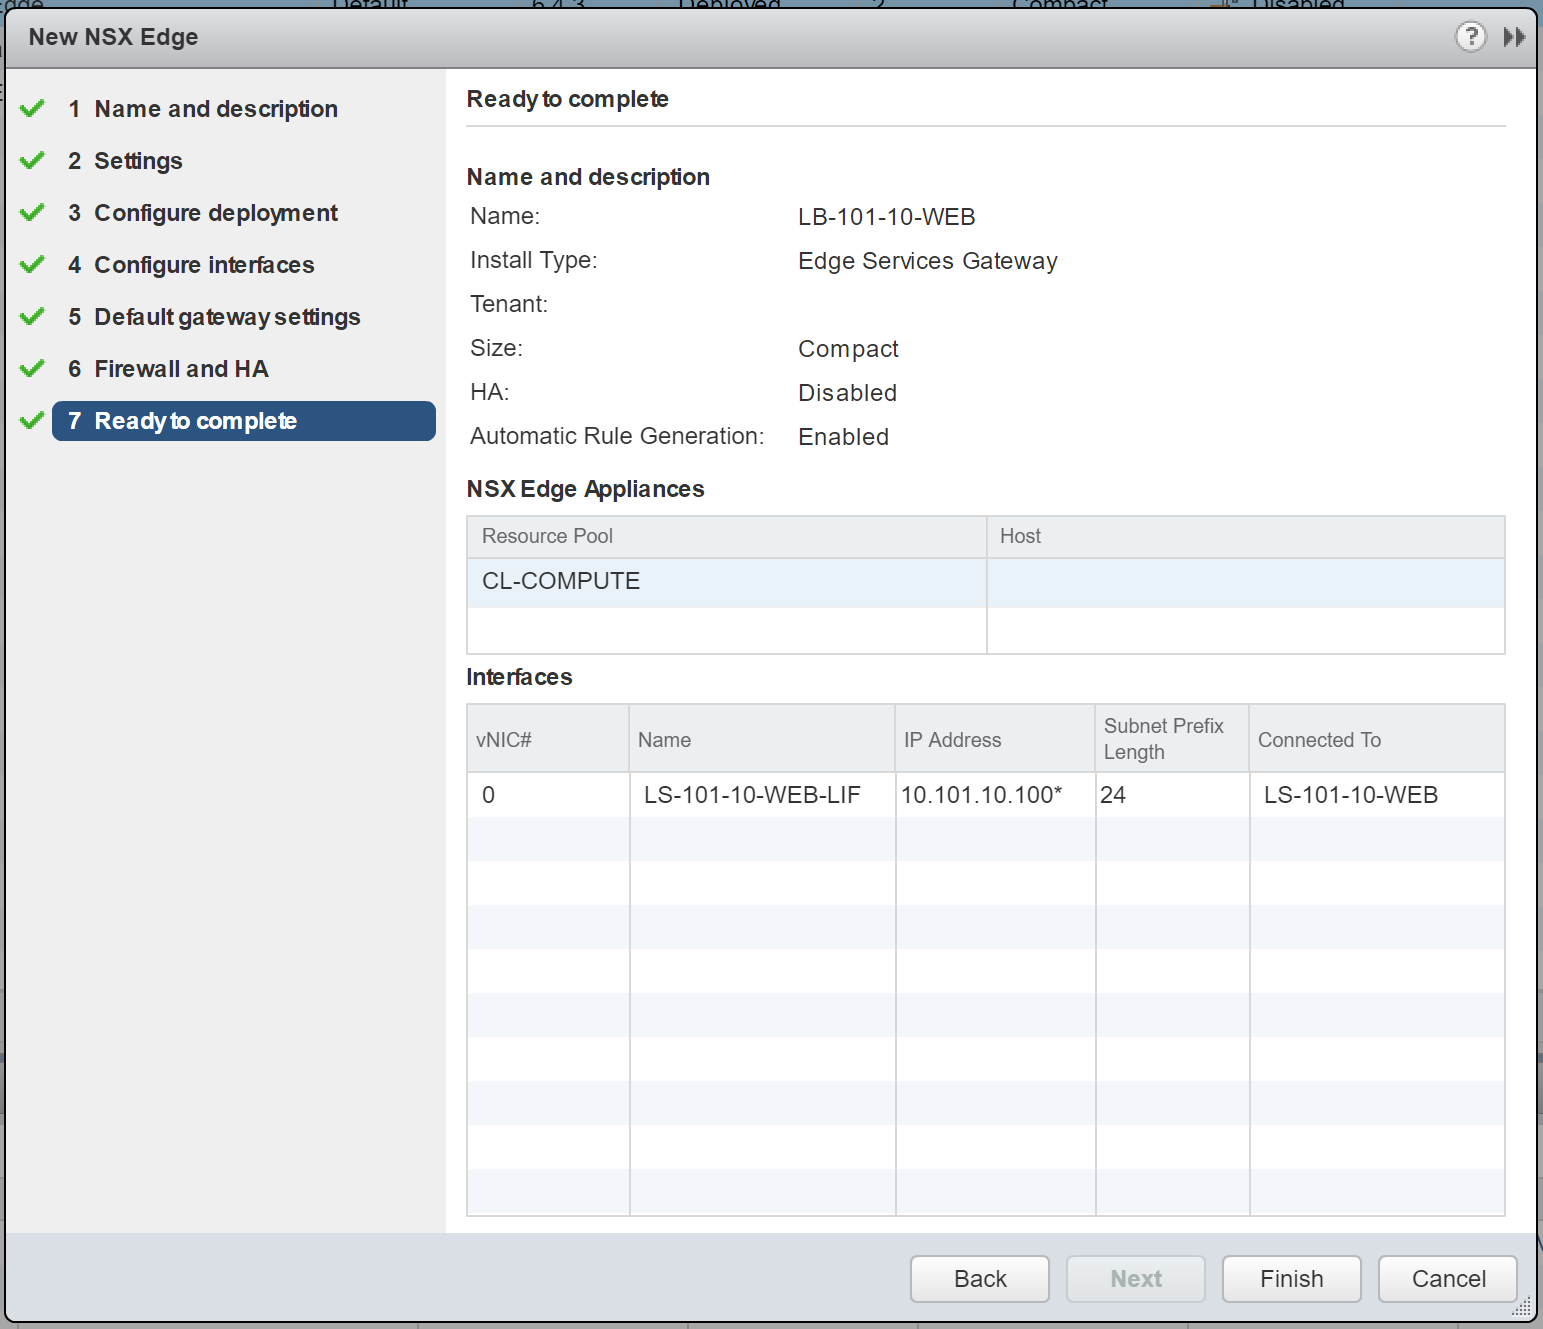
6. Confirm the configuration and click Next.
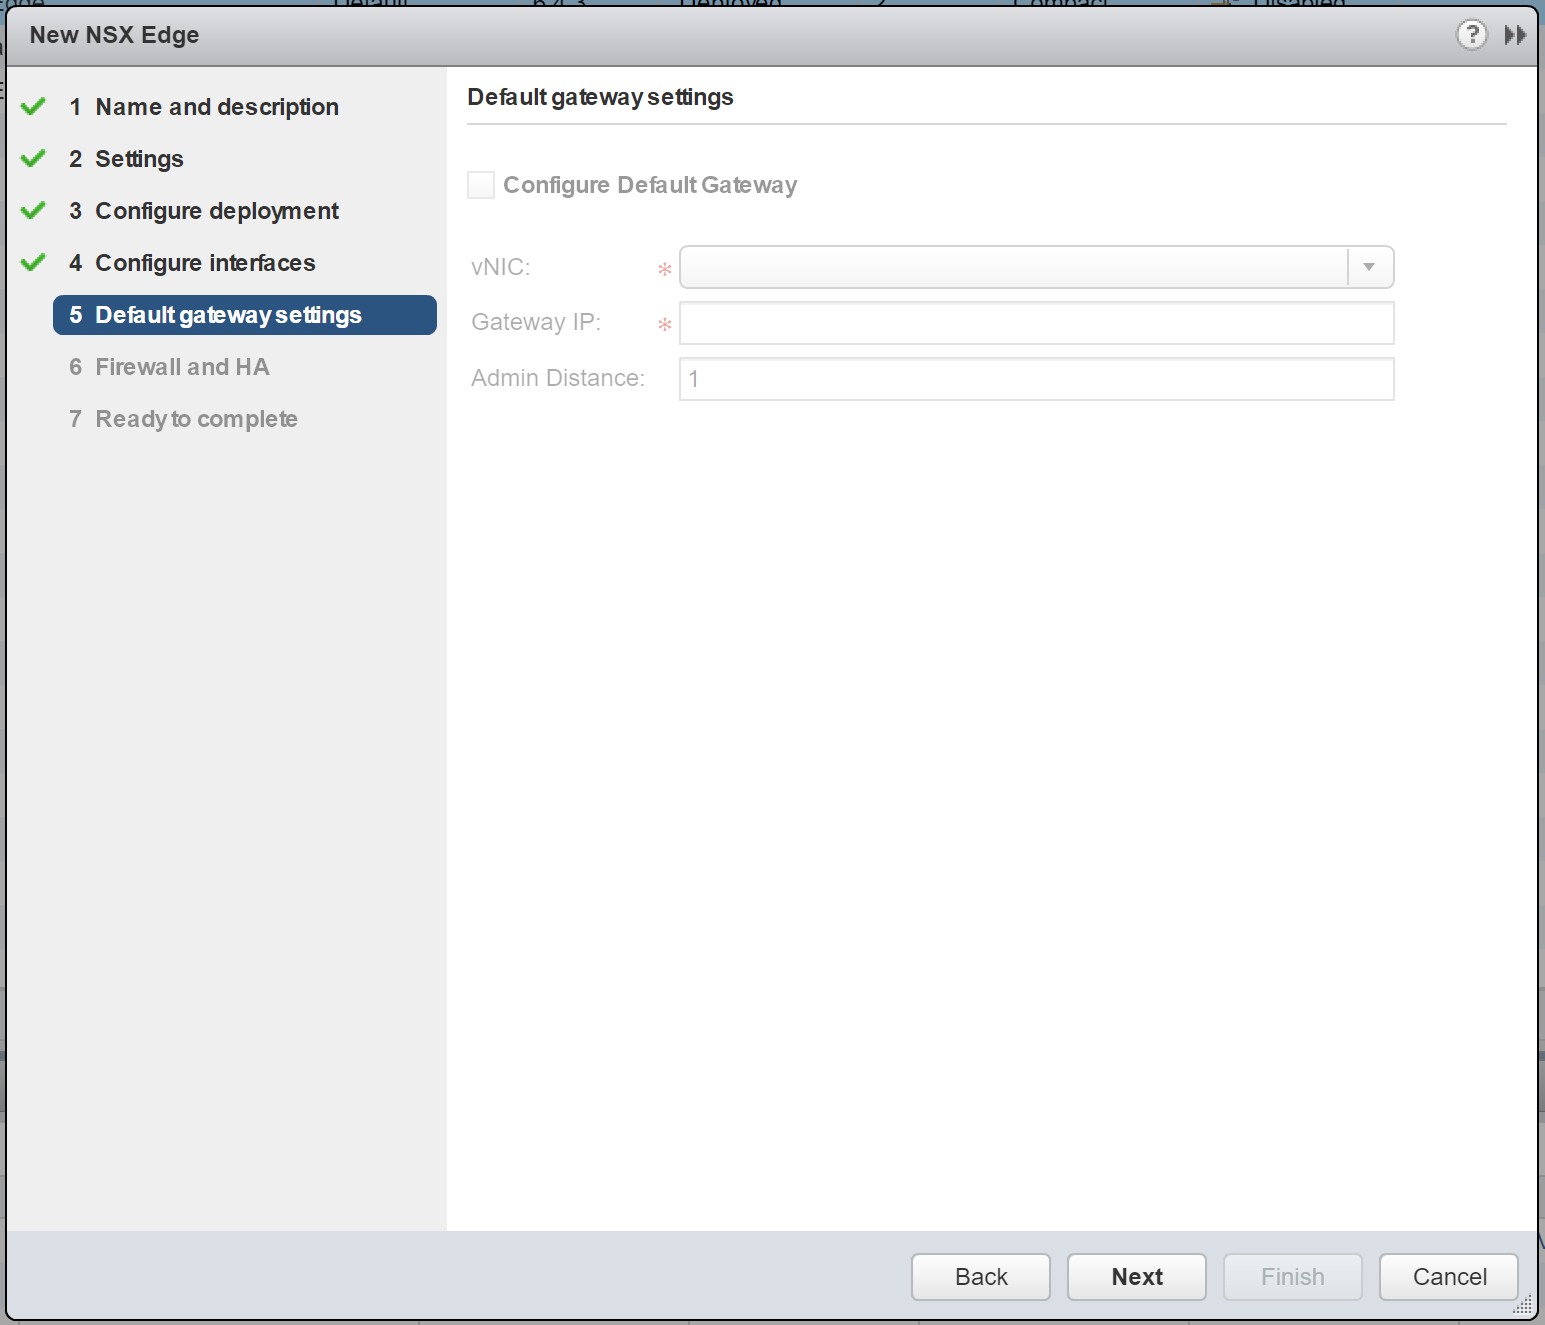
7. As the NSX Edge will not have an Uplink LIF, we will not be able to configure a default gateway. Click Next.
8. For lab purposes, I will not configure any firewall policies. Also, as we are not deploying the appliance in HA mode, all HA parameters will be greyed-out. Click Next.
9. Confirm the NSX Edge configuration, and click Finish to deploy.
NSX Edge – Routing
Here in Lab World, I don’t have OSPF/BGP configured, so we’ll create a static route to enable traffic to flow upstream. Looking at the topology a little more closely, you’ll note the NSX Edge load balancer has a next hop of 10.101.10.254 (the internal LIF of the DLR ).
Configure a VMware NSX Edge Static Route
To configure the static route, simply jump into the configuration console of the newly created NSX Edge, browse to Manage > Routing > Static Routes, and click +. Configure accordingly and click OK.
NSX Edge – One-Armed Load Balancer Configuration
Now that our new NSX Edge has been deployed, we will enable the load balancer feature and configure in One-Armed/Proxy Mode.
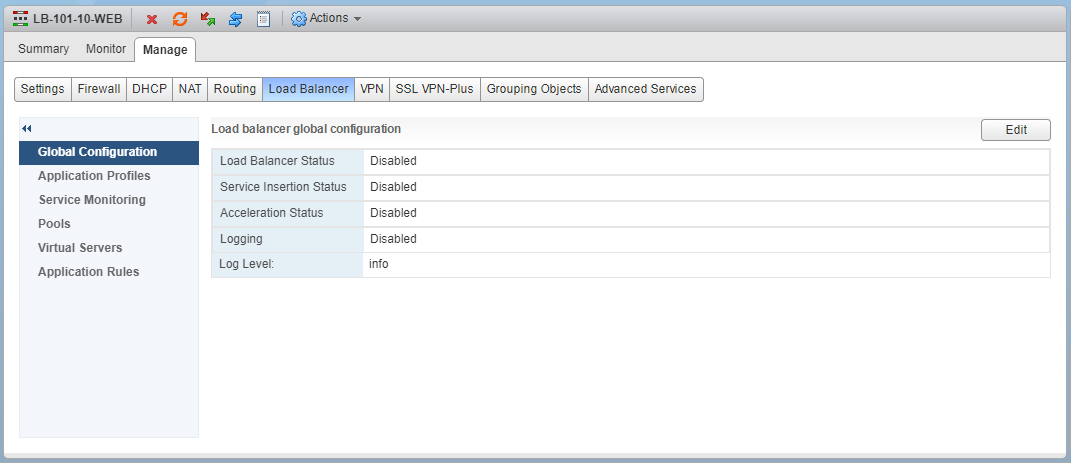
1. Browse to Manage > Load Balancer > Global Configuration and click Edit.
2. Ensure Enable Load Balancer is ticked, and click OK.
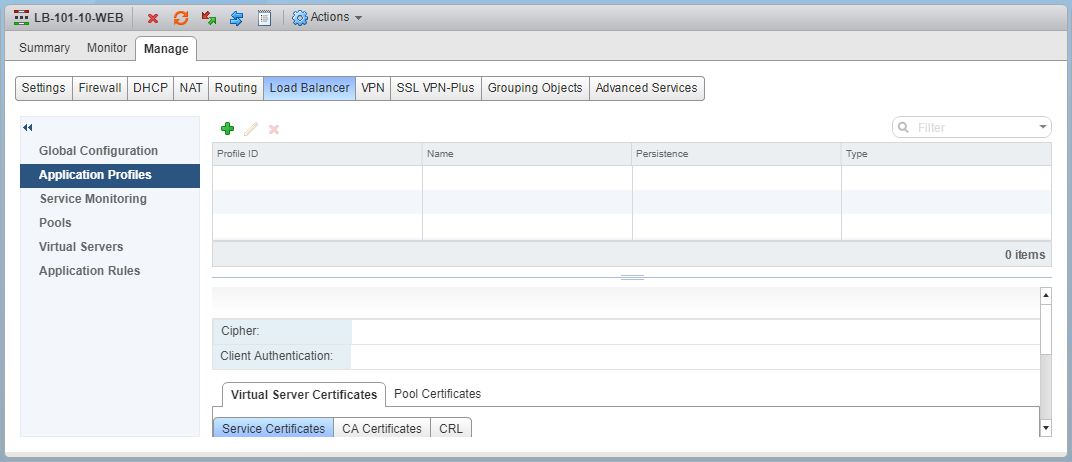
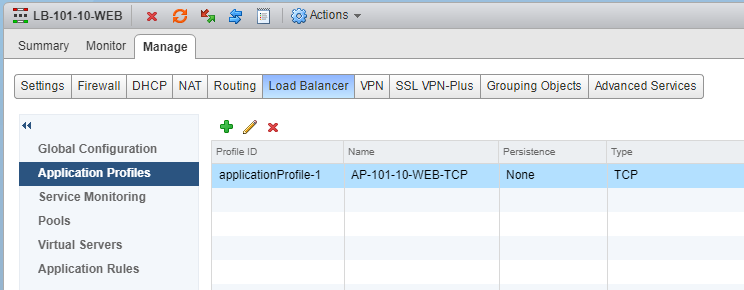
3. Browse to Manager > Load Balancer > Application Profiles and click +.
Application Profiles – An Application Profile is used to define the behaviour of a particular type of network traffic, and is associated with a virtual server (virtual IP address). The virtual server then processes traffic according to the values specified in the Application Profile. This allows us to perform traffic management tasks with greater ease and efficiency.
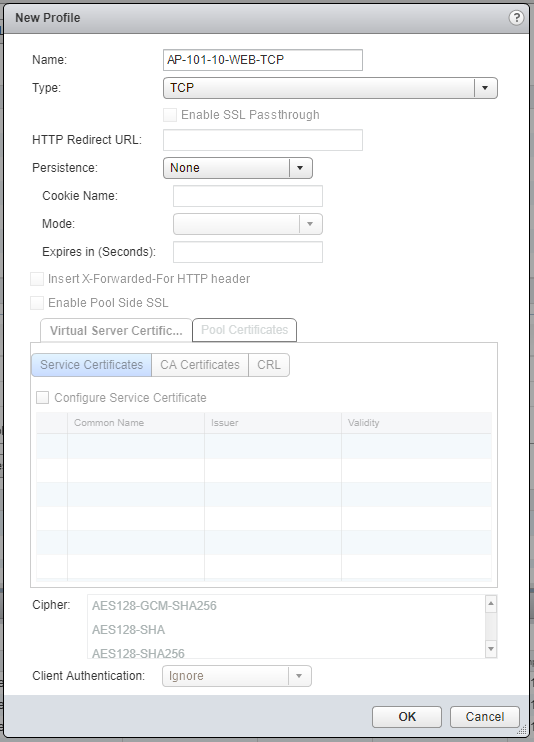
4. As mentioned at the start of this post, we are only interested in load balancing for resilience. As such (and as detailed below), we will set the Application Profile Type to TCP.
5. Confirm creation of the new Application Profile.
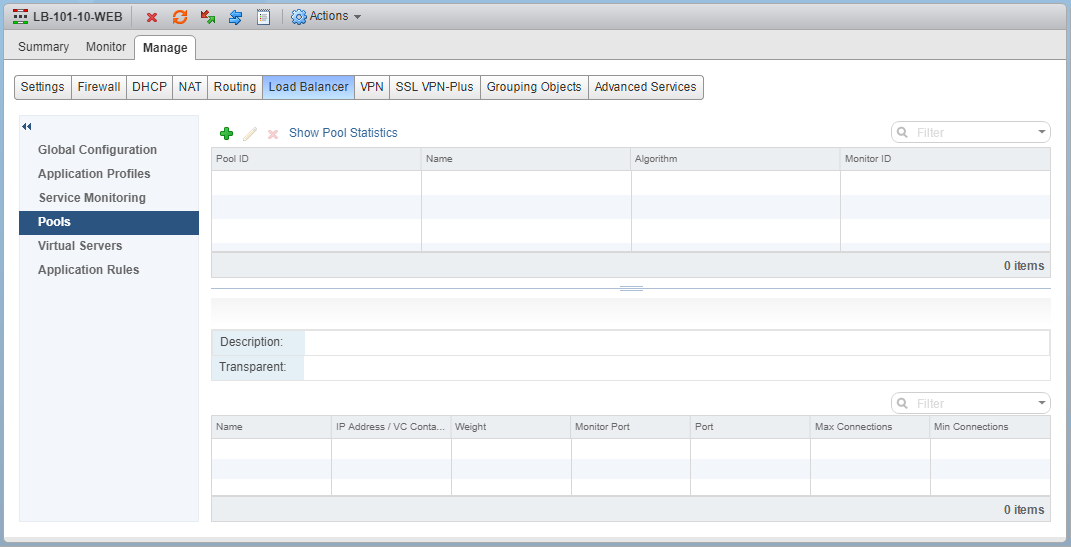
6. Browse to Manager > Load Balancer > Pools and click +.
Pools – A Pool is simply a group of back-end servers (aka, Members), and is configured with a load-balancing distribution method/algorithm. A service monitor (optional) can also be configured and, as this suggests, is used to perform health checks on its Members.
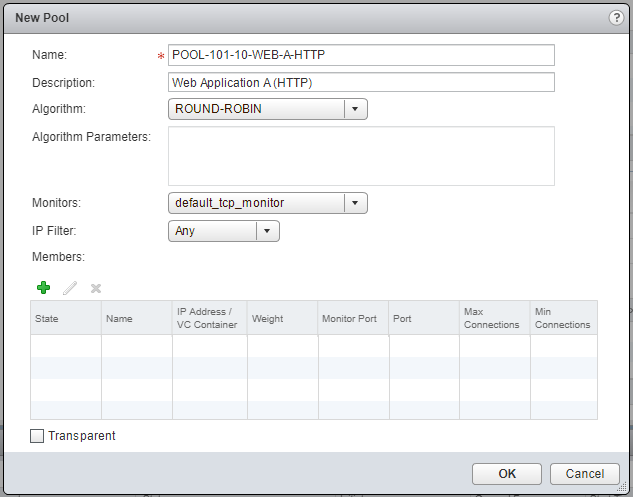
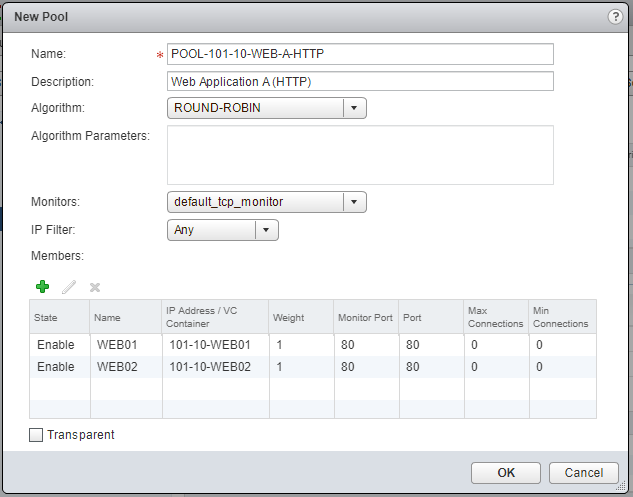
7. Give your new Pool a Name, Description, choose its distribution method/Algorithm, and Monitors.
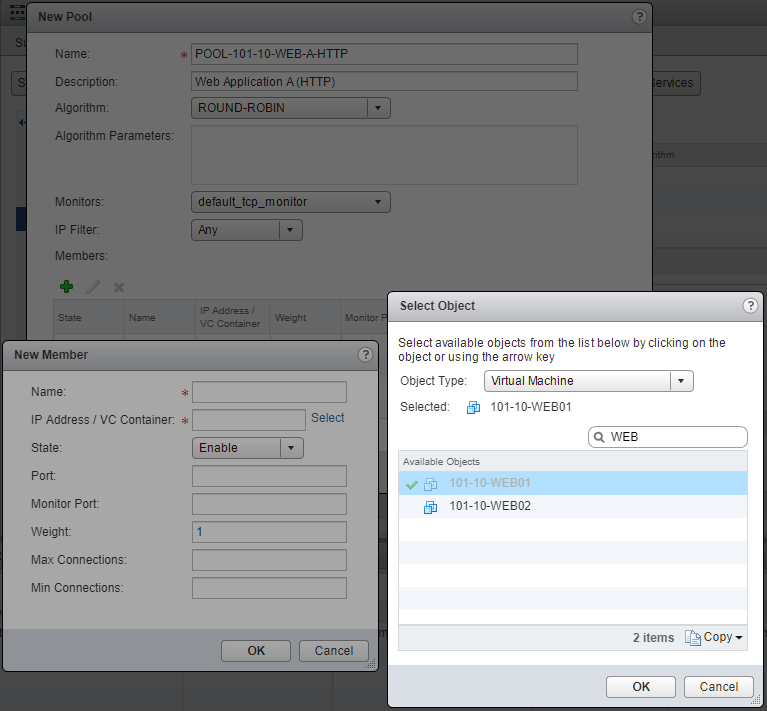
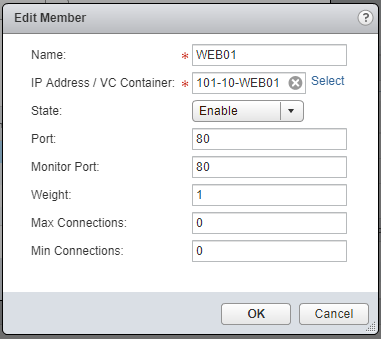
8. When ready, click + to add your back-end/member servers. For this either click Select to choose a vSphere Object, or simply type the destination’s IP address.
9. Define the Port (in this instance I am load-balancing HTTP/80 traffic), as well as the Monitor Port (here I use port 80 again). When done, click OK.
10. Confirm your configuration by clicking OK.
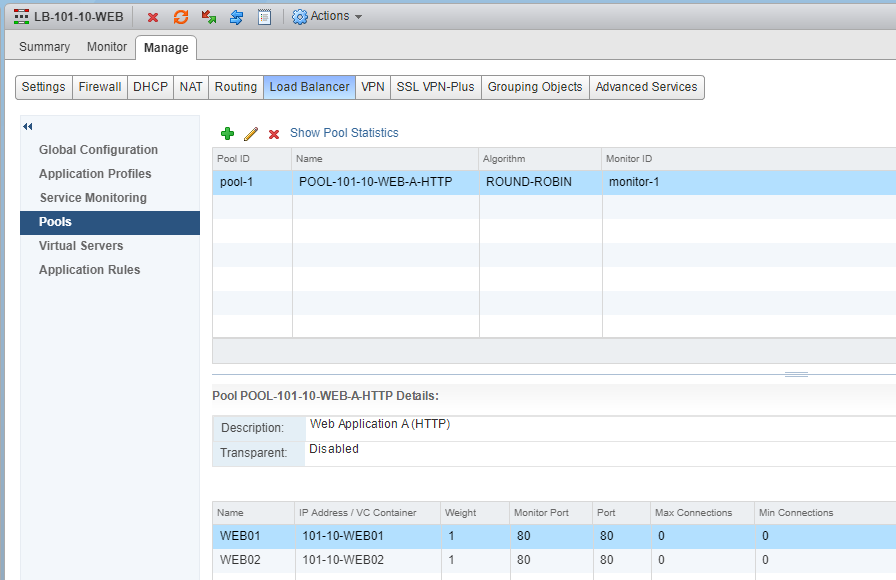
11. Confirm creation of the new Pool.
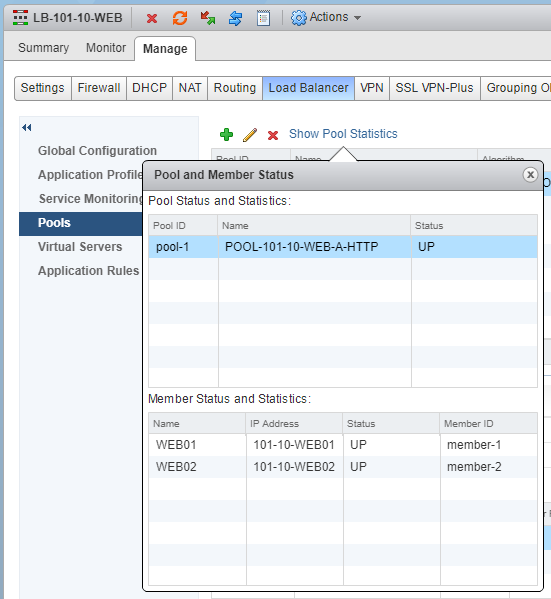
12. Check your newly created Pool’s health status by clicking Show Pool Statistics. The Status of both the Pool and it’s Members should show UP.
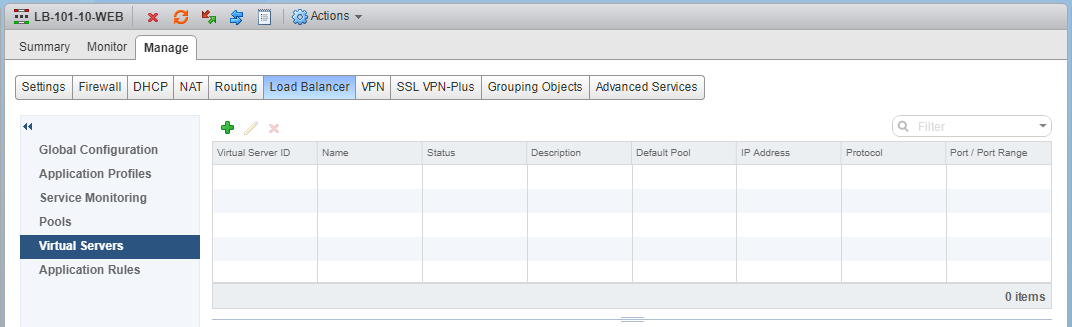
13. Browse to Virtual Servers and click +.
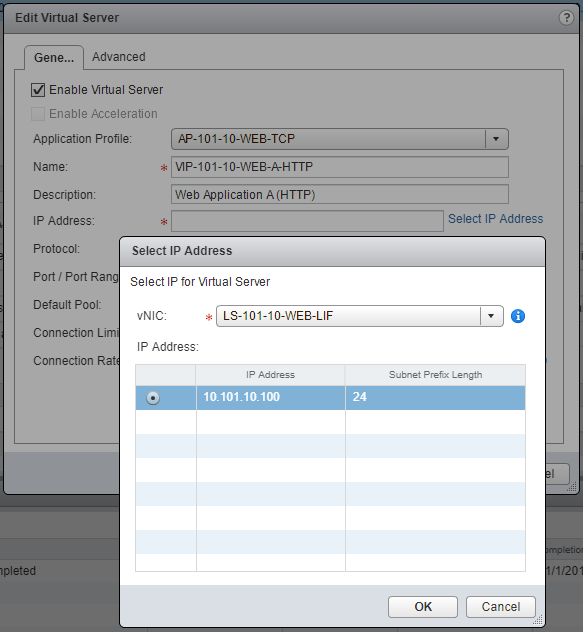
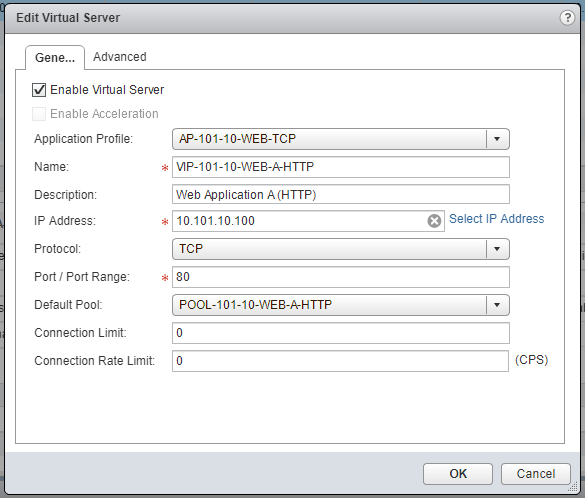
14. From the Application Profile drop-down menu, select the recently created Application Profile, give the Virtual Server a Name and Description, and click Select IP Address to select the IP address which we allocated to the internal LIF when we created the load balancer.
15. Lastly, set the Protocol to TCP, Port/Port Range to 80, and set the the Default Pool to the pool we created in step 6.
16. Confirm creation of the new Virtual Server.
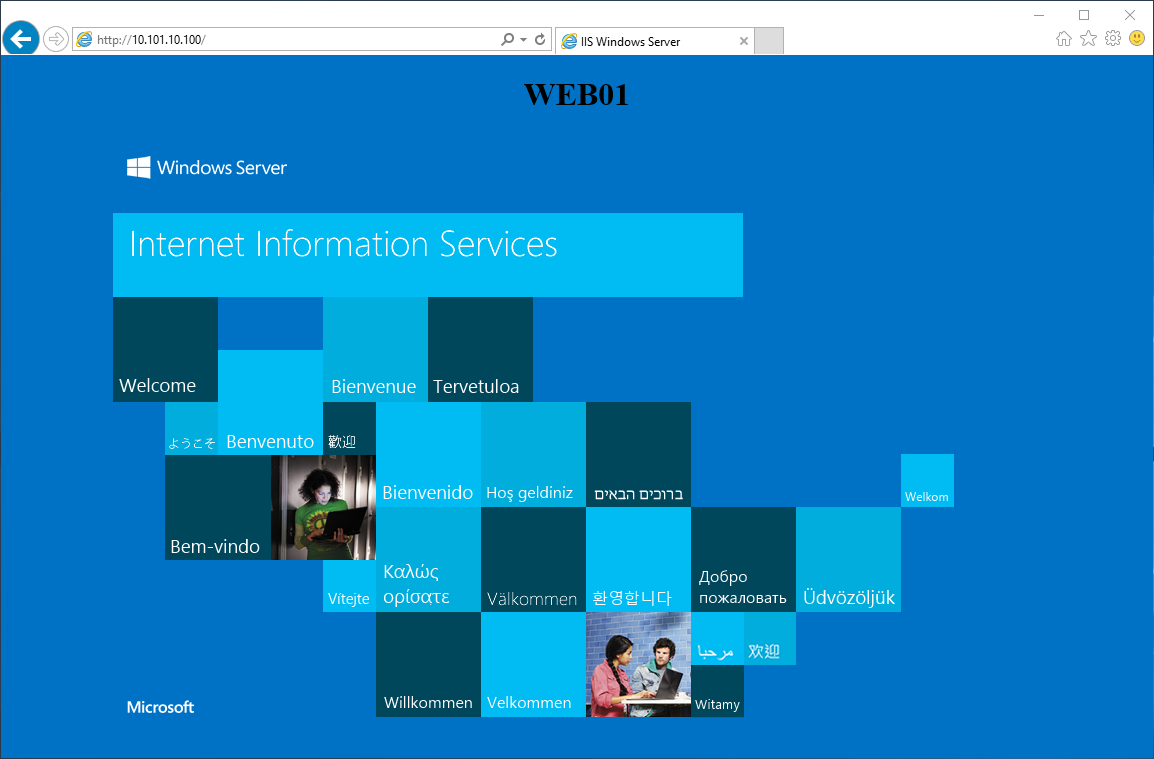
17. Finally, browse to the Virtual Server IP address to confirm load-balancing to each of the Pool Members is successful. In the below screenshot, traffic is routed to the VM, 101-10-WEB01.
18. After Refreshing the browser, I am directed to 101-10-WEB02.
Conclusion
In the next post we’ll cover the second flavour of NSX Edge load balancer, In-Line mode (aka, Transparent mode) and, in future posts, we’ll look at use cases for both, as well as troubleshooting tips.
You don’t have to have an enterprise-grade lab environment to run VMware NSX Data Center for vSphere. For those who neither wish to house half a rack of servers, storage, and enterprise networking kit at home, nor wish to incur the wrath of their energy company for the privilege, a single desktop/laptop with appropriate compute and storage is more than capable of handling NSX.
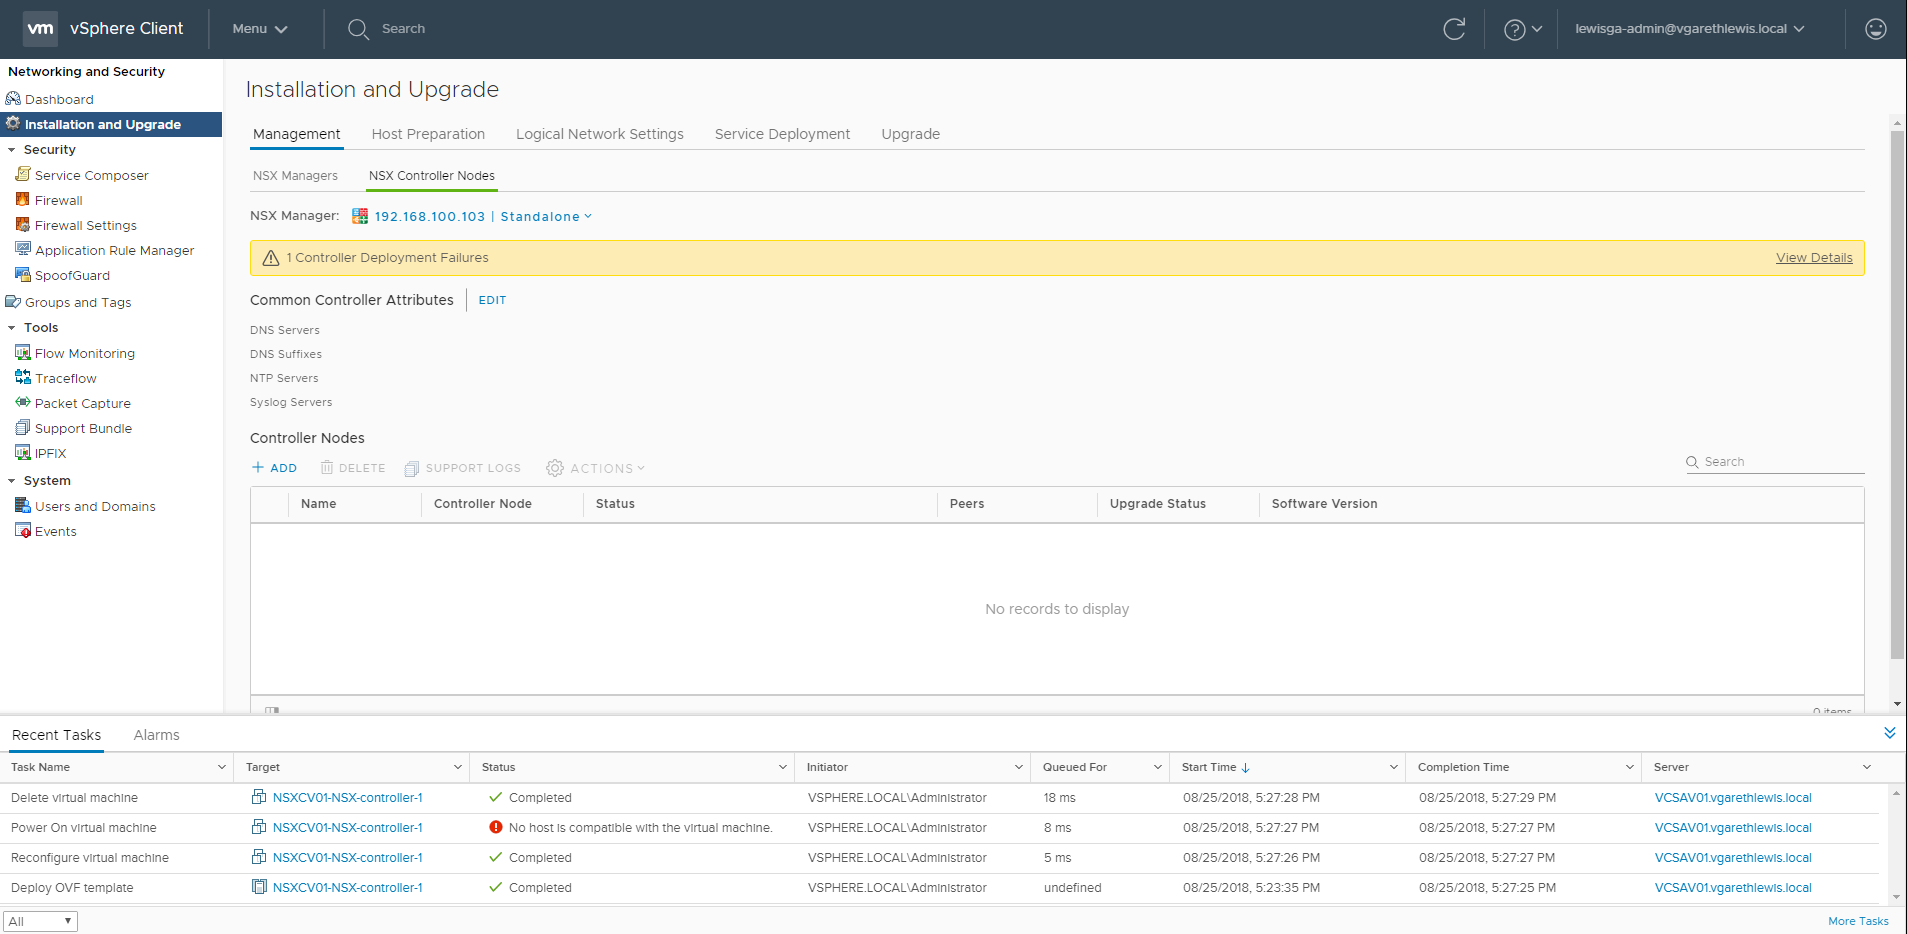
However, there are obvious limitations to this style of lab environment and, as you’re reading this, I’m guessing you’ve been unable to deploy an NSX Controller (likely due to its CPU requirements). By default, NSX Controllers are deployed with 4 vCPU and 4 GB memory. This is likely too high a requirement to be accommodated in smaller lab environments and, as a result, NSX Controller deployments will fail.
NSX Controller Deployment Failed – No host is compatible with the virtual machine.
Challenge – We are unable to specify NSX Controller resources during their deployment via UI. As NSX Controllers are also Protected VMs, we are unable to alter their resources via UI after the template is deployed and before it is deleted due to the error ‘No host is compatible with the virtual machine’.
Solution – We will a) remove the lock from the protected NSX Controller, and b) apply a more ‘lab-friendly’ resource configuration to the NSX Controller via PowerCLI.
Okay, so I’m guessing you’ve already attempted to deploy an NSX Controller. No problem, we just need to identify the failed entity’s Managed Object Reference ID (moRef ID). For more information, see my previous post regarding moRef IDs.
vCenter is quite predictable in that all newly created entities are assigned moRef IDs incrementally. Identifying the moRef ID of the previously failed NSX Controller (Stage 1) will allow us to delete the next moRef ID (which will remove the Protected VM lock) and, subsequently, enable us to reconfigure the NSX Controller’s resources via PowerCLI before the VM is powered on (Stage 2).
Please note, as stated in my previous post, VMware do not support or recommend this procedure in any way. As such, this procedure should not be implemented in a production environment.
Stage 1 – Identify Failed NSX Controller moRef ID
1. Connect to your vCenter Server via SSH.
2. Enable and enter Bash.
shell.set --enable True
shell
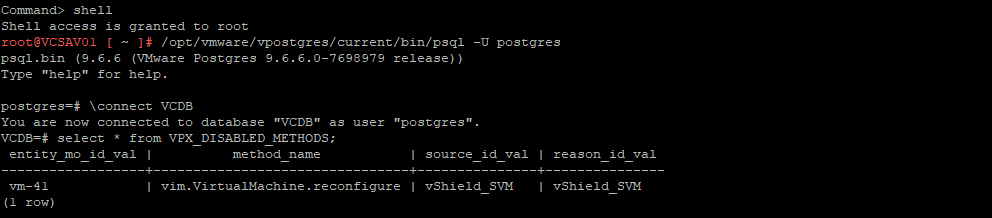
3. Connect to the vCenter Postgres Database via PSQL.
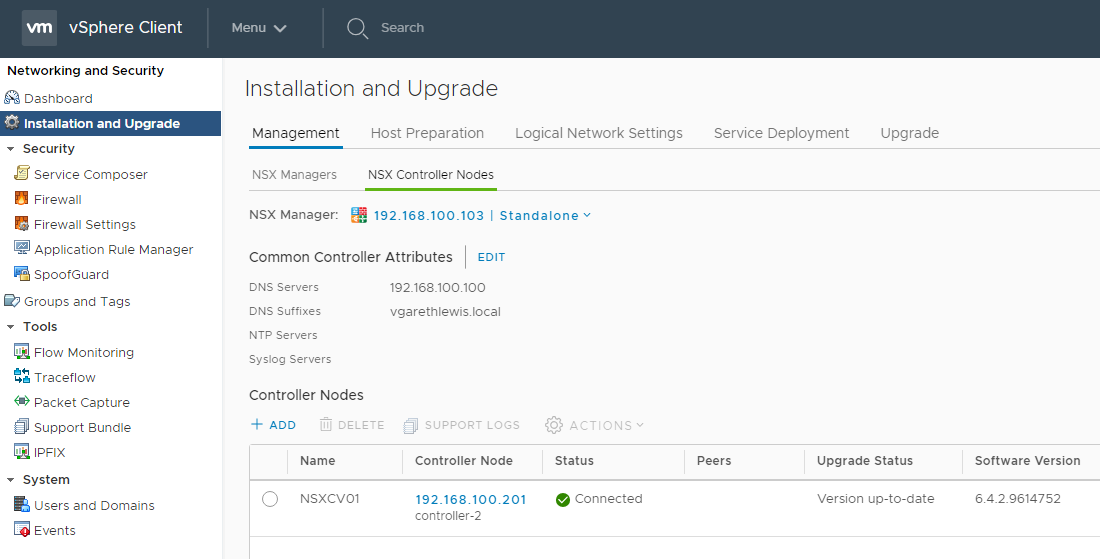
5. Identify and note the moRef ID of the failed NSX Controller. In my case, this is ‘vm-41’ (see below screenshot).
select * from VPX_DISABLED_METHODS;
The previous NSX Controller creation attempt. Note the MO_ID (vm-41).
Stage 2 – Remove Future NSX Controller Protected VM Lock and Reconfigure VM Resource via PowerCLI
Identification done, we now need to prepare for the next stage – the deployment of a new NSX Controller, the removal of the Protected VM lock via SSH, and the reconfiguration of its resources via PowerCLI.
For this we’ll need to setup two commands in readiness, both of which must be run at specific stages of the NSX Controller ‘Deploy OVF template’ task.
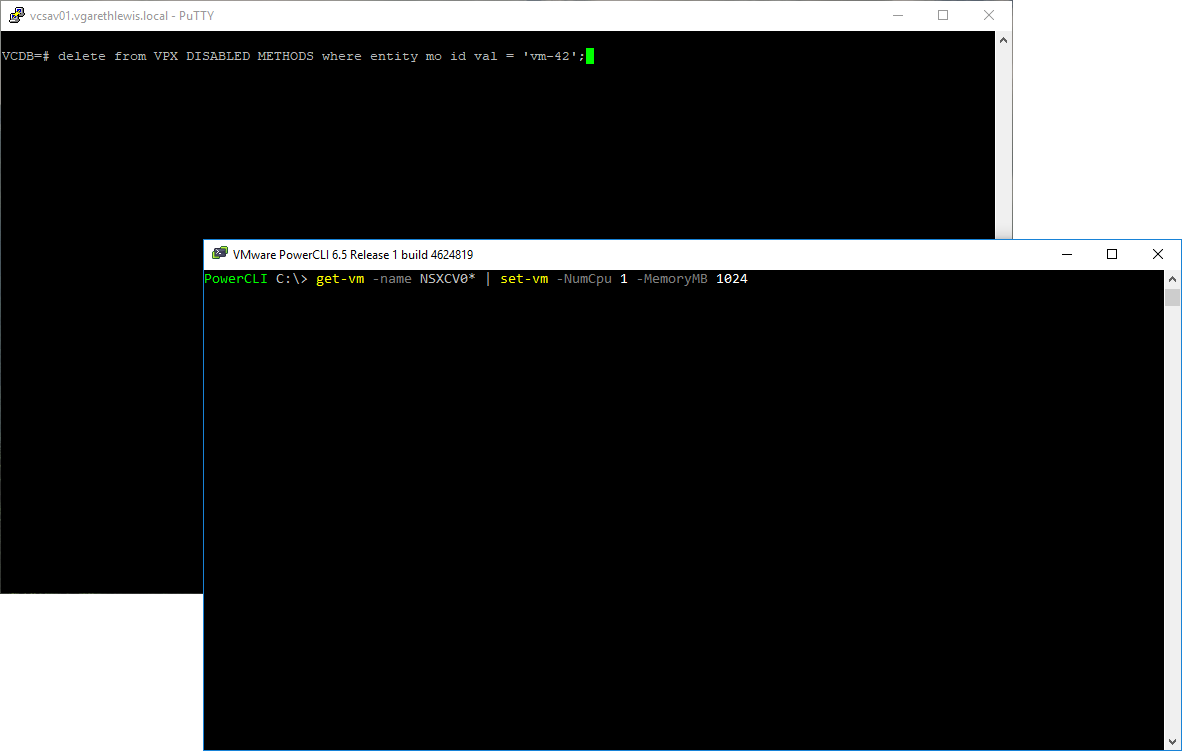
1. Remove Protected VM Lock via SSH – Jump back into your previous SSH session and ready the below command (but don’t run it yet), configured with the ‘next in line’ moRef ID (in my case ‘vm-42’). This will remove the Protected VM lock at the end of the OVF template deployment, and will allow PowerCLI to jump in and reconfigure the VM just before it is powered on.
delete from VPX_DISABLED_METHODS where entity_mo_id_val = 'vm-42';
2. Reconfigure NSX Controller Resources via PowerCLI – Launch PowerCLI, connect to your VCSA, and ready the below command (but don’t run it yet). This is the NSX Controller resource configuration change. For my lab environment, 1x vCPU and 1 GB of memory is fine. Note, ‘NSXCV0’ is the start of my NSX Controller name. Configure yours accordingly.
3. With both commands prepared, do not run them yet. They will be run AFTER the NSX Controller deployment has started.
Protected VM Lock Removal and PowerCLI Resource Configuration commands prepared.
4. Jump back into your vSphere Client and create a new NSX Controller.
5. At specific stages of the Deploy OVF Template task, run the prepared commands detailed above.
~60% – Reconfigure NSX Controller Resources via PowerCLI. This will queue until it’s able to run (e.g. – following the removal of the Protected VM lock).
~98% – Remove Protected VM Lock via SSH. Run this command repeatedly from 98%, and until you receive the ‘DELETE 1’ feedback. Don’t hold back on this step! Repeat the command as you would mash your keyboard to enter BIOS.
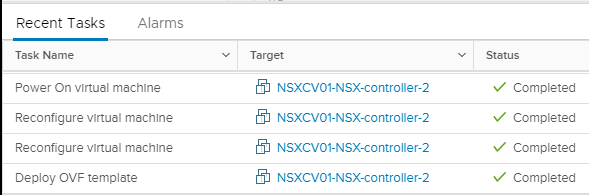
And, hey presto! From the below screenshots we can see the Protected VM lock has been removed successfully, allowing the PowerCLI command to complete, resulting in a reconfigured NSX Controller.
Protected VM Lock Removed after repeatedly running the delete command via SSH at ~98%.Allocating a more ‘lab-friendly resource configuration via PowerCLI.
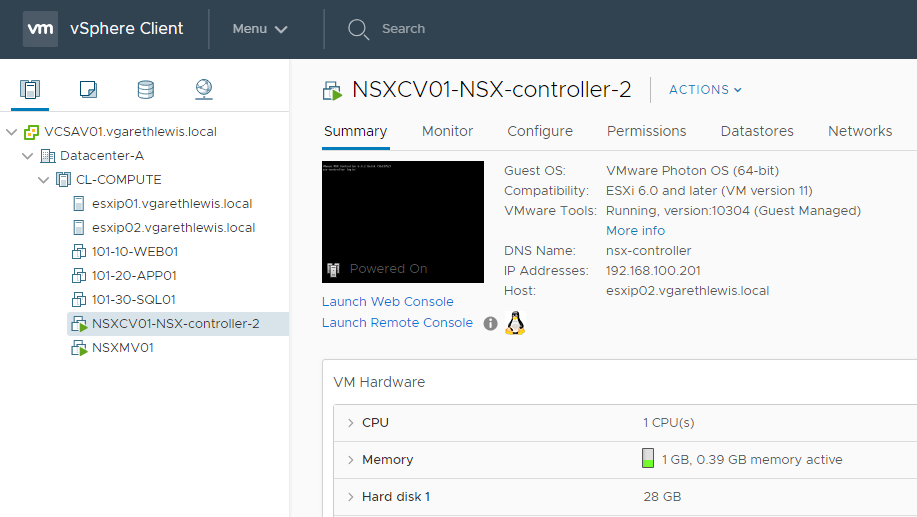
Via the vSphere Client, we can see the Deploy OVF template, Reconfigure virtual machine, and Power On virtual machine tasks were able to complete successfully.
And below, our shiny, new, ‘lab-friendly’ NSX Controller.
The ‘Lab-Friendly’ NSX Controller.…and confirmation of its more appropriate resource allocation.
References
During my research for this article, I came across to below guides, without which, the above would not have been possible. Props.
You may have noticed that your usual Active Directory user account (which might afford you full administrative access in vCenter) doesn’t get you very far when attempting to manage NSX for vSphere. This is by design, as NSX access is not governed or controlled by vCenter Server roles.
NSX utilises it’s own predefined security roles for role based access, all of which can be assigned to Active Directory Users and/or Security Groups. This is great for larger teams with clearly defined areas of demarcation and responsibilities, smaller teams of administrators and read-only support teams, and even one-off auditor visits.
In this post, I detail the procedure for implementing AD integration in VMware NSX for vSphere 6.4.2, however, the procedure is the same for NSX 6.X. Before we start, let’s take a look at the six NSX Security Roles:
NSX Security Roles
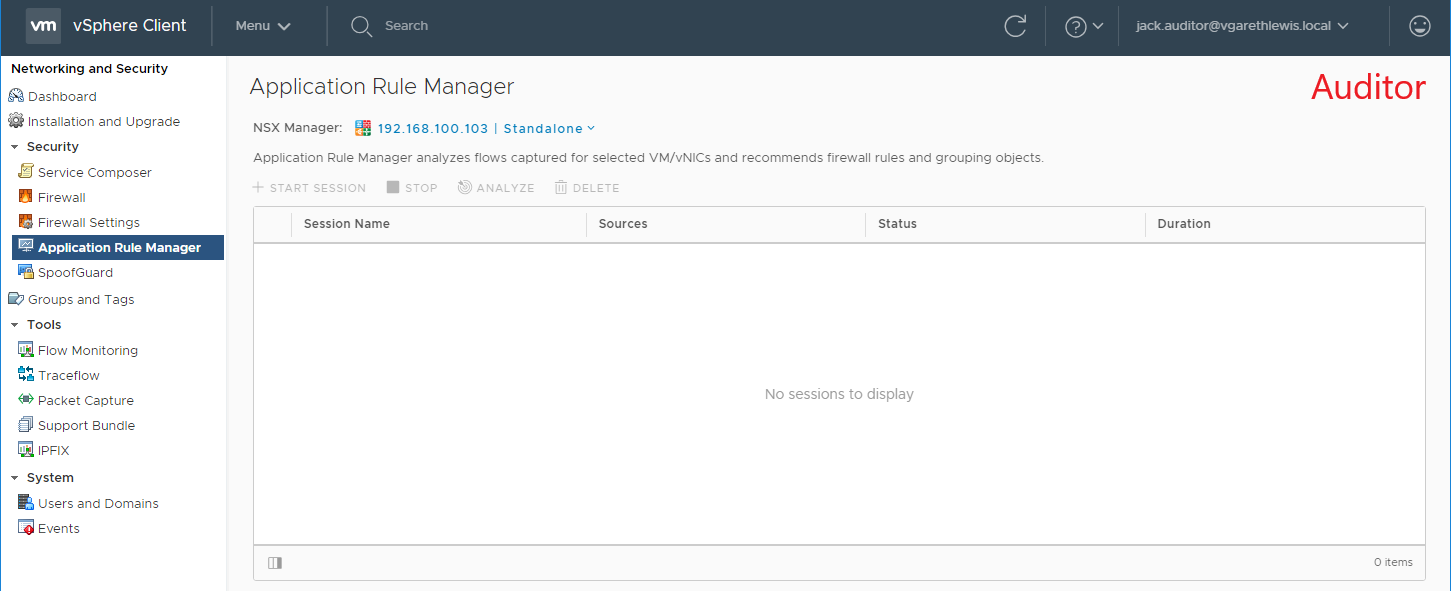
Auditor – Users in this role can only view system settings and auditing, events and reporting information and will not be able to make any configuration change.
Security Engineer – Users in this role can perform all security tasks, such as configuring policies and firewall rules. Users have read access to some networking features, but no access to host preparation and/or user account management.
Network Engineer – Users in this role can perform all networking tasks, such as routing, DHCP, bridging, etc. Users have read access to endpoint security features, but no access to other security features.
Security Administrator – Users in this role can configure security compliance policies in addition to viewing the reporting and auditing information in the system.
NSX Administrator – Users in this role can perform all tasks related to deployment and administration of this NSX Manager instance.
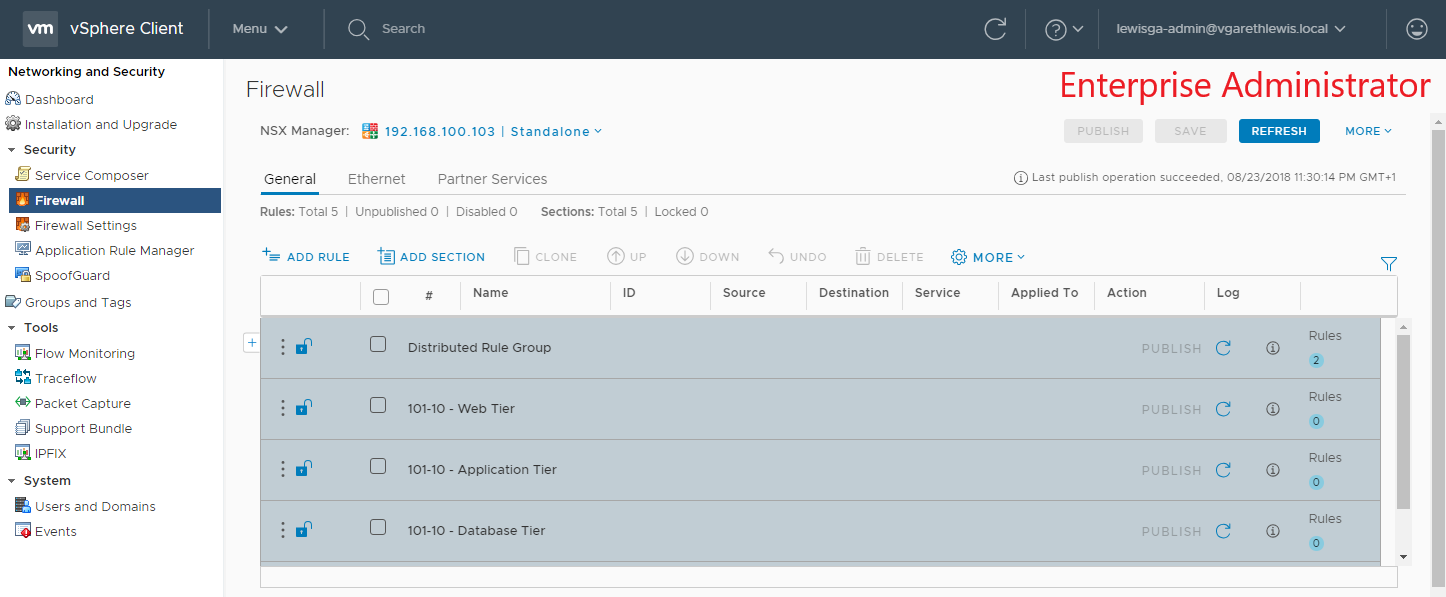
Enterprise Administrator (God Mode) – Users is this role can perform all tasks related to deployment and configuration of NSX products and administration of this NSX Manager instance.
Procedure
Please note, due to current feature parity differences between the vSphere Web Client (Flex) and vSphere Client (HTML 5), the below procedure will need to be performed utilising the vSphere Web Client (Flex).
1. Create your required AD Security Groups, naming accordingly.
2. Log in to the vSphere Web Client (Flex) as administrator@vsphere.local.
3. Browse to Networking & Security > System > Users and Domains.
4. Via the Users tab, click the Add icon.
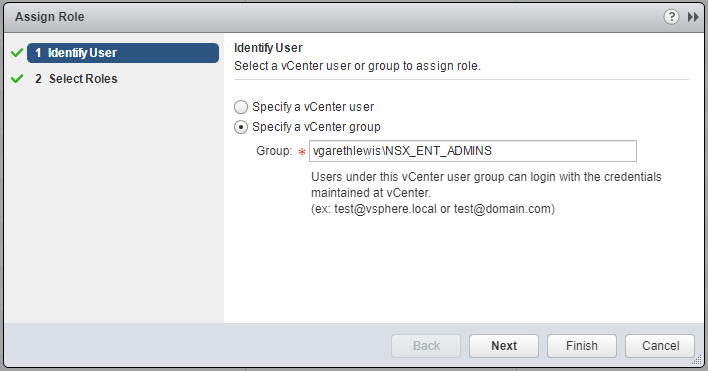
5. Select Specify a vCenter group and enter the AD Security Group name as per above AD Objects. When ready, click Next.
6. Select the appropriate NSX Security Role to associate with the AD Security Group and click Finish.
7. Repeat steps 4 – 6 until all required AD Security Groups have been added.
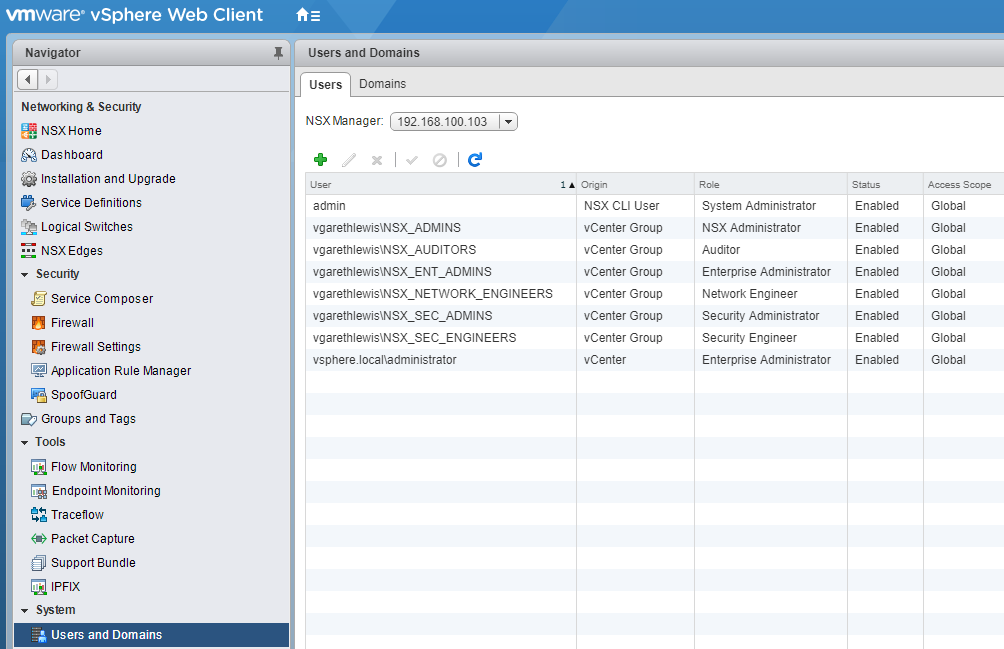
8. Confirm successful addition of all NSX Security Roles. At this point, you can assign further AD Users/Security Groups, disable or enable accordingly, and delete.
9. Log in to either the vSphere Web Client or vSphere HTML5 Client as a user associated to one of the newly added AD Security Groups and test access. Below I detail an example of both Auditor and Enterprise Administrator roles.
Here, the user is assigned the NSX Auditor Security Role.Here, the user is assigned the NSX Enterprise Administrator Security Role.
We use cookies to ensure that we give you the best experience on our website. If you continue to use this site we will assume that you are happy with it.