As the holiday season is almost upon us (just two days), why not finish with one final article in my vRNI series and an article that will likely finalise my blog posts for the year.
In my previous article (VMware vRealize Network Insight (vRNI) – Part 5 – Data Flow Analysis & Micro-Segmentation), we analysed collected data flows in vRNI to manually micro-segment an application utilising the VMware NSX-T Distributed Firewall (DFW). However, what if we want to automate this process? After all, applications that require a small number of firewall rules (such as the application used in the previous article) are rare.
This article looks at Martijn Smit‘s great script, which imports vRNI recommended firewall rules into VMware NSX-T Data Center via a Python script.
Full vRNI Series
- VMware vRealize Network Insight (vRNI) – Part 1 – Installation
- VMware vRealize Network Insight (vRNI) – Part 2 – Configuration
- VMware vRealize Network Insight (vRNI) – Part 3 – Identity & Access Management via LDAP
- VMware vRealize Network Insight (vRNI) – Part 4 – Application Discovery
- VMware vRealize Network Insight (vRNI) – Part 5 – Data Flow Analysis & Micro-Segmentation
- VMware vRealize Network Insight (vRNI) – Part 6 – Importing Recommended Firewall Rules into NSX-T via Python Script
By default, the imported rules will be in a disabled state, unless you opt to pass the –enablerules parameter when running the script. As a result, network traffic will not be impacted until you start enabling the firewall rules.
Note – While NSX-T security groups will be created based on the tier names defined within the vRNI application, this script will not populate the security groups with the respective VM or IP address members. For rules to apply to the appropriate source and destination objects, security group memberships should be populated.
Prerequisites
- Python 3.7 or above
- Requests, json, argparse, sys, requests, glob, os, xml.dom, xml.etree.Elementtree, getpass python libraries installed (see requests.txt for further details)
- Connectivity to the internet from where the script will be executed
- Connectivity to NSX-T Manager or VIP over HTTPS (443)
Step 1 – Download the Script
Firstly, we’ll need to download the script and all accompanying files via GitHub. Simply visit https://github.com/vrealize-network-insight/vrni-rule-import-vmc-nsxt.git and grab all the files.
Step 2 – Install Python
This article assumes you have already installed Python and it’s required modules, details for which are defined in the requirements.txt downloaded in conjunction with the above script.
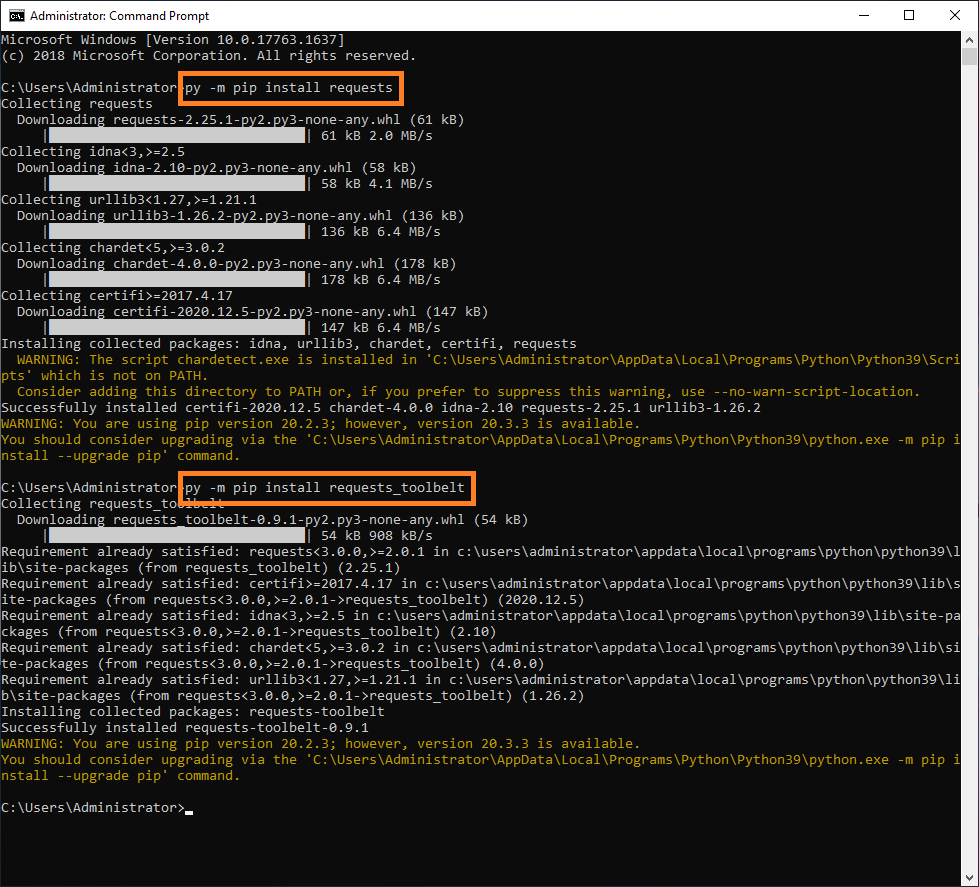
If you are yet to install Python, install the relevant release (see prerequisites above) and, as I’m using a Windows desktop, I launch a Command Prompt and install the required modules using the below commands.
py -m pip install requests
py -m pip install requests_toolbelt
Step 3 – Export vRNI Recommended Firewall Rules
In the previous article, we noted that just because traffic is observed, doesn’t mean it should be enabled. So why would we want to export all recommendations blindly? More on this later.
1. Login to vRNI and, via the search bar, enter the below criteria:
plan security of application 'Application Name'
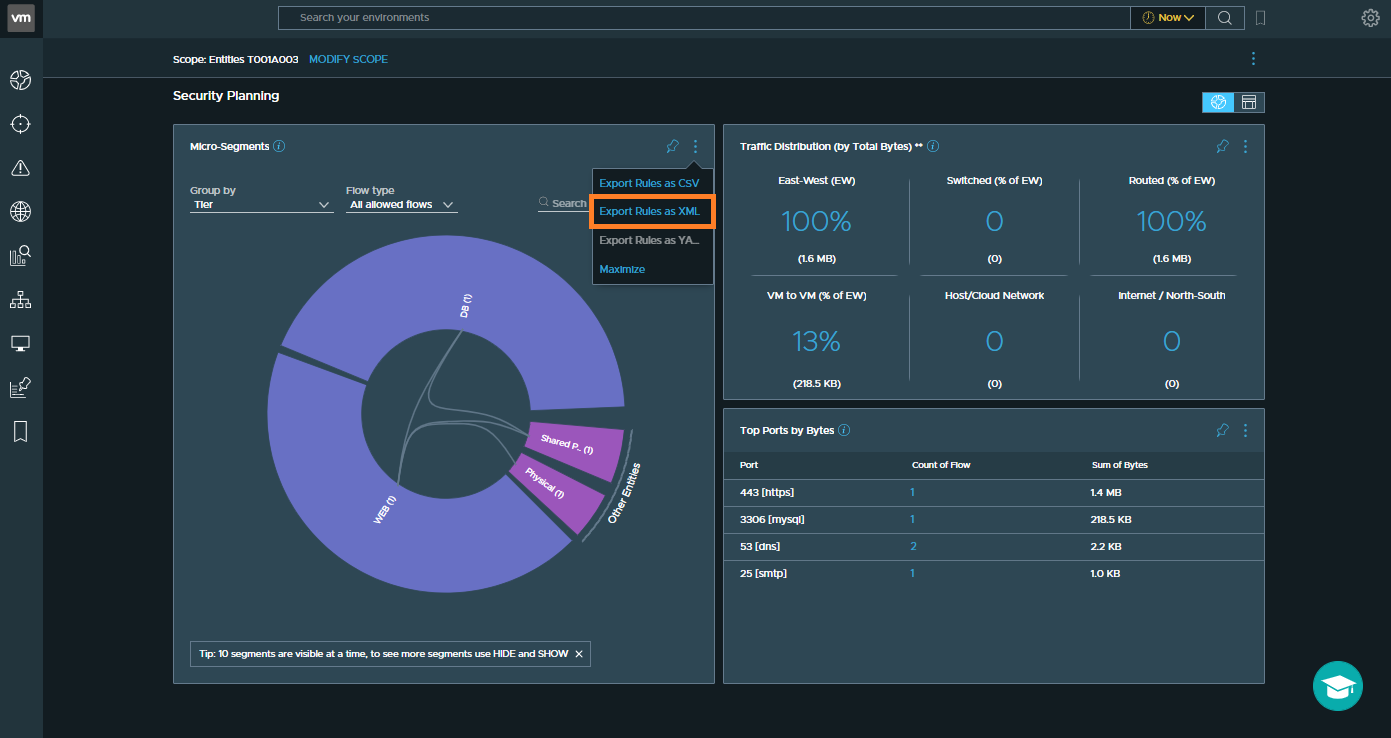
2. From the Micro-Segments section, click the three dots and click Export Rules as XML. In our scenario, we’ll download all recommendations and review in a later step.
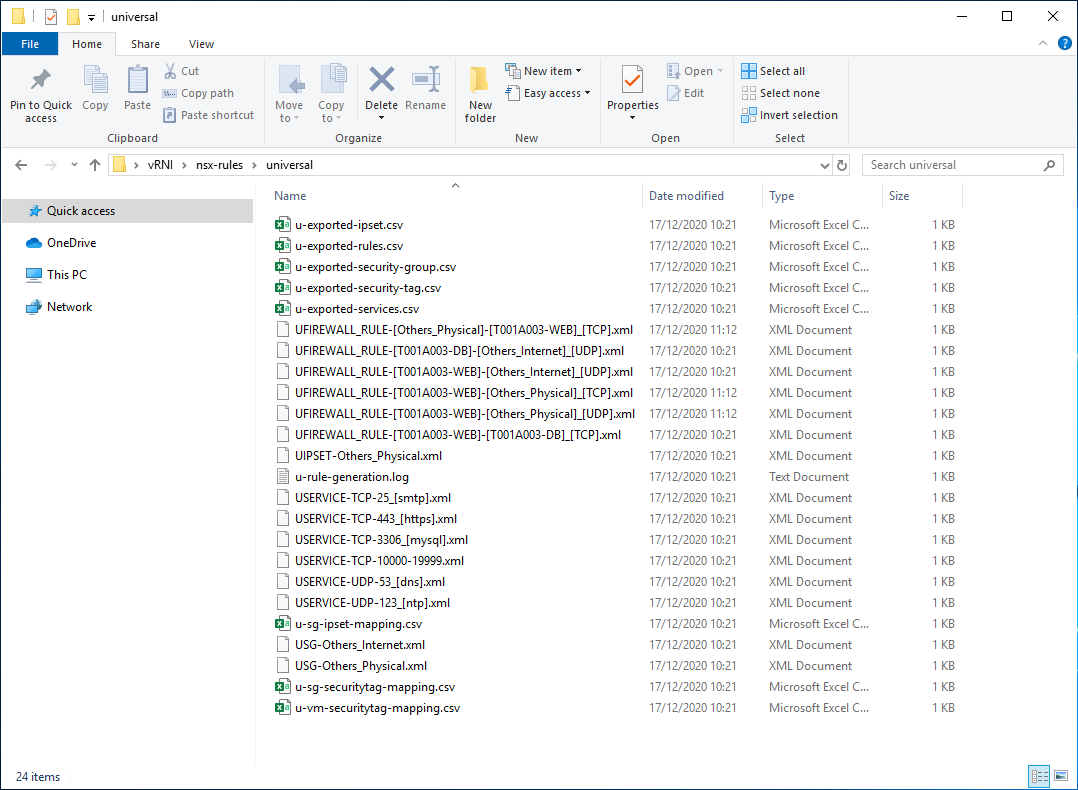
3. Extract the downloaded .zip file and let’s take a look at the contents. Browse to nsx-rules/universal and note the .xml files which define our firewall rules and services, as well as the .csv files which define security groups, security tags, services, etc.
Step 4 – Run the Python Script
1. Launch a Command Prompt and run the Python script. When prompted, enter the requested details to target either VMware NSX-T DFW or NSX on VMC.
py "Path-To-Python-Script" --rulefolder "Path-to-Rule-Folder" --appname "NSX-Policy-Name" --nsxturl "NSX-Manager-or-VIP-URL" --nsxtuser "NSX-Username"
Step 5 – Review and Enable NSX-T DFW Rules
1. Login to VMware NSX-T Data Center.
2. Browse to Inventory > Groups and review the security groups created by the script. Note that the security group names are appended with the text, -vRNI-Import-Tier, making searching for the automatically created groups easier. Add the respective VMs to the respective security group(s) as per the application topology.

3. Browse to Security > East West Security > Distributed Firewall and note the newly created DFW policy.
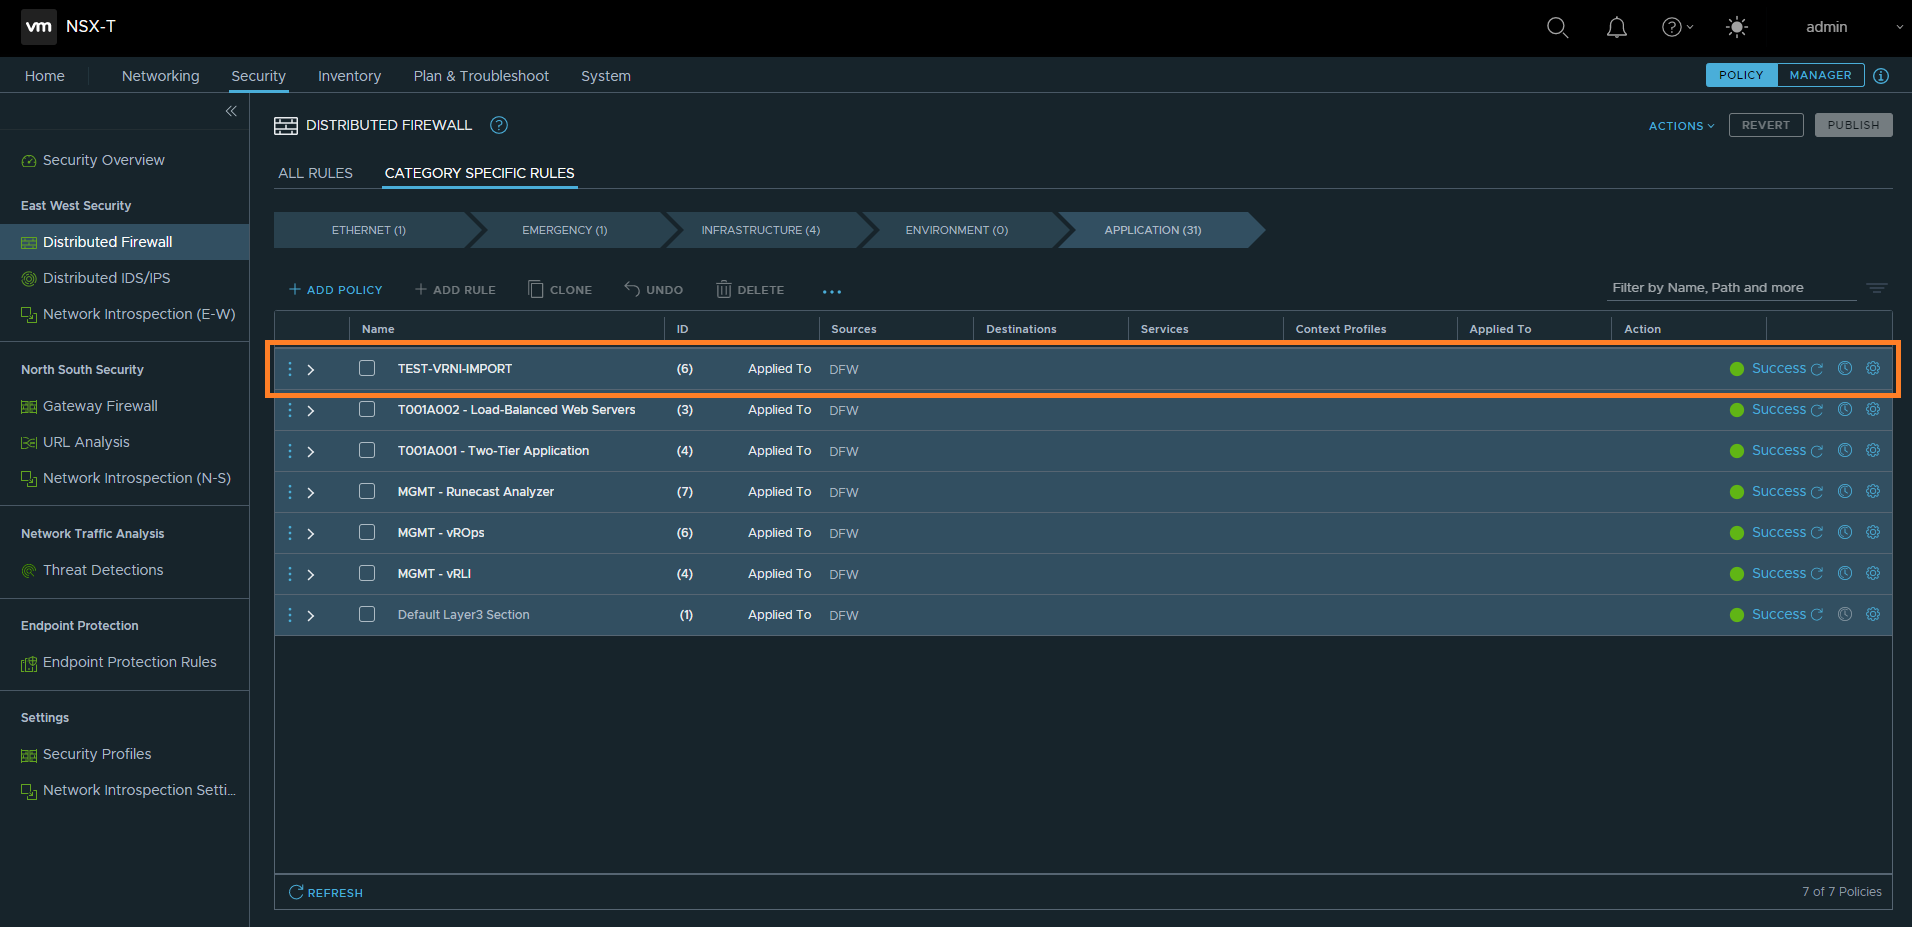
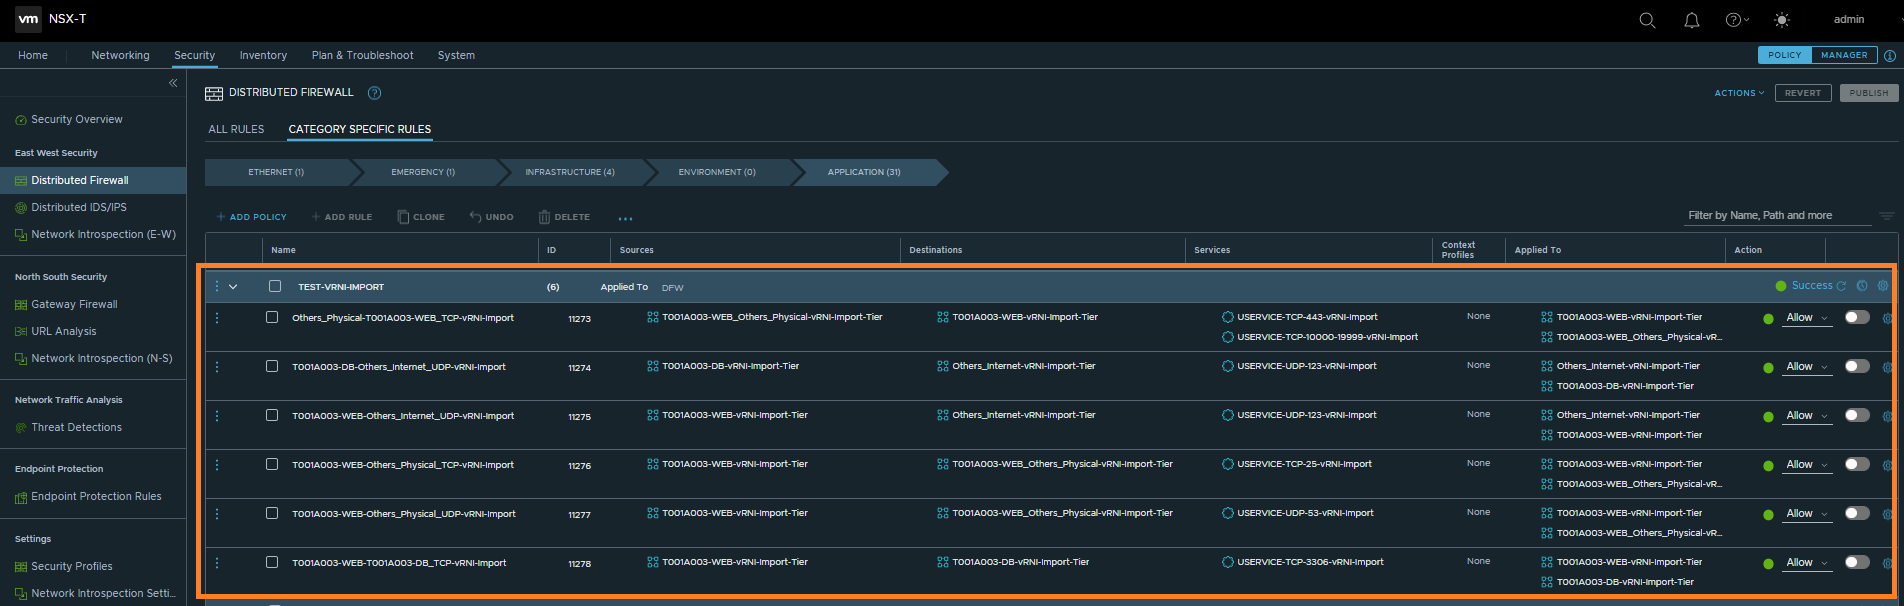
4. Expand the policy and review/validate all rules. Note that all rules are disabled as we did not use the –enablerules parameter when running the script. At this point, you have the option to edit or remove DFW rules.
5. Once you have validated the DFW rules, enable the rules and (as we are implementing micro-segmentation on a per-application basis (brownfield environment)) create inbound and outbound drop rules for all services to/from the application. Place these at the bottom of the policy and apply to all servers within the application.
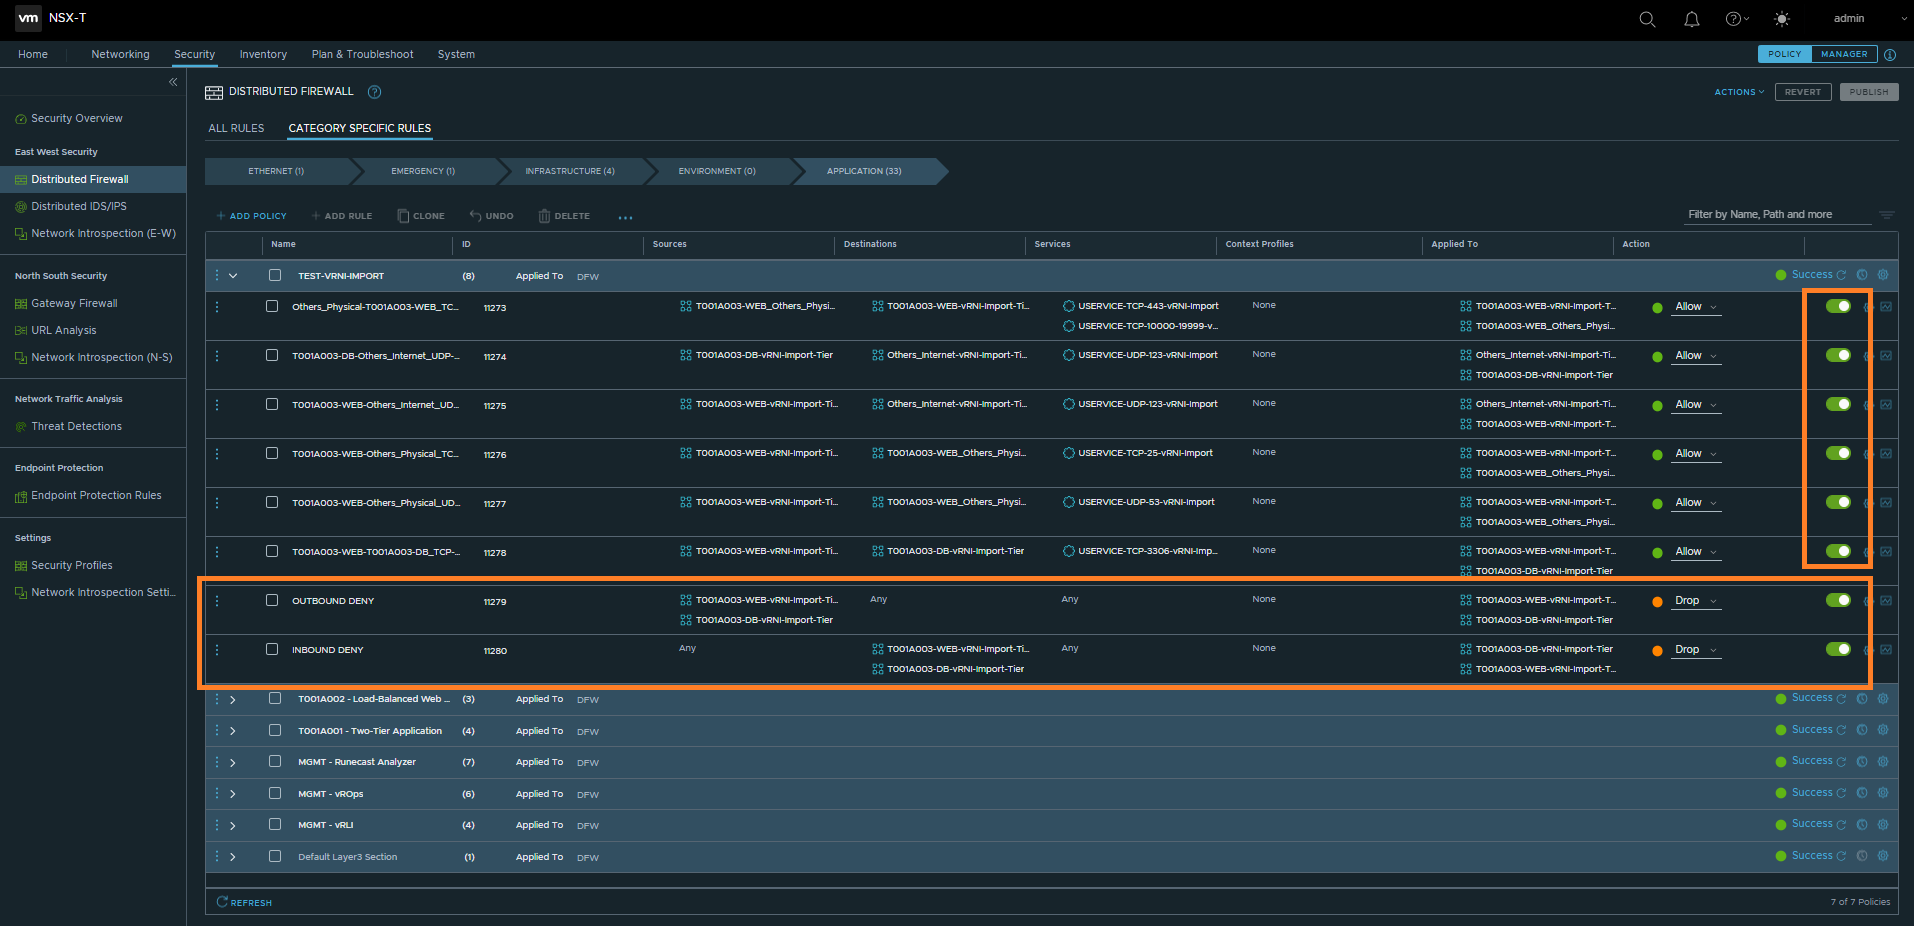
6. Finally, publish the DFW rules.
In Summary
In this article, we utilised Martijn Smit’s script to import vRNI recommended firewall rules to the NSX-T DFW.
In the previous article, and as mentioned above, we noted that just because traffic is observed, doesn’t mean it is valid. As such, you can see the importance of understanding your applications, their dependencies, and firewalling requirements.
This script will help a great deal when large numbers of firewall rules are required, however, it’s important these are reviewed and validated with the respective application owners before they are enabled.
We have now covered the manual and scripted process of creating NSX-T DFW rules based on vRNI data flow analysis. One final option exists, of course, and that is NSX Intelligence. More on this to follow in 2021.
Finally…
I’d like to wish you all a happy holiday season, and a huge thank you to all followers for your support and collaboration throughout this past year. Needless to say, 2020 has been a very different kind of year and, unfortunately for some, a very tough year indeed. Thank you to all readers, Xtravirt, VMware, and all within the tech community, vExpert and VMUG programs. Your support and comradery have been truly inspiring.
Further Reading/Viewing
- VMware Blogs – Importing Recommended Firewall Rules from vRealize Network Insight into VMware Cloud on AWS
- YouTube – Importing Recommended Firewall Rules from vRealize Network Insight into VMware Cloud on AWS
- Marijn Smit on Twitter
- GitHub – Martijn Smit – Import vRNI Recommended Firewall Rules
- Martijn Smit’s vRealize Network Insight Cookbook
Full vRNI Series
- VMware vRealize Network Insight (vRNI) – Part 1 – Installation
- VMware vRealize Network Insight (vRNI) – Part 2 – Configuration
- VMware vRealize Network Insight (vRNI) – Part 3 – Identity & Access Management via LDAP
- VMware vRealize Network Insight (vRNI) – Part 4 – Application Discovery
- VMware vRealize Network Insight (vRNI) – Part 5 – Data Flow Analysis & Micro-Segmentation
- VMware vRealize Network Insight (vRNI) – Part 6 – Importing Recommended Firewall Rules into NSX-T via Python Script
can I import exported firewall rules from a vRNI instance that has a production NSX-T integrated and importing those rules into a lab NSX-T that basically has very minimal config using the same script? I do get errors so i’m just wondering if it’s even possible to start with
That’s a good question, Sam, and something I’ve not tried. You’ve just added an item to my weekend lab ‘to do’ list 🙂
Hi Sam,
you can use AutoNSX (https://digitout.net/product/). It allows you to export from any to any, including crating groups and tags VMs
Yes this should work without issue. If you are having problems it is not related to the NSX-T Instance the recommendations is for, or the instance you’re actually applying the rules towards.
I’m hitting the same issue as sam. With an existing config this script errors out for me to
Hi Andre
Try AutoNSX (https://digitout.net/product/).
If you are having problems it is not related to the NSX-T Instance the recommendations is for, or the instance you’re actually applying the rules towards. There is likely something else missing thats tripping up the script from running.
To fully automate script import, you can use a tool called AutoNSX (https://digitout.net/services/autonsx/ or this link with short demo https://digitout.net/product/autonsx-protectapp/). Using this tool all VMs are tagged and all members including physical IPs are added to the NSX. User can define unified global rules that can be applied on top of the vRNI rules. User can enrich rules from vRNI by adding conditions and criteria to match.
I ran the script and it imported rules in NSX-T but IP address is not imported and rules sits without any VM/IP address. Am I missing something ?
Hi Manikandan. That’s correct, and I mention in a note early in the article that “Note – While NSX-T security groups will be created based on the tier names defined within the vRNI application, this script will not populate the security groups with the respective VM or IP address members. For rules to apply to the appropriate source and destination objects, security group memberships should be populated.” The population of the groups will need to take place post-migration.
It’s been almost a couple of years since I wrote this post, so I’m eager to take a look if the script has changed in any way.
Thanks for your valuable response on this. We have NSX-T in Azure AVS environment where IP intelligence cannot activate it. So we rely with vRNI tool to monitor the traffic logs and based on it the DF rules need to create it. Any other solution for achieve this ?
Apologies for the delay Manikandran, but if you’re using vRNI already, that’s the tool I’d be using. To support vRNI though, vRLI can also be used. A full write-up on application dependency mapping via vRLI is available via https://www.vgarethlewis.com/2021/11/24/vmware-nsx-t-micro-segmentation-via-vrealize-log-insight/
hello Gareth
i got stuck here. could you please give a hint ?
Traceback (most recent call last):
File “C:\Users\Changed\vrni-rule-import-vmc-nsxt\vRNI_DFW_Rule_to_VMC_and_NSXT_Import.py”, line 591, in
VMCRuleImport().main()
File “C:\Users\Changed\vrni-rule-import-vmc-nsxt\vRNI_DFW_Rule_to_VMC_and_NSXT_Import.py”, line 159, in main
self.createfirewallrulesection()
File “C:\Users\Changed\vrni-rule-import-vmc-nsxt\vRNI_DFW_Rule_to_VMC_and_NSXT_Import.py”, line 460, in createfirewallrulesection
self.sectionid = fwrulesection[“id”]
~~~~~~~~~~~~~^^^^^^
Hi Gareth,
Your blog has been extremely helpful in helping me get through a microseg project. I just have one query to you. Do you find the rules that VRNI outputs almost over complicate the requirements? When things like ephermal ports get used you find it makes multiple rules when those rules could be reduced to 1 for all application traffic regarding the ephermal ports. That’s just an example but personally I use VRNI as a reference point and build the rules manually with the knowledge of the environment. I understand the product doesn’t have my knowledge but the rule set is just wild in some cases. Let me know your thoughts.
Hi BM, I fully support you in this regard. vRNI gives you tons of rules and you have to filter them. In my work with NSX rules I have used tool called AutoNSX (https://digitout.net/product/). This tool allows you to build/put your knowledge of the environment inside as a blueprint and set of conditions. So when you run segmentations it will connect to vRNI/NSX and take your blueprint and apply to suggest rules in vRNI. This will give less amount of rules to be implemented in NSX. You don’t have to implement them manually AutoNSX will provision rules in automated fashion and apply deduplication algorithm. This way your knowledge of the environment will apply and it will speeds up the entire segmentation process. Check it… it’s very useful.