In the previous articles in this series, we covered the installation (VMware vRealize Network Insight (vRNI) – Part 1 – Installation) and configuration (VMware vRealize Network Insight (vRNI) – Part 2 – Configuration) of vRealize Network Insight, before integrating vRNI with Microsoft Active Directory via LDAP (VMware vRealize Network Insight (vRNI) – Part 3 – Identity & Access Management via LDAP).
In this article, we will dive a little deeper and begin looking at how we can define our applications and, in Part 5 (VMware vRealize Network Insight (vRNI) – Part 5 – Data Flow Analysis & Micro-Segmentation), begin analysing the collected data flows to implement micro-segmentation via the NSX-T Distributed Firewall.
Full vRNI Series
- VMware vRealize Network Insight (vRNI) – Part 1 – Installation
- VMware vRealize Network Insight (vRNI) – Part 2 – Configuration
- VMware vRealize Network Insight (vRNI) – Part 3 – Identity & Access Management via LDAP
- VMware vRealize Network Insight (vRNI) – Part 4 – Application Discovery
- VMware vRealize Network Insight (vRNI) – Part 5 – Data Flow Analysis & Micro-Segmentation
- VMware vRealize Network Insight (vRNI) – Part 6 – Importing Recommended Firewall Rules into NSX-T via Python Script
Before we start, let’s talk about the data vRealize Network Insight collects. In a nutshell, vRNI collects a lot of data. Like, all of it. We have the option to interrogate this tide of data by simply working through the collected data flows; however, the power of vRNI is in its ability to identify applications and visualise the traffic flows between and within each application, as well as the flows connecting to and from the physical world.
Defining our applications can be quite a simple process, the discovery process for which can be approached via several options:
- Option 1 – Manually, by selecting the virtual machines which make-up an application.
- Option 2 – Dynamically by utilising vSphere or AWS tags and/or custom attributes.
- Option 3 – Dynamically by defining a VM naming convention.
- Option 4 – Integration with a Configuration Management Database (CMDB) (e.g., ServiceNow).
This article will detail options 1-3, and will not cover CMDB integration.
To jump to the relevant section(s), simply click the below links:
- Adding an Application Manually
- Application Discovery Using vSphere Tags and/or Custom Attributes
- Application Discovery Using Naming Conventions
Option 1 – Adding an Application Manually
Firstly, let’s take a look at the manual option, perfect for quickly defining small applications.
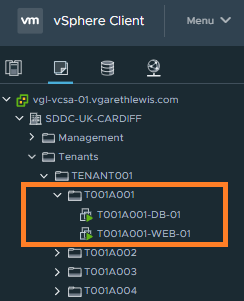
In this example, I define a simple, two-tier application called T001A001. The application consists of the below virtual machines:
- Tier 1 – WEB
- T001A001-WEB-01 (Apache Web Server)
- Tier 2 – DB
- T001A001-DB-01 (MySQL Server)
From a vSphere perspective, the application VMs are housed within a single VM Folder.
To define this application manually in vRNI, let’s follow the below process.
1. Firstly, login to vRNI and browse to Plan & Assess > Applications.
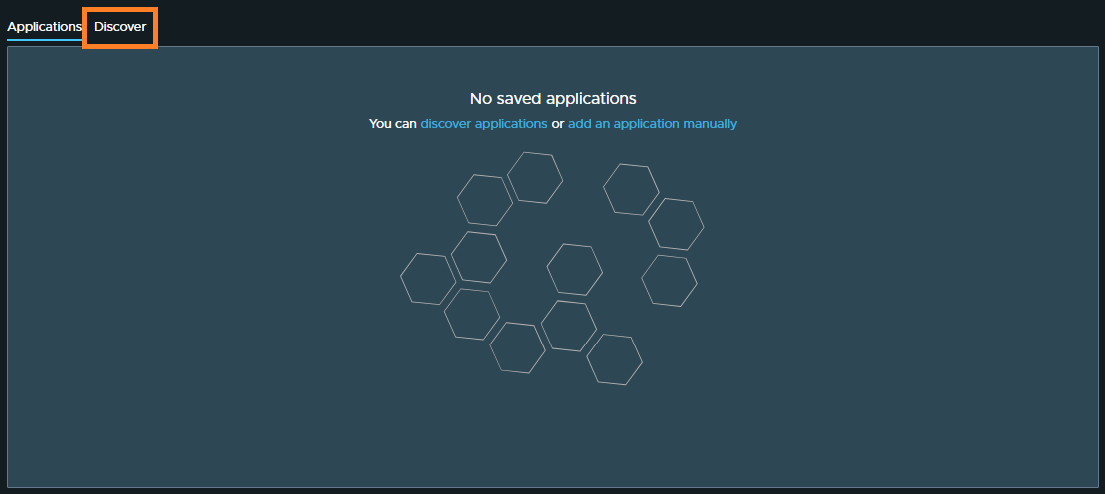
2. Click Add an application manually.

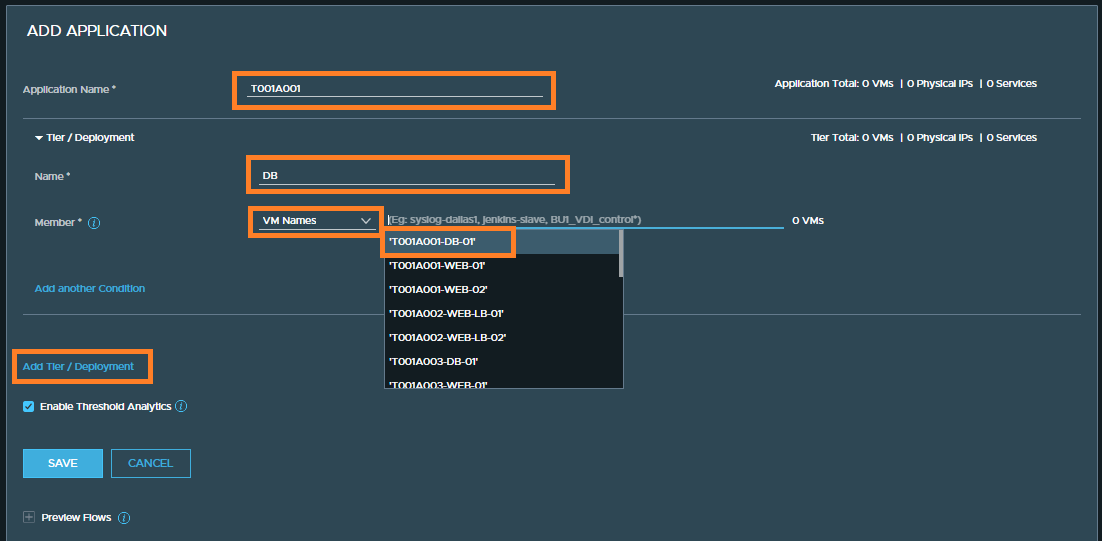
3. From the Add Application window, give your application a name and, under the Tier/Deployment section, assign an appropriate Tier Name. From the Member drop-down menu, select VM Names and select the VM(s) which make up the first tier. Once added, click Add Tier/Deployment to add all other tiers and their respective VMs.
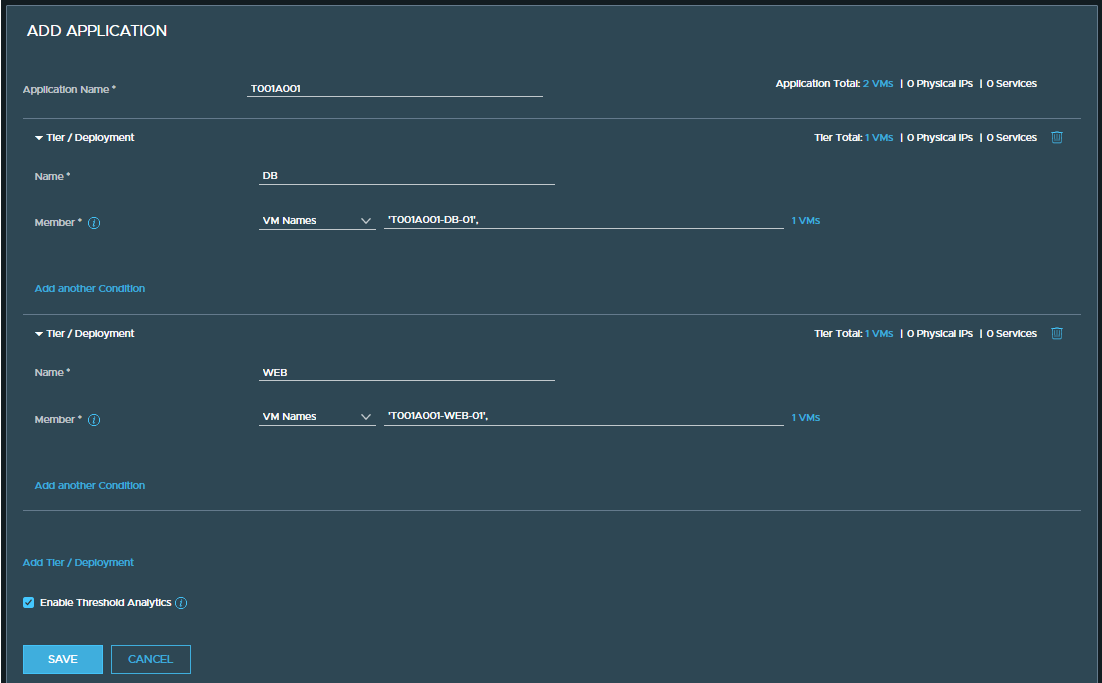
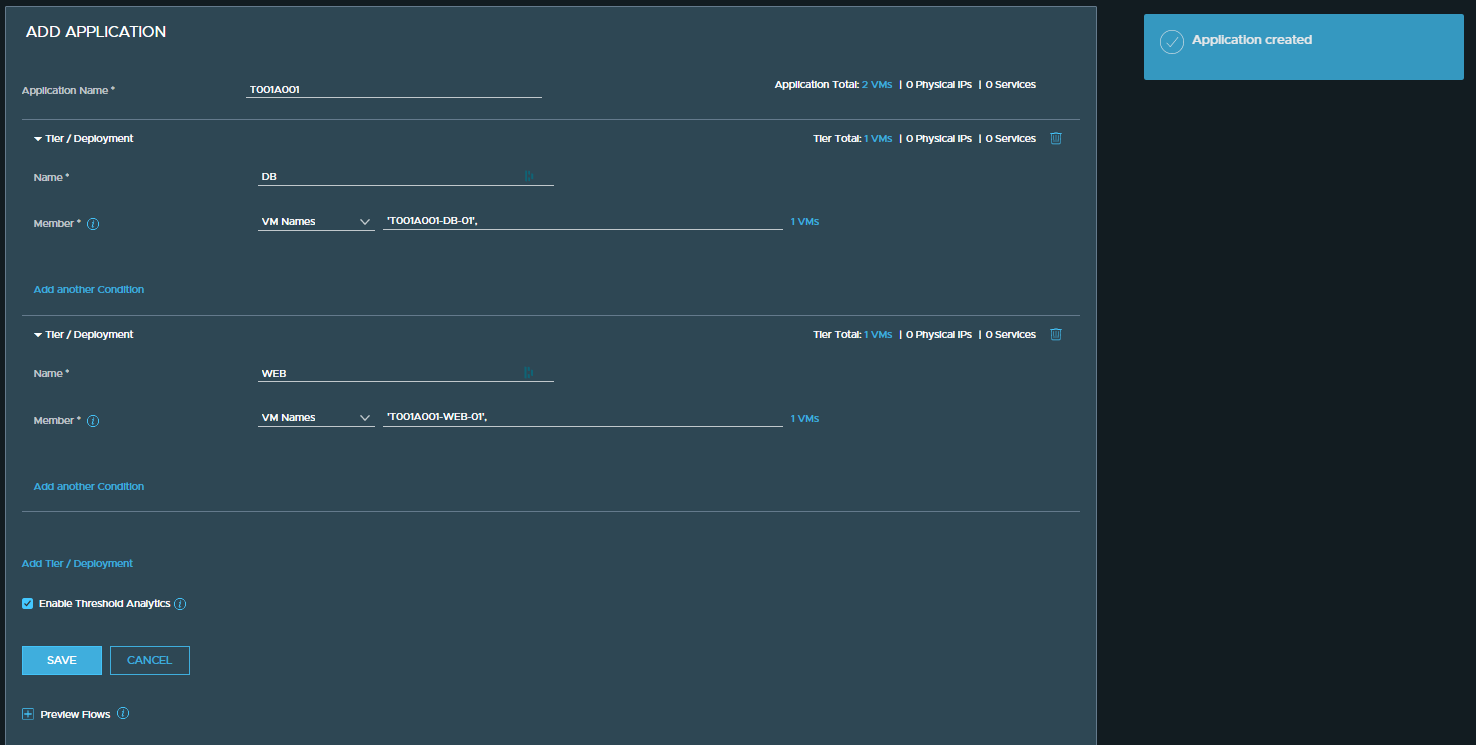
4. From the below configuration, you can see I have defined both Web and DB tiers, and the VM for each tier has been assigned accordingly. When ready, click Save.
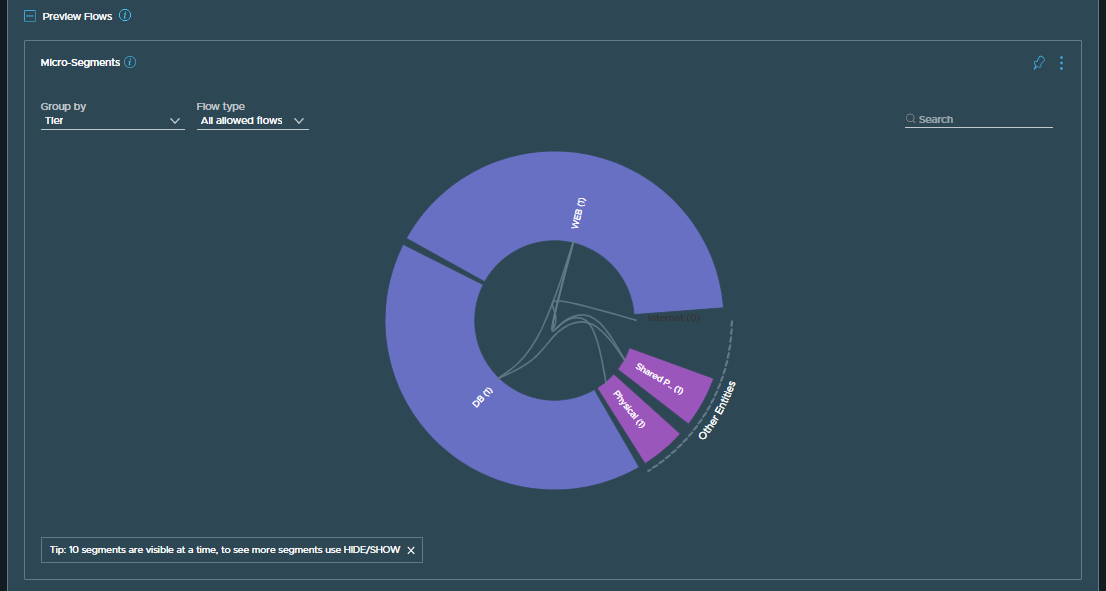
5. Now that the application has been saved, we have the option to preview the collected flows by expanding the Preview Flows section.
6. Once the Preview Flows section is expanded, we are presented with our collected data, neatly organised by each application tier.
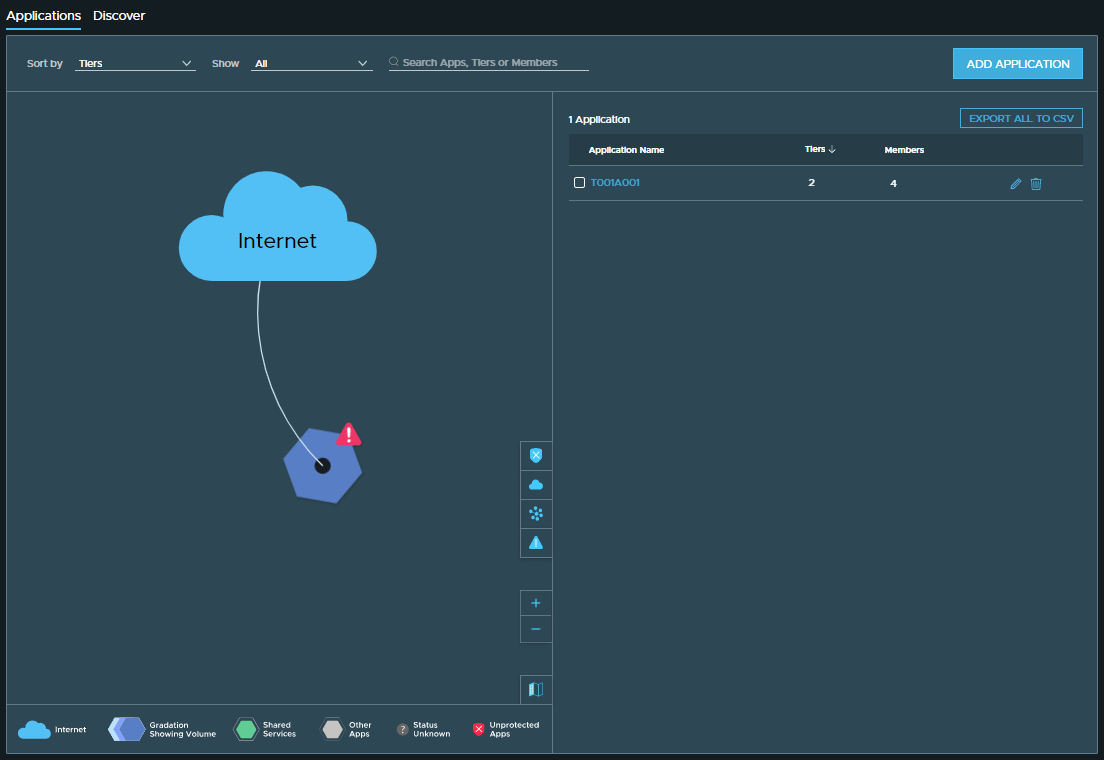
7. Finally, browse to Plan & Assess > Applications, and you’ll see our newly added application, T001A001.
Note the number of Tiers (DB and WEB), as well as the number of Members. You might remember that we only added two VMs, so why are there four members? This is because there are four entities – 2x VMs, and 2x physical IPs.
As you saw in the above process, adding applications manually is a quick and easy task. Some applications, however, may consist of hundreds of VMs with more than two tiers, so you can see where the manual process will quickly become unworkable.
Option 2 – Application Discovery Using vSphere Tags and/or Custom Attributes
Note – In readiness for the below scenario, all previously created applications have been removed.
One of the options afforded to us when defining multiple applications consisting of multiple VMs and/or Tiers is to utilise vSphere tags and/or Custom Attributes.
In this second scenario, we will add multiple applications by calling on the vSphere Custom Attributes which have been assigned to numerous VMs.
Note – Using vSphere tags is just as easy, and I refer to where you would use these in the below procedure.
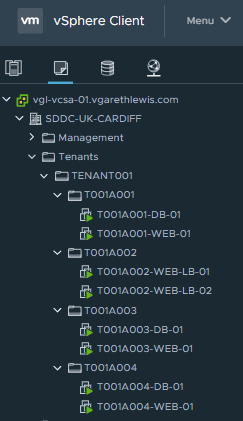
From a vSphere perspective, you can see our four tenant applications in the below screenshot, each of which has been housed in its own VM Folder.
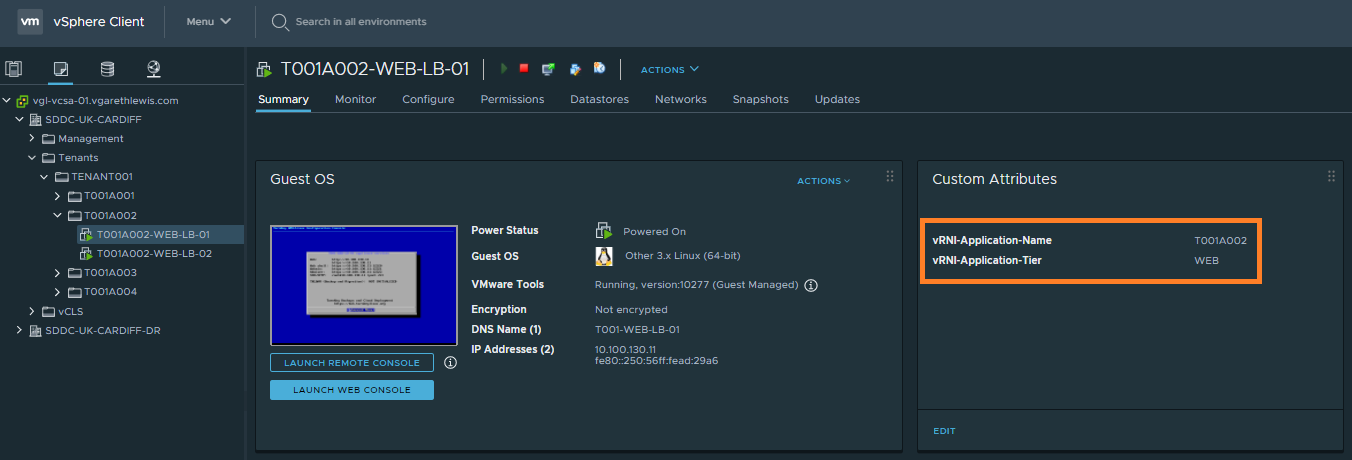
Within vSphere, two Custom Attributes have been created (vRNI-Application-Name and vRNI-Application-Tier). These have been assigned to all VMs, the details for which have been configured with the relevant Application Name and Application Tier.
Alternatively, feel free to assign vSphere tags instead of the custom attributes at this step if you so wish.
1. Within vRNI, browse to Plan & Assess > Applications, and click the Discover tab.
2. Ensure the Tags tab is selected.
3. In Section 1 (Scope), select All VMs (you can narrow the scope by defining, for example, a VM Folder, etc., if you so wish).
In Section 2 (Group Applications by) select the vSphere Custom Attribute, vRNI-Application-Name.
In section 3 (Group Tiers by) select the vSphere Custom Attribute, vRNI-Application-Tier.
Note – If using vSphere tags instead of Custom Attributes, select the relevant tags at this stage.
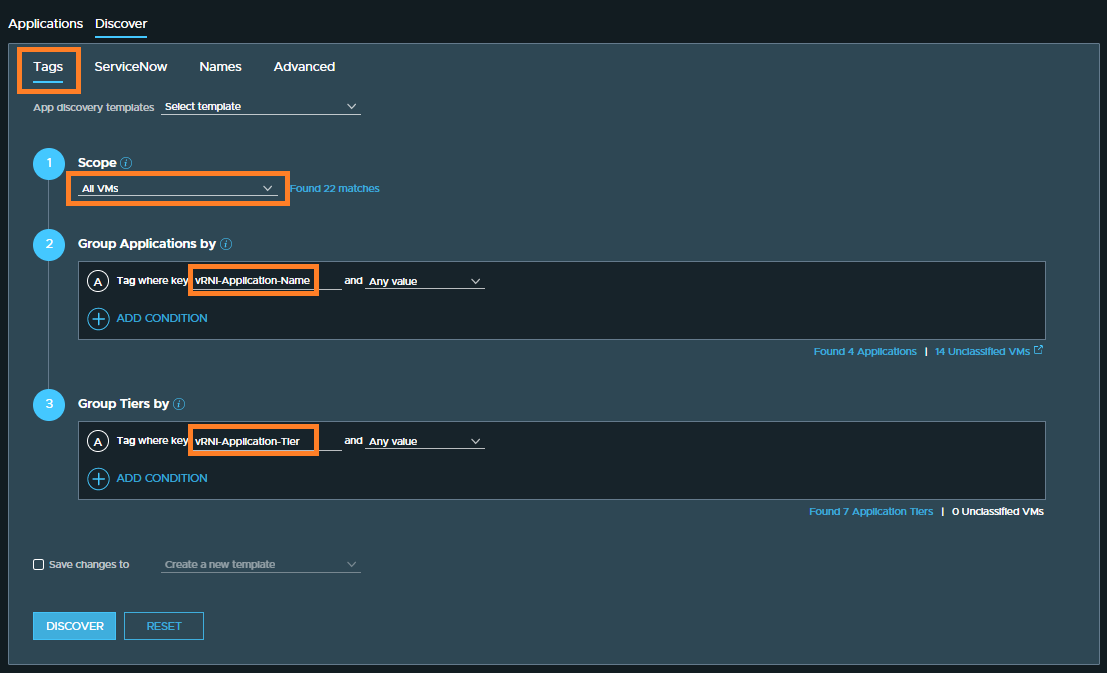
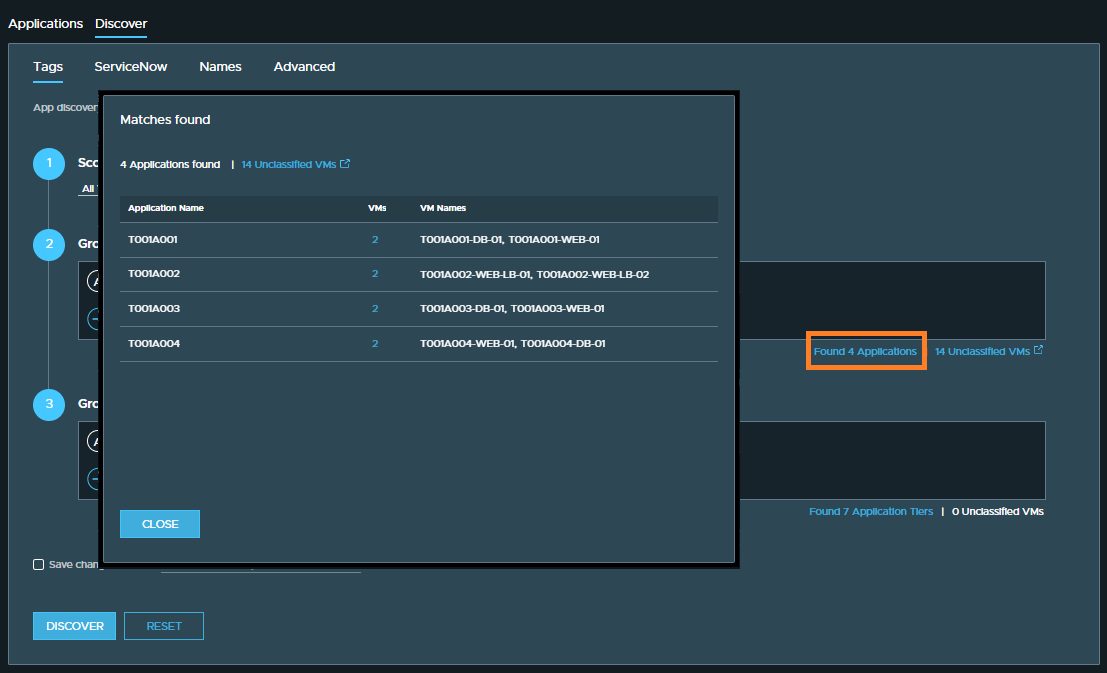
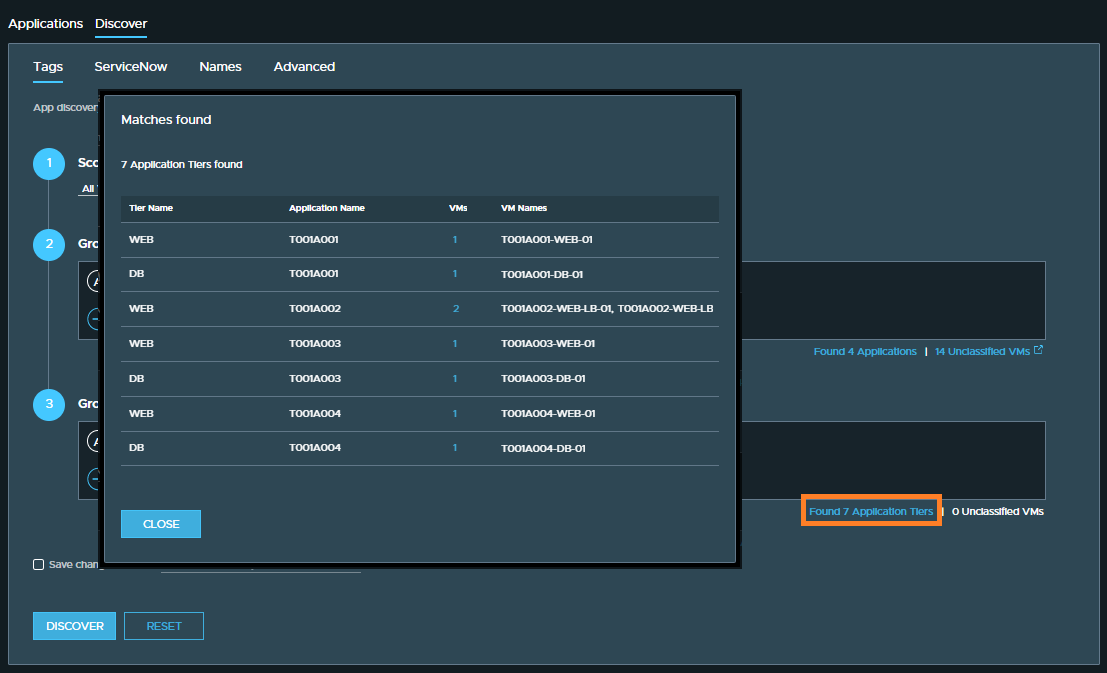
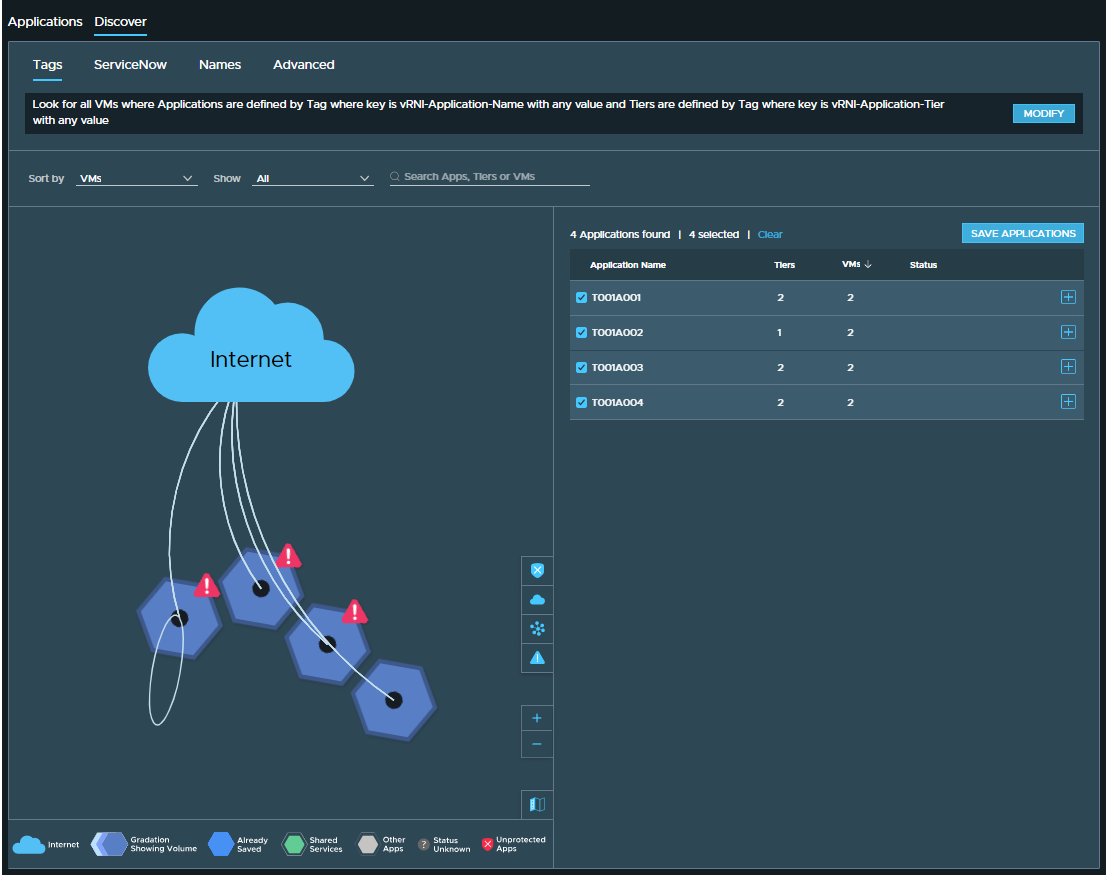
4. Note the number of ‘found applications’ and ‘found application tiers’ identified. If required, click the relevant link to review.
5. Finally, after clicking Discover, all four applications are successfully identified and listed ready to be saved.
Note – Should you notice a misconfiguration in your application definition, click the Modify button to amend and resubmit.

5. When ready, select all of the discovered applications and click Save Applications.
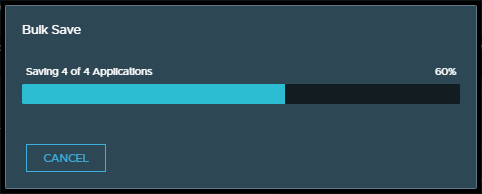
6. When prompted to bulk save and enable threshold analytics, click Confirm.

7. Note the bulk save progress and, when prompted, click Close.

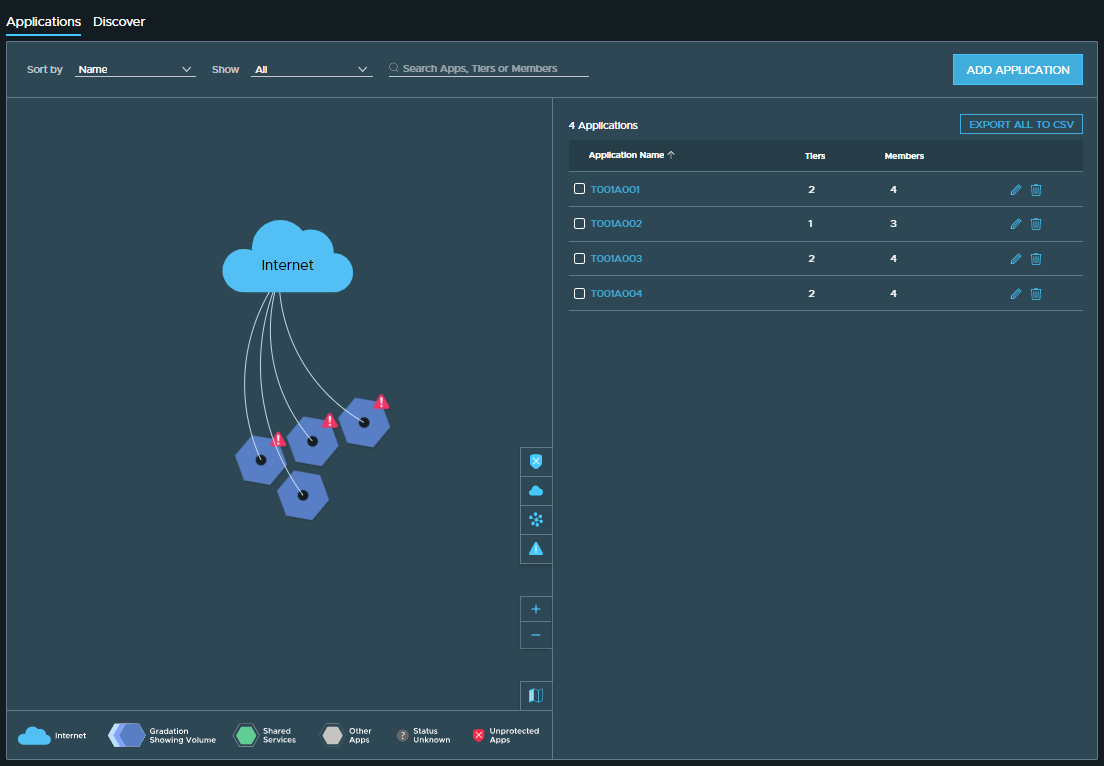
8. Browse back to the Applications tab and note the successful (and automated) addition of all applications based on vSphere Custom Attributes (or tags).
Option 3 – Application Discovery Using VM Naming Conventions
Note – In readiness for the below scenario, all previously created applications have been removed.
In this final scenario, we will look at defining our applications by a VM naming convention. This scenario assumes that you indeed have a naming convention in place and, as such, my VMs are named using the below naming convention:
<APPLICATION-NAME>-<TIER-NAME>-<XX>
1. Within vRNI, browse to Plan & Assess > Applications, and click the Discover tab.
2. Ensure the Names tab is selected.
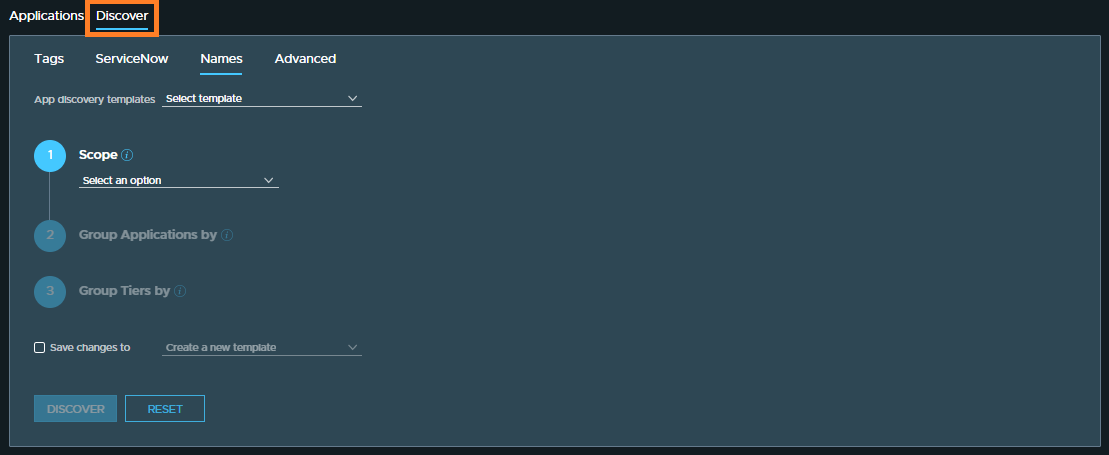
3. In Section 1 (Scope), select All VMs (you can narrow the scope by defining, for example, a VM Folder, etc., if you wish).
In Section 2 (Group Applications by) click the Pattern Builder button to begin defining the application naming convention.

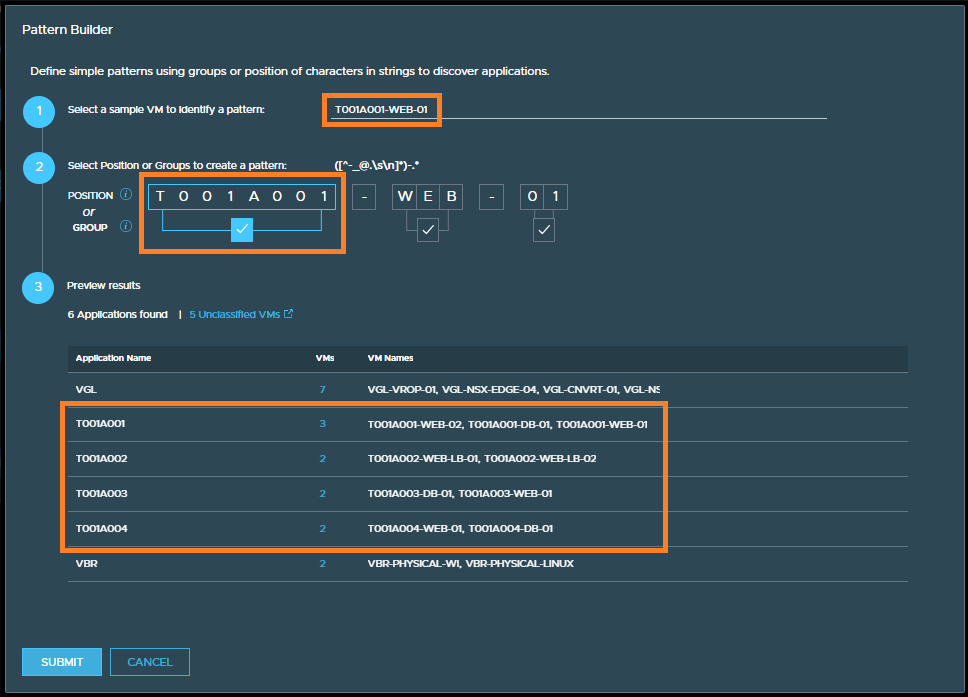
4. In the Pattern Builder dialogue box, we will define our application by using the naming convention defined above.
In Section 1 (select a sample VM to identify a pattern) select a suitable VM and, in Section 2 (select Position or Groups to create a pattern), I select the entire first element (group) of the VM name by clicking the appropriate ‘tick’. Review Section 3 (preview results) and note the inclusion of our four applications.
When ready, click Submit.
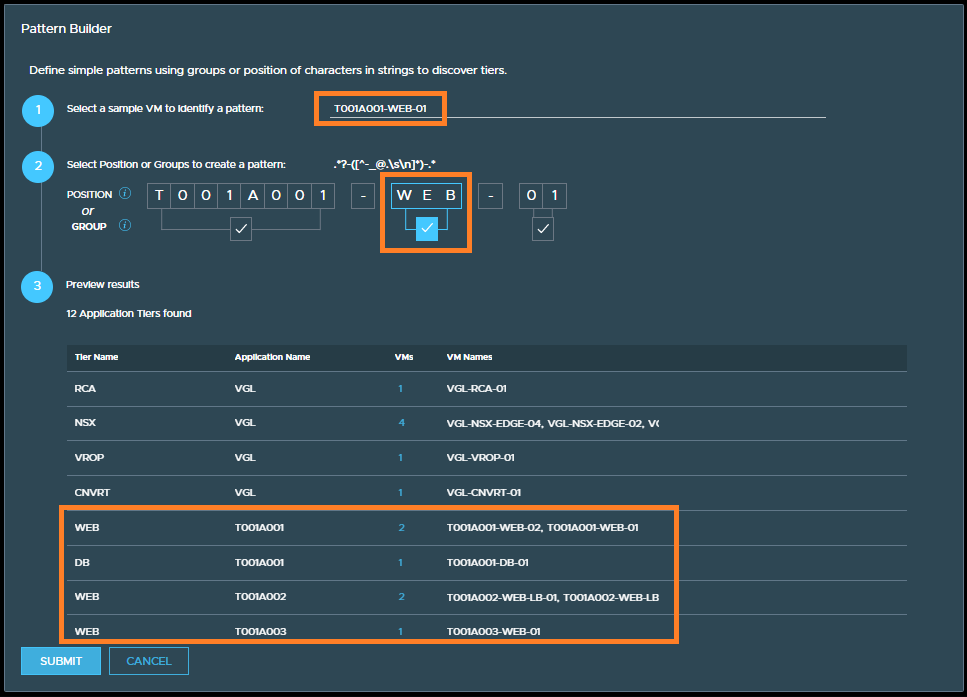
5. Now that we have defined the Regex for our application, we will use the Pattern Builder again to define the application tier. In Section 3 (Group Tiers by), click the Pattern Builder button.

6. Similarly to step 4 above, select the same VM and, this time, select the second element of the VM name, which defines the VM’s application tier. Once again, note the inclusion of our application tiers.
When ready, click Submit.
7. Now that we’ve defined the naming convention for our applications and application tiers via the Pattern Builder, the relevant Regex is displayed. When ready, click Discover.
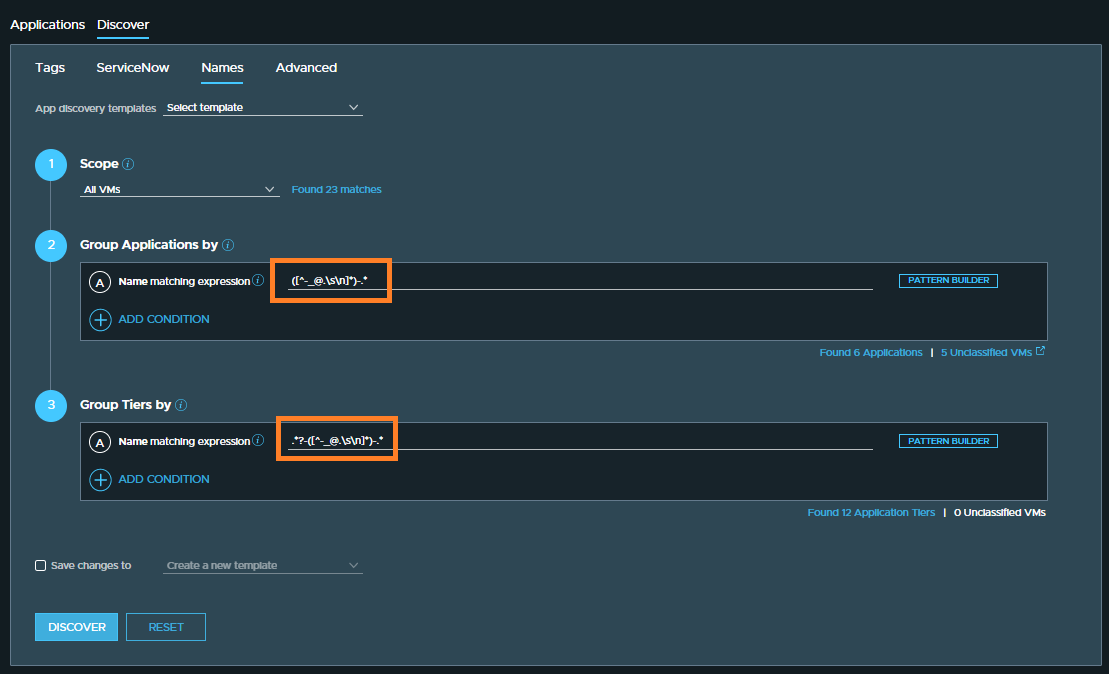
8. Back at the Discover screen, you’ll note the inclusion of our applications along with several unrequired ‘applications’. This is because we selected All VMs in our defining scope and, as such, these can be ignored.
When ready, select the relevant applications and click Save Applications.
Note – Should you notice a misconfiguration in your application definition, click the Modify button to amend and resubmit.

9. Note the bulk save progress and, when prompted, click Close.

10. Browse back to the Applications tab and note the successful (and automated) addition of all applications based on the VM naming convention.

In Summary
In this article, we defined multiple applications, both manually and via several automated options. Hopefully, this post has enabled you to see the power of the automated methods; however, in reality, no customer has one single naming convention…these tend to change naturally and as teams discover new/better naming methods, etc.
That said, you have the option of using either naming convention, or vSphere Tags/Custom Attributes where they are most appropriate and, for smaller applications, you can quickly define an application and its tiers manually.
As we have defined our applications, we are ready for Part 5 (VMware vRealize Network Insight (vRNI) – Part 5 – Data Flow Analysis & Micro-Segmentation), in which we will begin analysing the data flows in order to define the required NSX-T Distributed Firewall rules for micro-segmentation.
Further Reading
- VMware Docs – vRNI – Create an Application Manually
- VMware Docs – vRNI – Application Discovery
- vRealize Network Insight Cookbook, by Martjin Smit
Full vRNI Series
- VMware vRealize Network Insight (vRNI) – Part 1 – Installation
- VMware vRealize Network Insight (vRNI) – Part 2 – Configuration
- VMware vRealize Network Insight (vRNI) – Part 3 – Identity & Access Management via LDAP
- VMware vRealize Network Insight (vRNI) – Part 4 – Application Discovery
- VMware vRealize Network Insight (vRNI) – Part 5 – Data Flow Analysis & Micro-Segmentation
- VMware vRealize Network Insight (vRNI) – Part 6 – Importing Recommended Firewall Rules into NSX-T via Python Script
Leave a Reply