vSAN deployments in brownfield environments are simple. New hosts are configured based on projected workloads (plus points for utilising vSAN Ready Nodes), they’re purchased, racked, built, and absorbed into an existing vCenter workload domain before vSAN is finally enabled and configured. But how would we deploy vSAN into a greenfield environment? An environment with no vCenter, no shared storage, but only brand new ESXi hosts with valid (yet unconfigured) cache and capacity vSAN disks? As vSAN is reliant on vCenter for its operations, we seemingly have a chicken-and-egg scenario.
In this article, I detail the process of deploying (Stage 1) and configuring (Stage 2) a vCenter Server Appliance into a greenfield environment and, more specifically, onto a single-node vSAN cluster in hybrid-mode (Note – this is in no way supported by VMware for anything other than deploying vCenter and vSAN into a greenfield environment). I then add additional hosts to the cluster and configure vSAN storage and networking via the brilliant Cluster Quickstart tool (Stage 3), before applying a vSAN VM Storage policy to the vCenter Server Appliance (Stage 4). Once complete, our vSAN cluster will be ready to host live workloads.
Before we jump into the vCenter deployment, let’s take a look at our environment and a few prerequisites.
Environment Prerequisites
My environment has access to both DNS and NTP services. DNS records (forward and reverse) have been created for the vCenter Server Appliance and all vSphere Hosts (ESXi). This is a requirement than cannot be circumvented.
vSAN Prerequisites & Pre-Reading
I would advise a little pre-reading to ensure your vSphere Hosts (ESXi) are compatible. Please visit the VMware Docs Hardware Requirements for vSAN article for the full list of hardware requirements. A number of the key points are detailed below:
Cluster Requirements
- The vSAN cluster must contain a minimum of three ESXi hosts and must contribute local storage (four or more is recommended).
- Hosts residing in a vSAN cluster must not participate in other clusters.
Networking Requirements
- Hybrid Configurations – Minimum one 1 Gbps physical NIC (per host) dedicated to vSAN.
- All Flash Configurations – Minimum one 10 Gbps physical NIC (per host) dedicated to vSAN.
- All hosts must be connected to a Layer 2 or Layer 3 network.
- Each ESXi host in the cluster must have a dedicated VMkernel port, regardless of whether it contributes to storage.
Storage Requirements
- Cache Tier:
- Minimum one SAS or SATA solid-state drive (SSD) or PCIe flash device.
- Capacity Tier:
- Hybrid Configurations – Minimum one SAS or NL-SAS magnetic disk.
- All Flash Configurations – Minimum one SAS or SATA solid-state (SSD) or a PCIe flash device.
- A SAS or SATA HBA, or a RAID controller set up in non-RAID/pass-through or RAID 0 mode.
- Flash Boot Devices: When booting a vSAN 6.0 enabled ESXi host from a USB or SD card, the size of the disk must be at least 4 GB. When booting a vSAN host from a SATADOM device, you must use a Single-Level Cell (SLC) device and the size of the boot device must be at least 16 GB.
ESXi/vSAN Node Disk Configuration
Each of my vSAN nodes (of which there are three) has been configured with the below disk layout:
- 1x 20 GB (ESXi)
- 1x 50 GB SSD (vSAN Cache)
- 2x 500 GB HDD (vSAN Capacity)
Network Configuration
Conforming to the vSAN Network Requirements, we will use a dedicated network for vSAN traffic. Likewise, Management and vMotion traffic will also be segregated to their own network segments. As such, each vSAN node has been assigned six (6) NICs (two per service). vMotion and vSAN NICs will be configured in Stage 3 of this article via the Cluster Quickstart tool.
| VGL-ESX-MGMT-01 | VGL-ESX-MGMT-02 | VGL-ESX-MGMT-03 | |
| Management (vmnic0/vmnic1) |
10.0.0.111 | 10.0.0.112 | 10.0.0.113 |
| vMotion (vmnic2/vmnic3) |
10.0.1.111 | 10.0.1.112 | 10.0.1.113 |
| vSAN (vmnic4/vmnic5) |
10.0.2.111 | 10.0.2.112 | 10.0.2.113 |
Stage 1: Deploy vCenter Server Appliance with an Embedded Platform Services Controller
In this first stage we deploy a vCenter Server Appliance to an individual vSphere Host (ESXi). Part of this process will see the vSphere Host’s disks configured as a vSAN datastore.
1. First, download and mount the VMware vCenter Server Appliance ISO.
2. Browse to vcsa-ui-installer\win32\ and launch the installer.exe.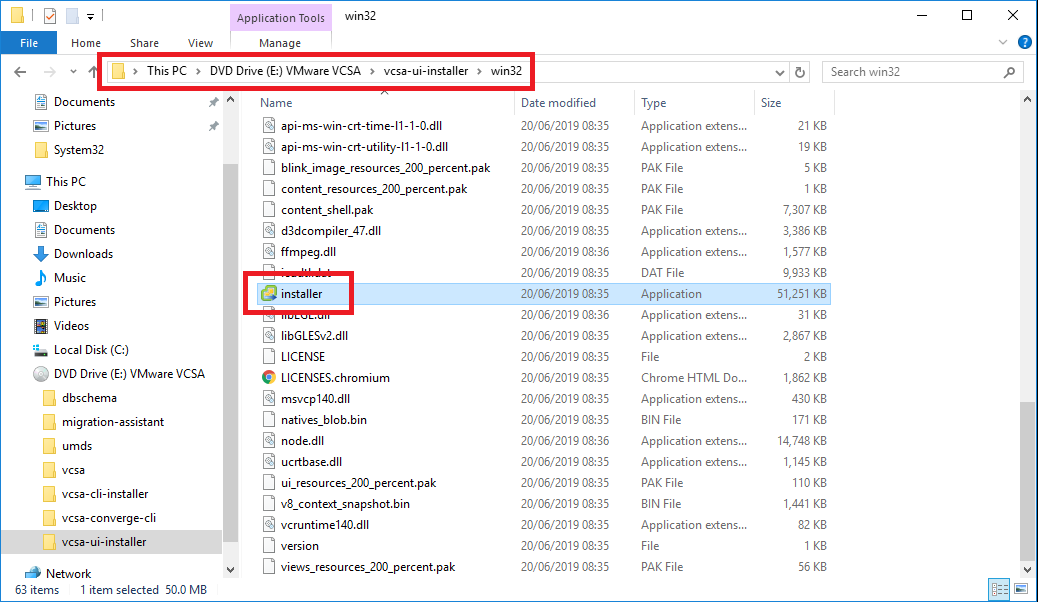
3. Click Install to begin the vCenter Server Appliance deployment.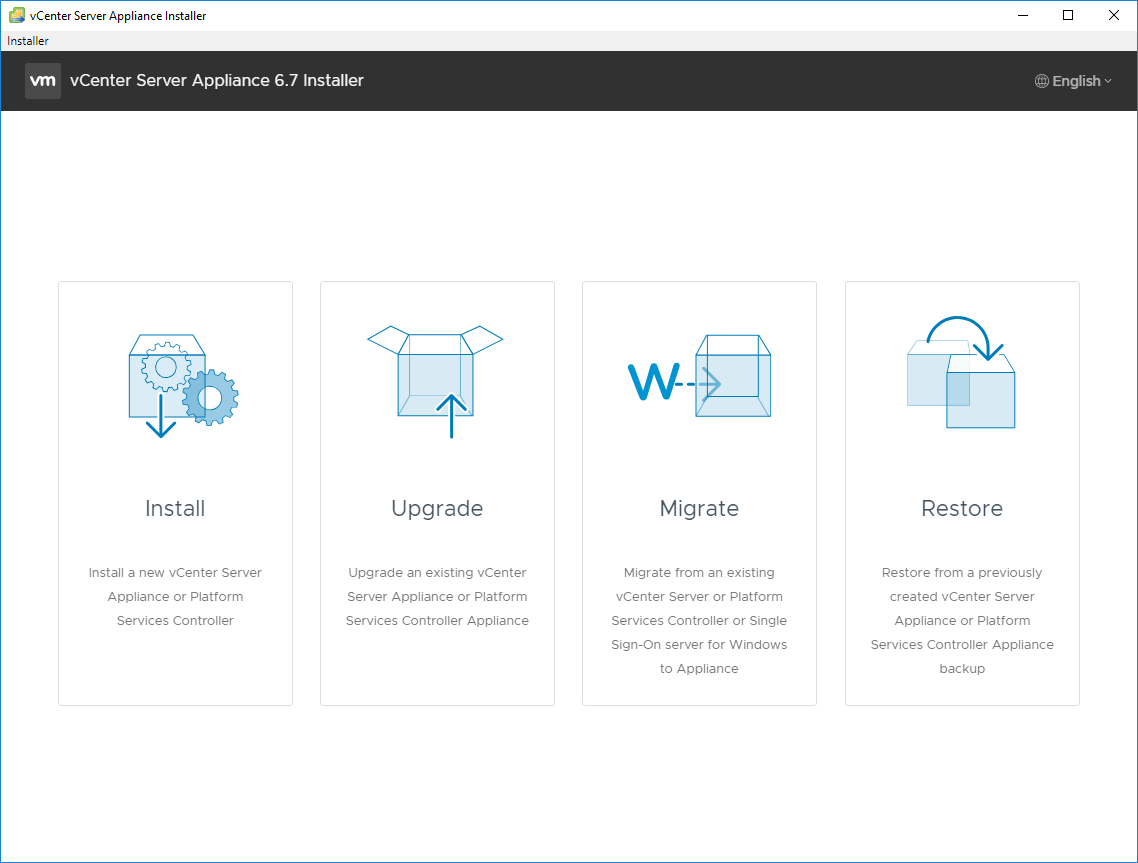
4. On the Introduction tab, click Next.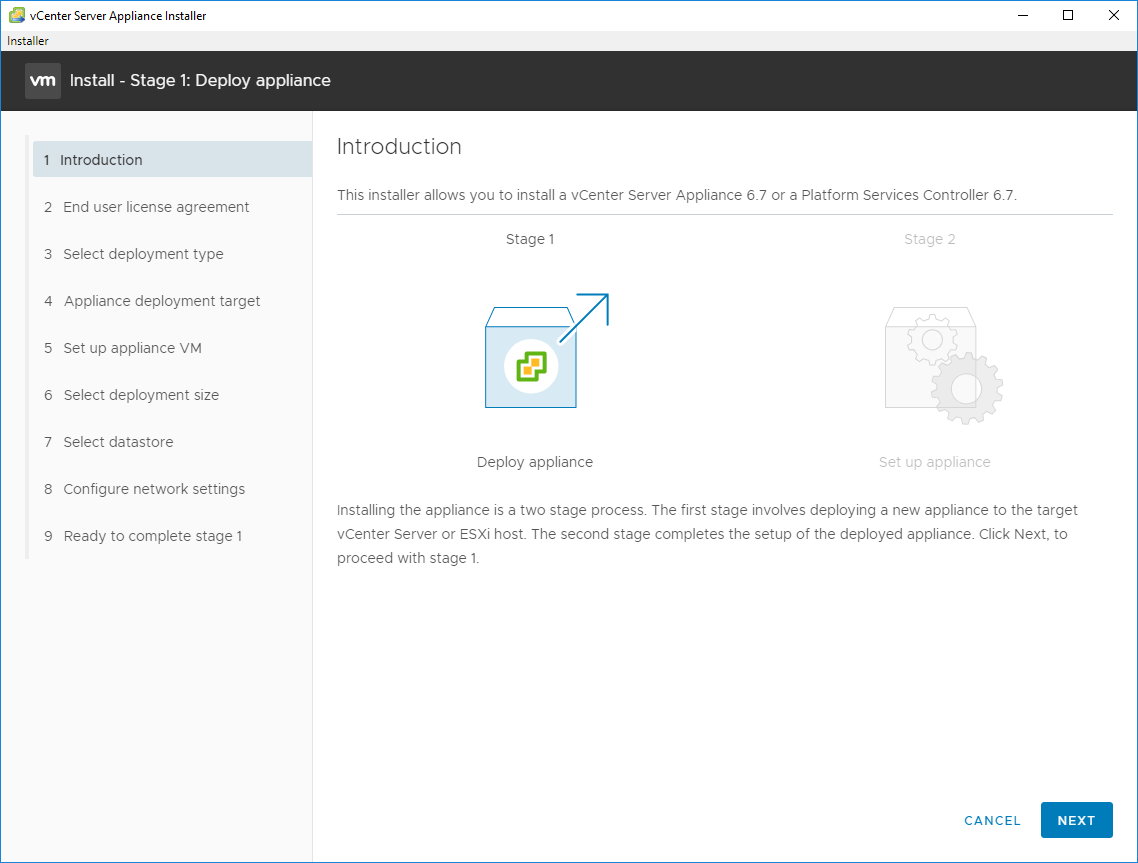
5. Accept the EULA and click Next.
6. Select Embedded Platform Services Controller (External PSC’s are deprecated from vSphere 6.7) and click Next. 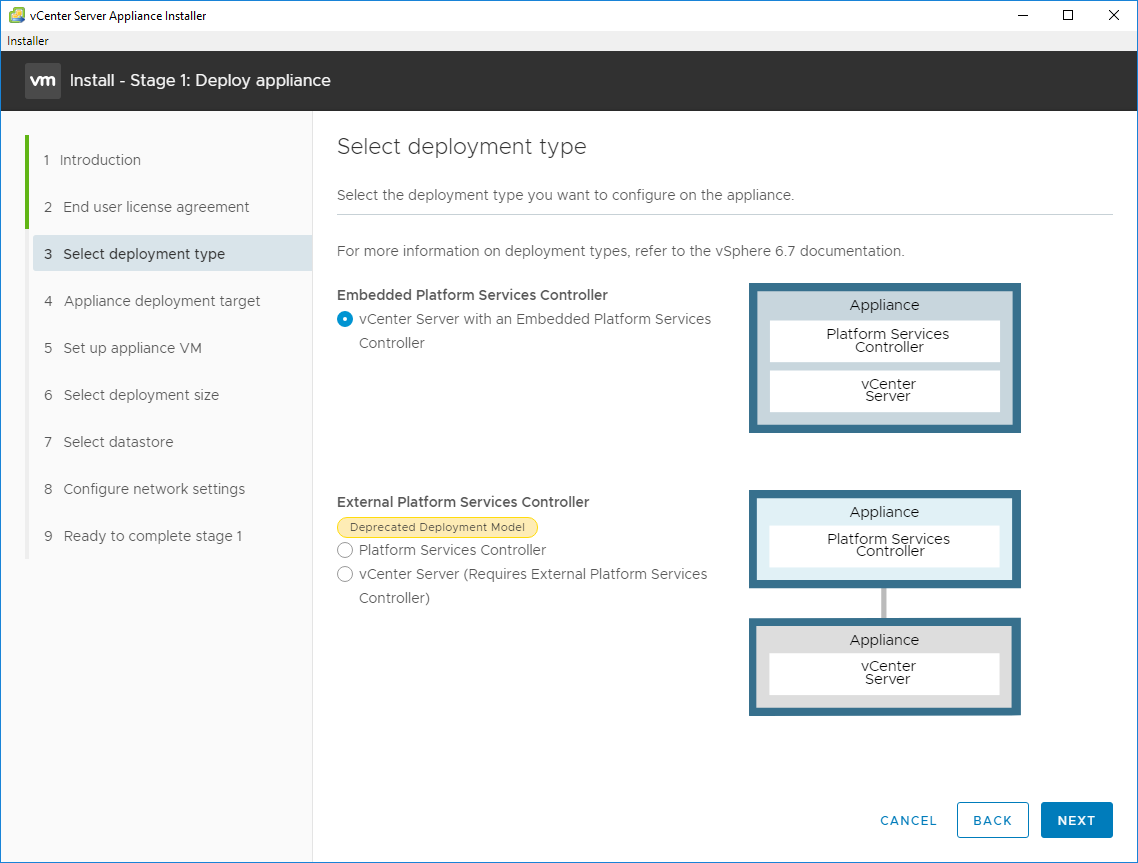
7. Enter the FQDN and credentials of your vSphere Host (ESXi) and click Next.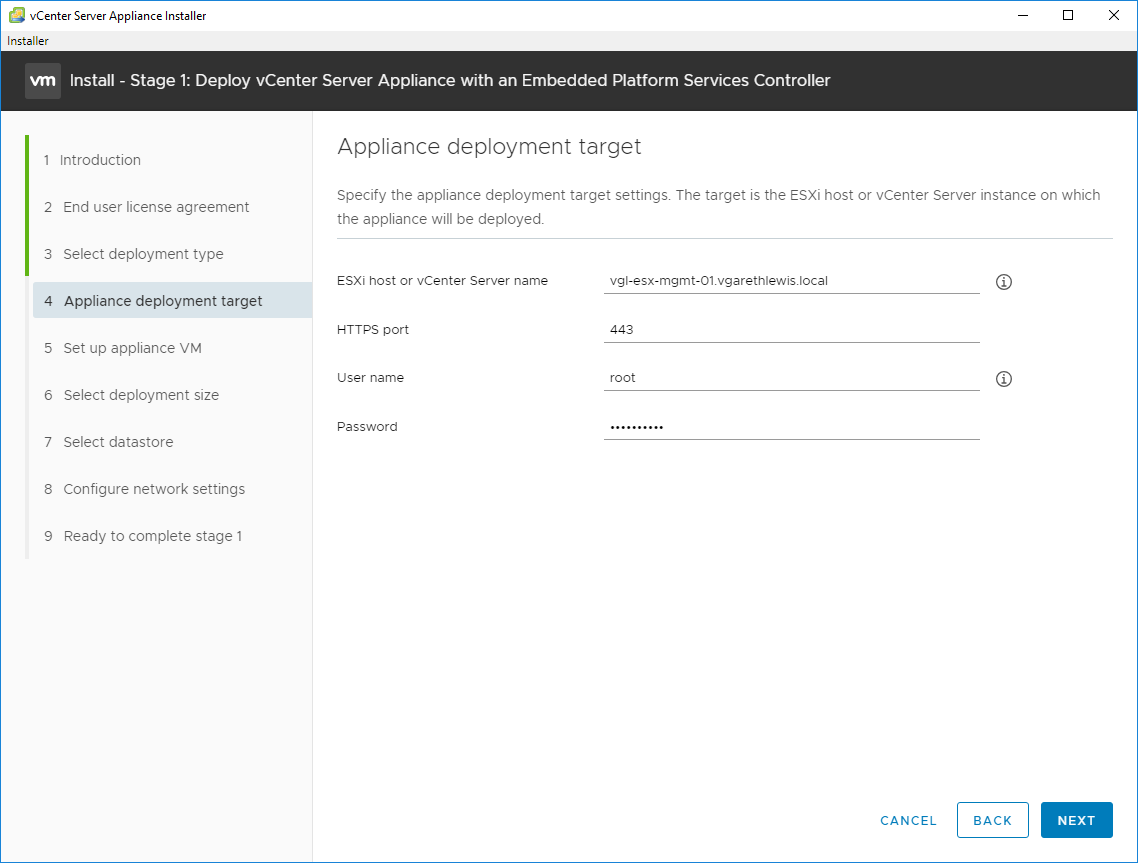
8. When prompted, accept the certificate warning by clicking Yes.
9. Specify the vCenter Server Appliance VM name and root password. When ready click Next.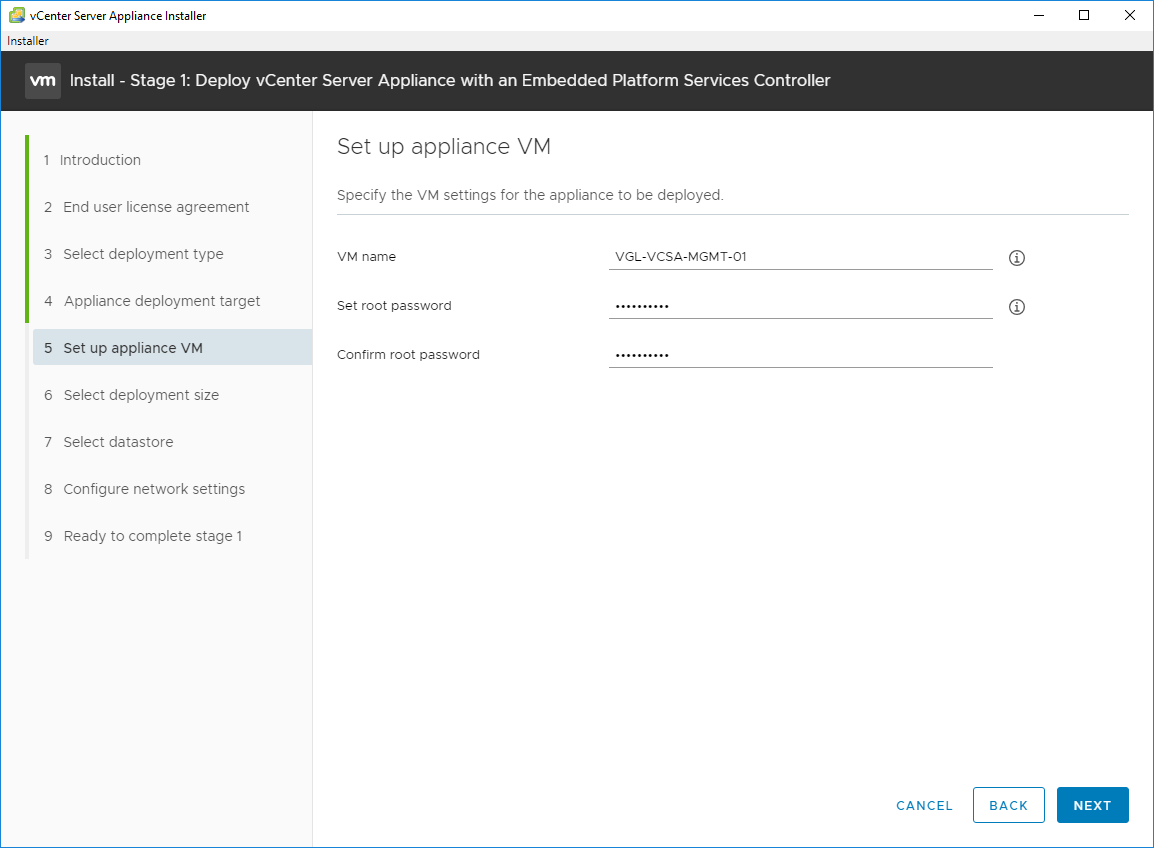
10. Select a Deployment Size (a Tiny Deployment is fine for my lab) and click Next.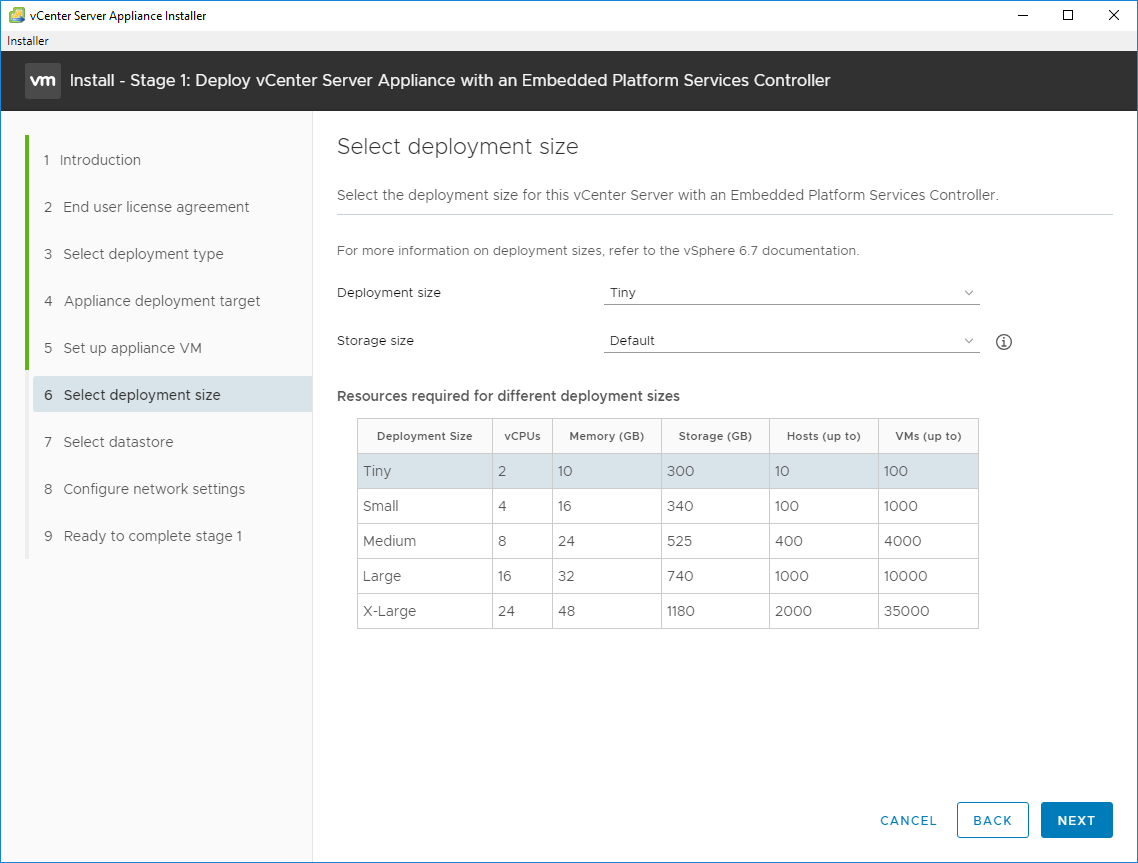
11. As discussed at the start of this article, we will be deploying vSAN at the same time as the vCenter Server Appliance. As such, select Install on a new vSAN cluster containing the target host. 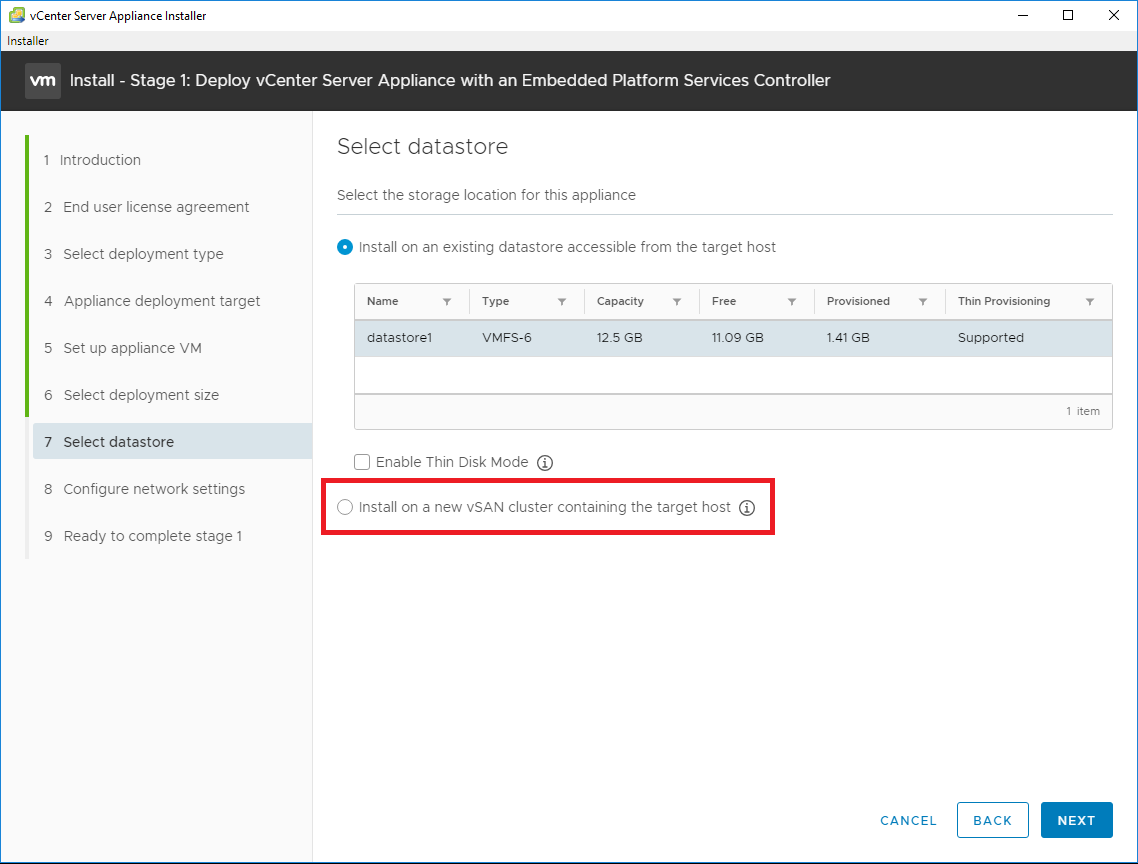
12. We now have the ability to configure our new vSphere Datacentre and vSphere Cluster. Specify a name for each and click Next.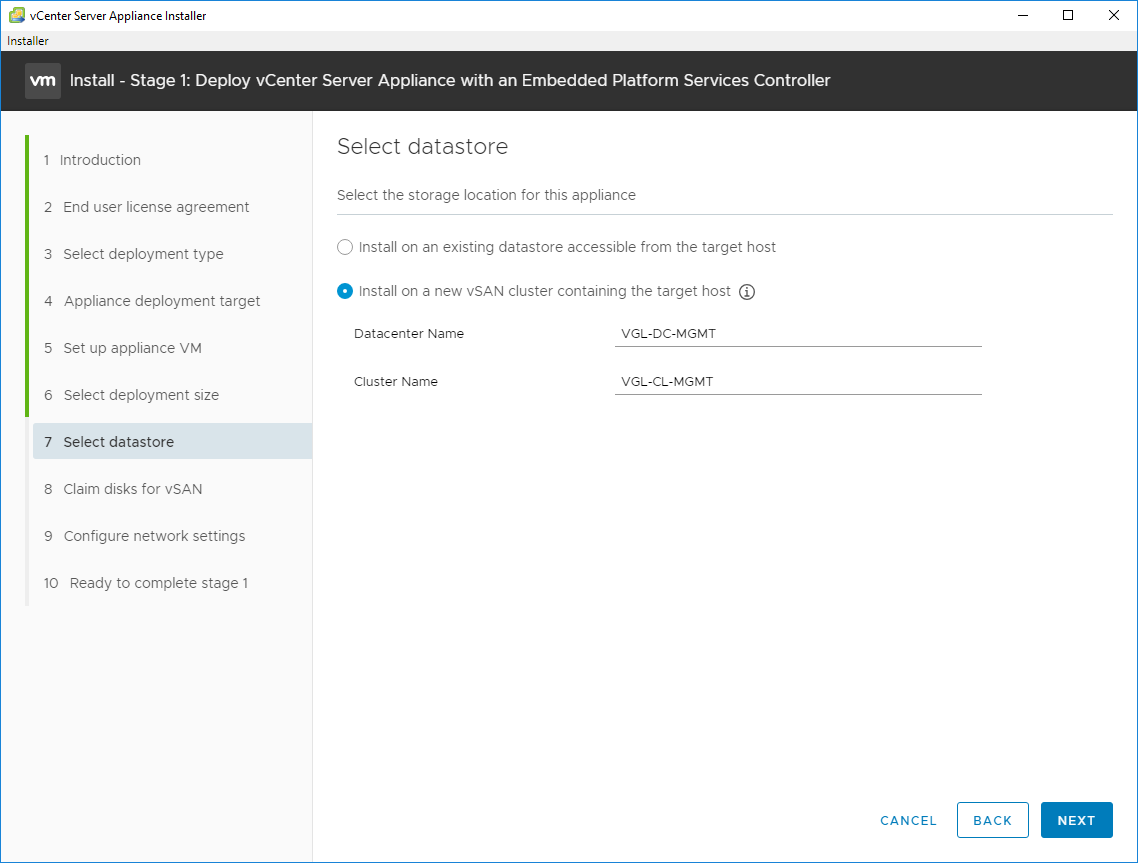
13. Configure the vSAN disks accordingly. For example, in the screenshot below you can see I have allocated the 50 GB flash drive to the Cache tier, and the two 500 GB HDD drives to the Capacity tier. For lab purposes, I have also opted to Enable Thin Disk Mode. When ready, click Next.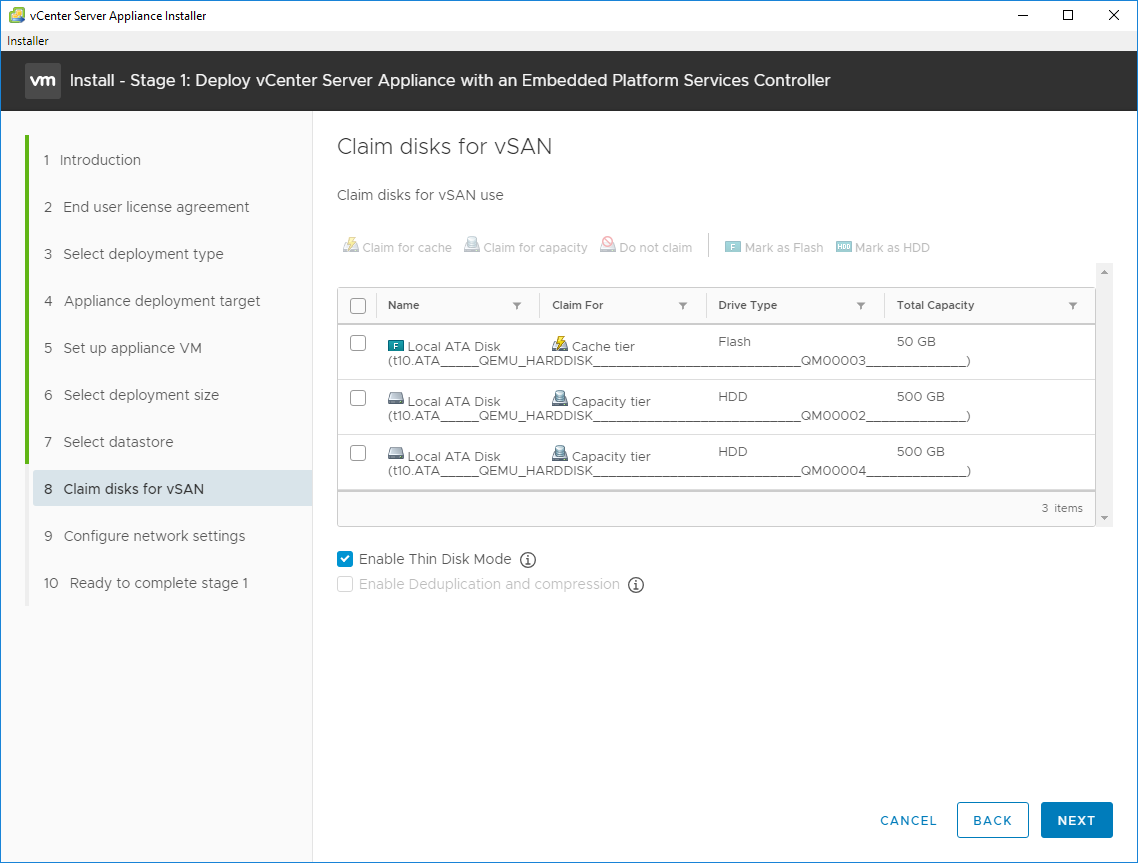
14. As mentioned earlier, make sure forward and reverse DNS records have been created for the new vCenter Server. Configure the Network Settings and click Next. 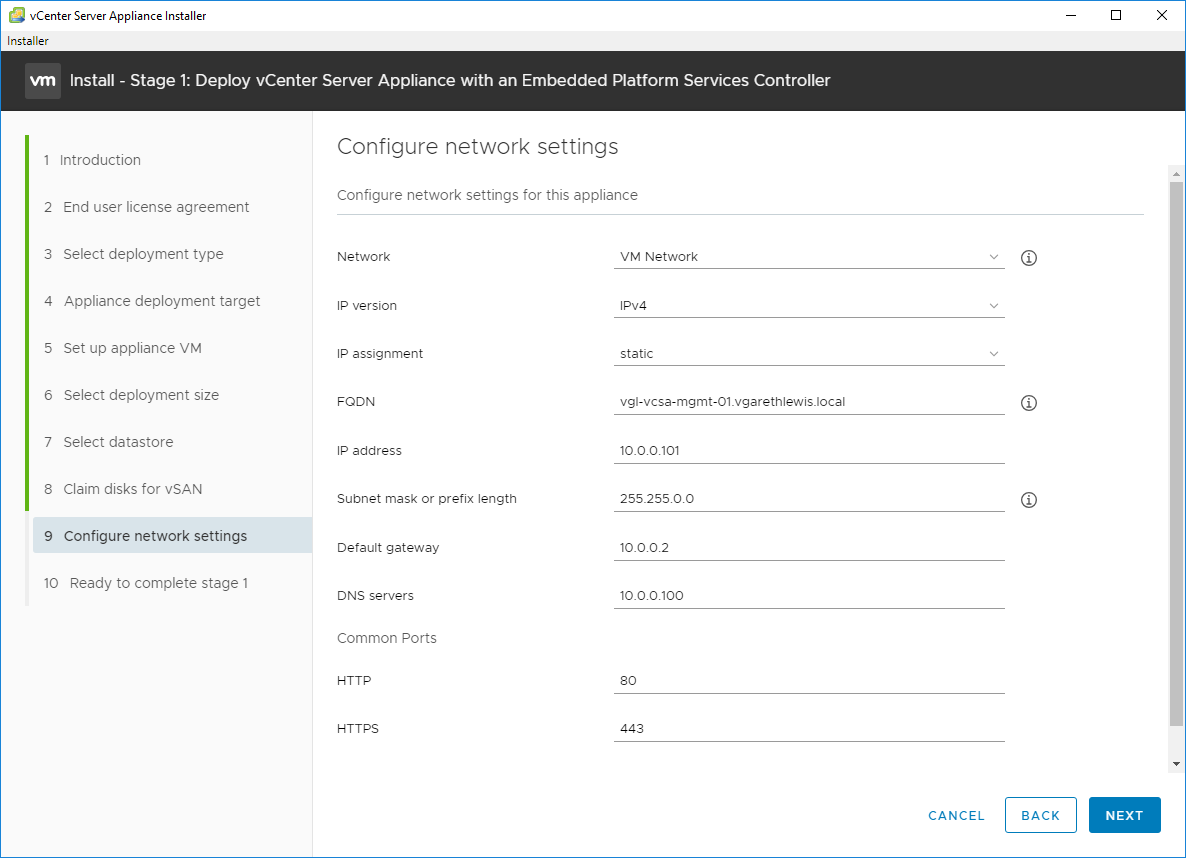
15. Review the deployment summary and, when ready, click Finish to begin the deployment.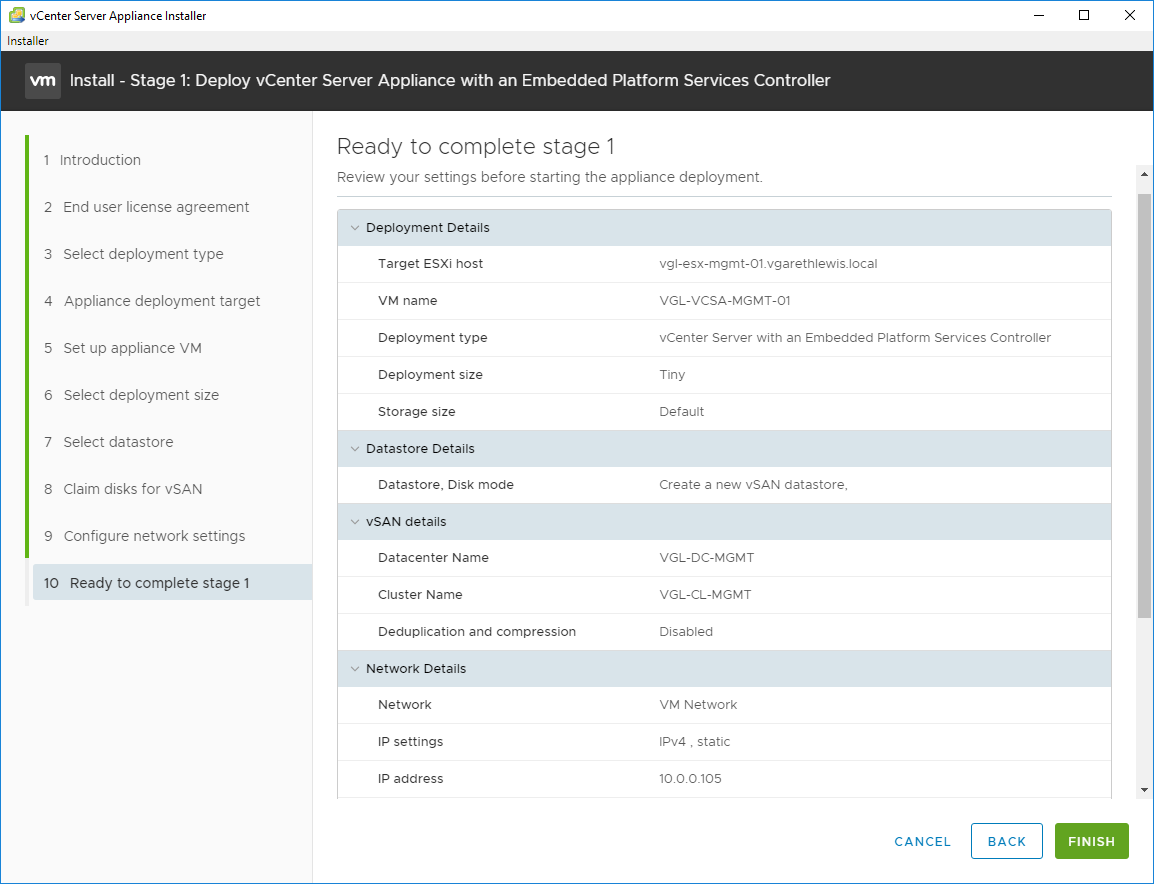
16. The vCenter Server Appliance deployment will now begin.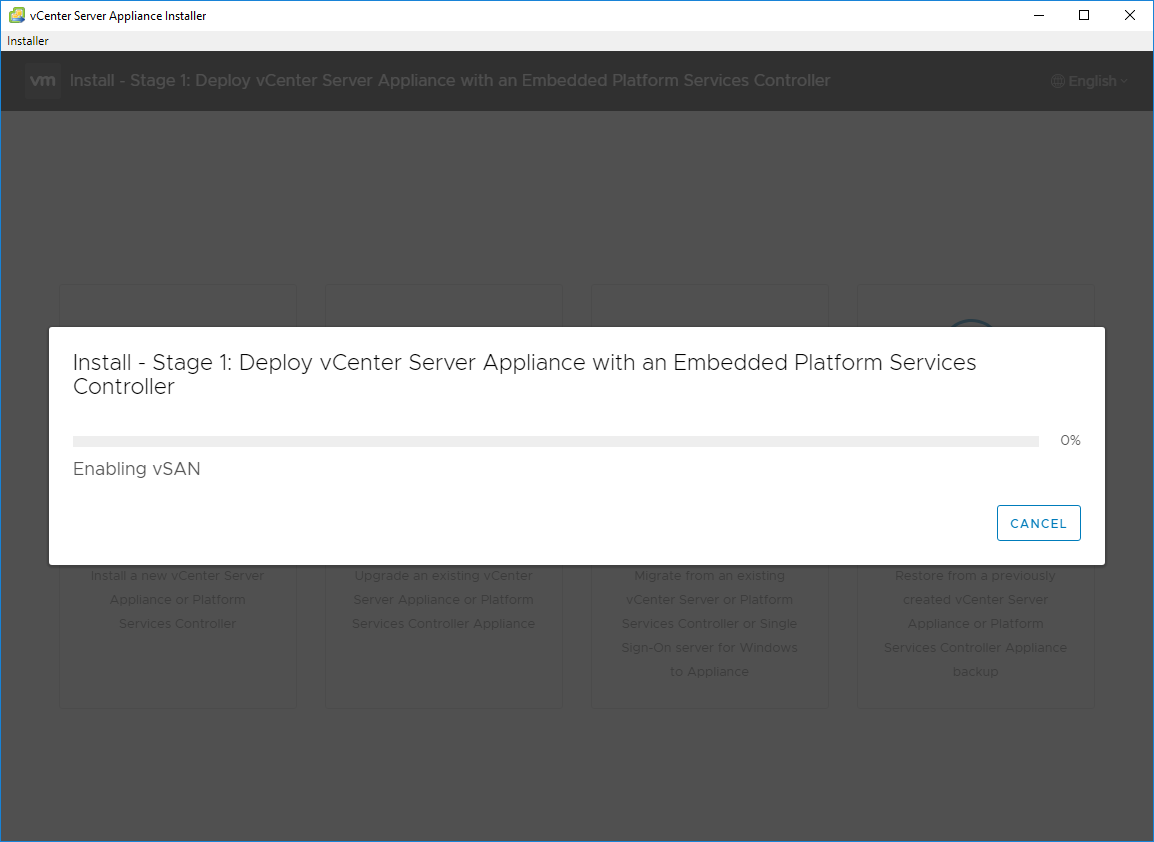
17. To monitor the deployment process, simply login to the vSphere Host (ESXi) and browse to Monitor > Tasks.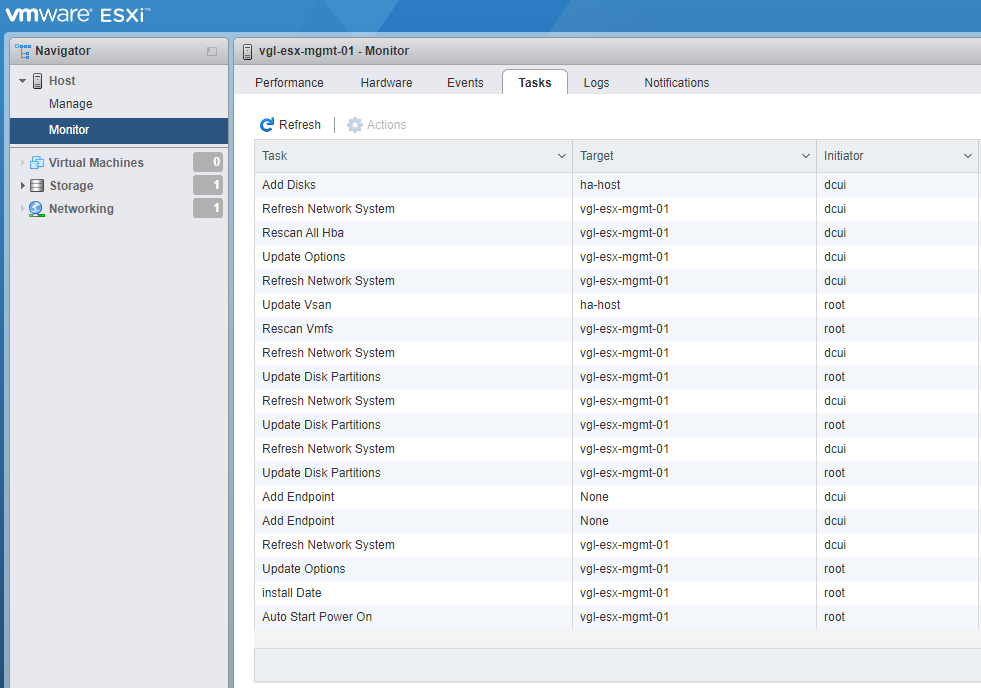
18. Once complete, the console for the new vCenter Server Appliance will display the below status.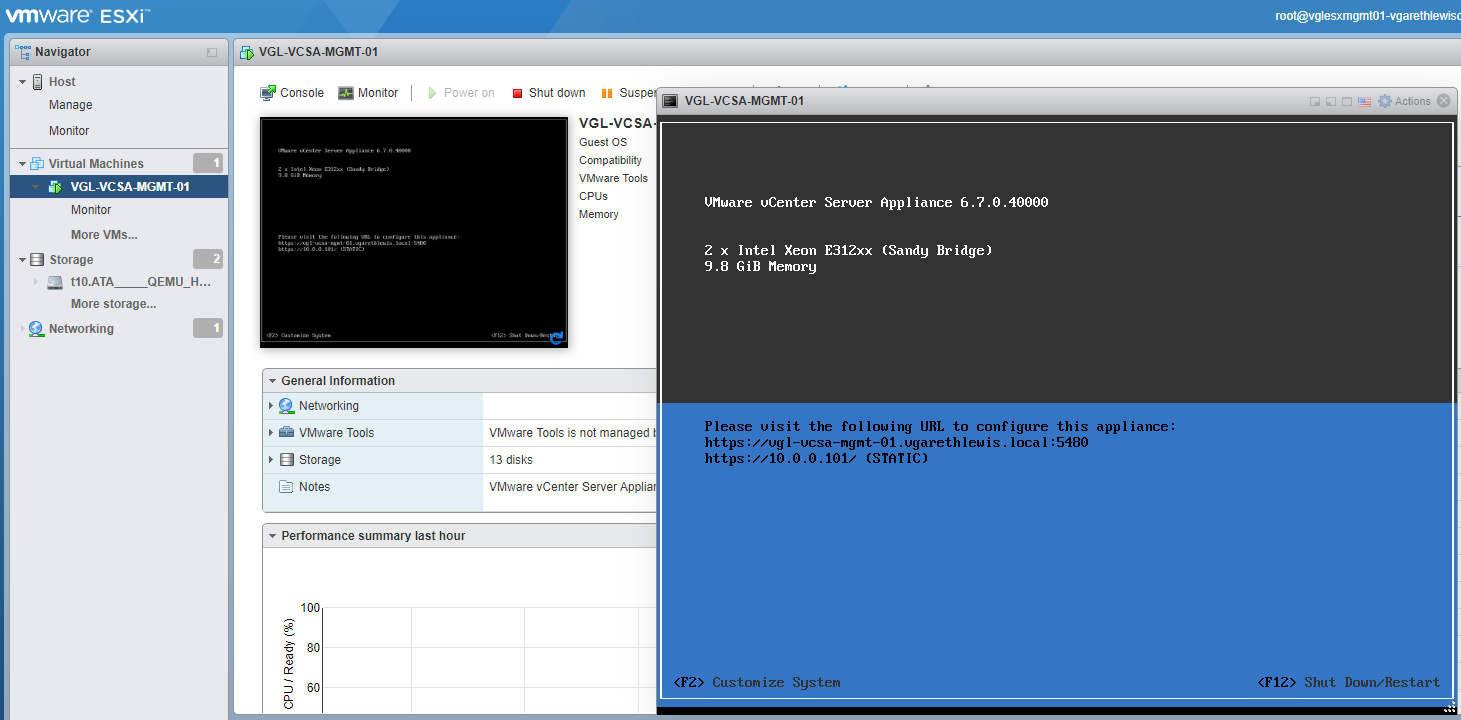
19. Take note of the appliance’s management address (https://<VCSA-FQDN>:5480/), and click Continue.
Stage 2: Set Up vCenter Server Appliance with an Embedded Platform Services Controller
With the deployment stage (Stage 1) complete, we now need to configure the appliance and its embedded PSC.
1. To begin the appliance and PSC configuration, click Next.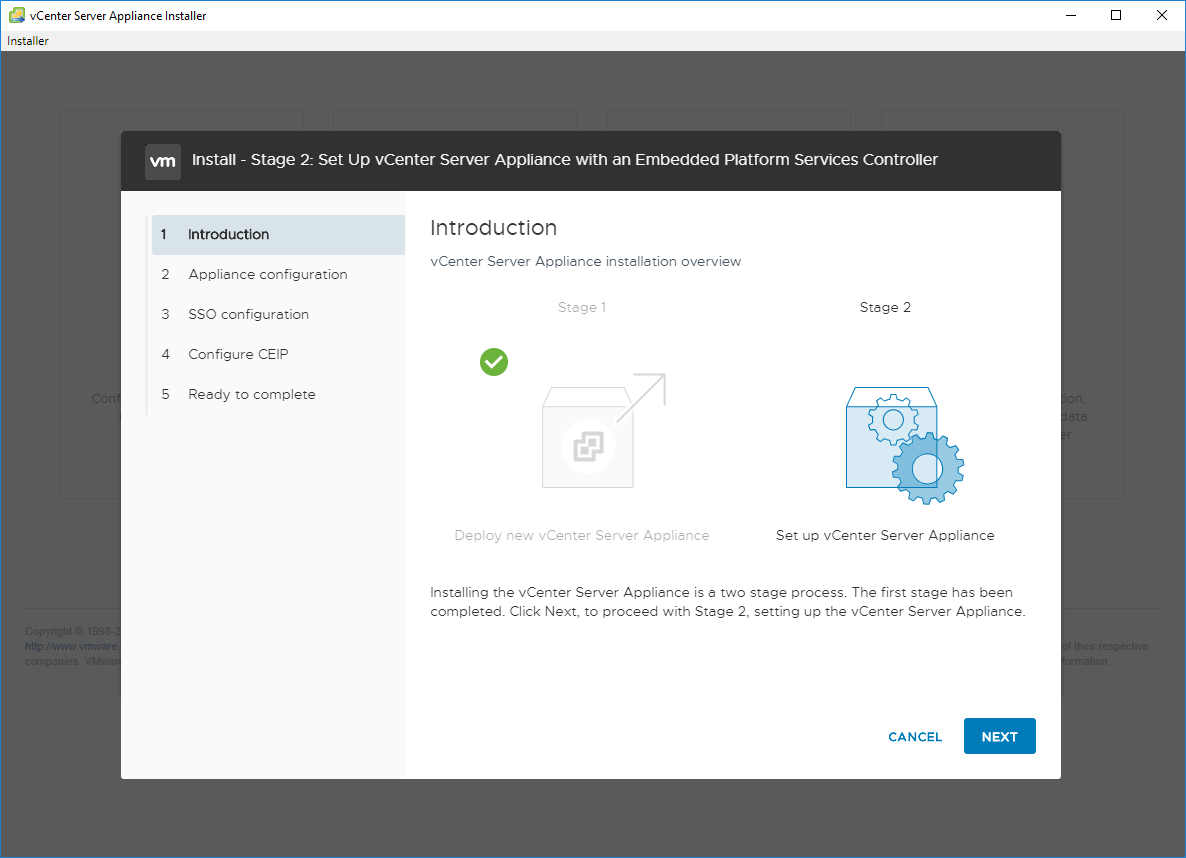
2. Specify an NTP server and click Next. In my lab environment, I have also enabled SSH.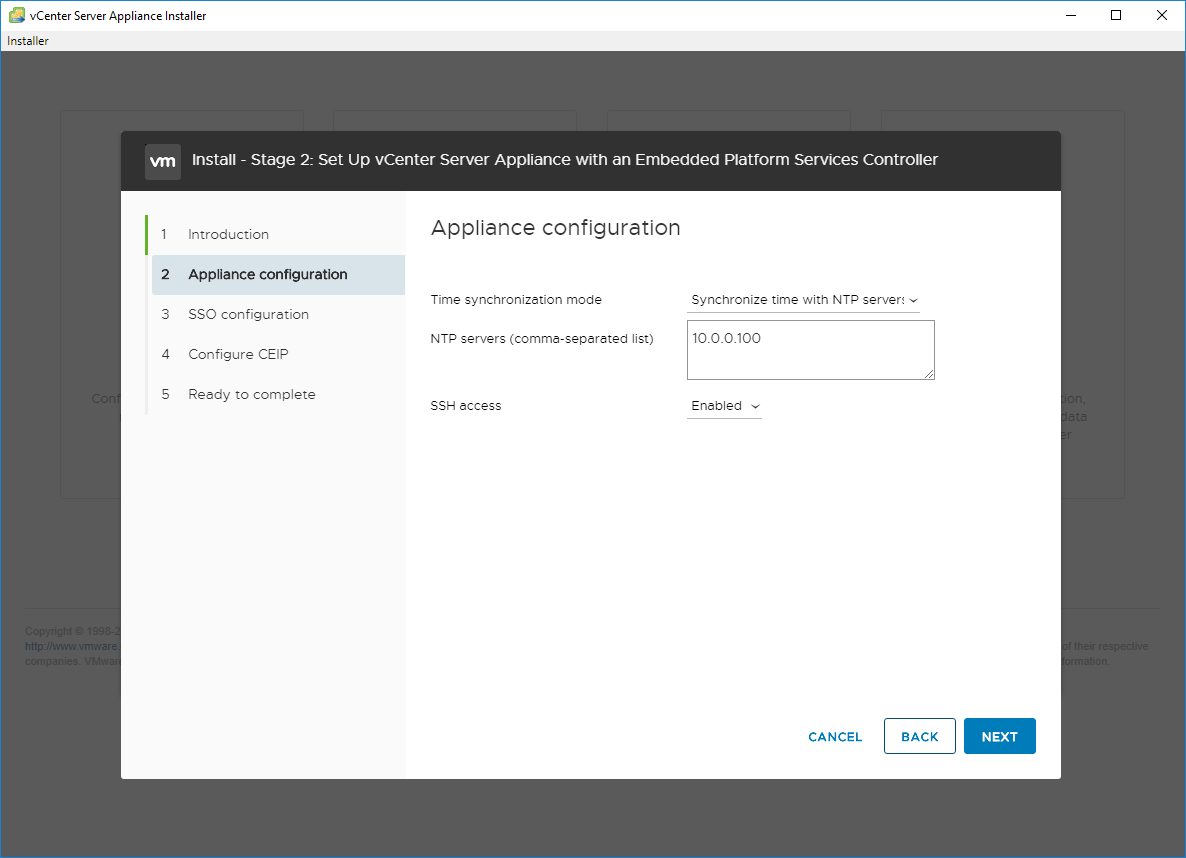
3. Specify the new SSO Domain Name and Administrator credentials, and click Next.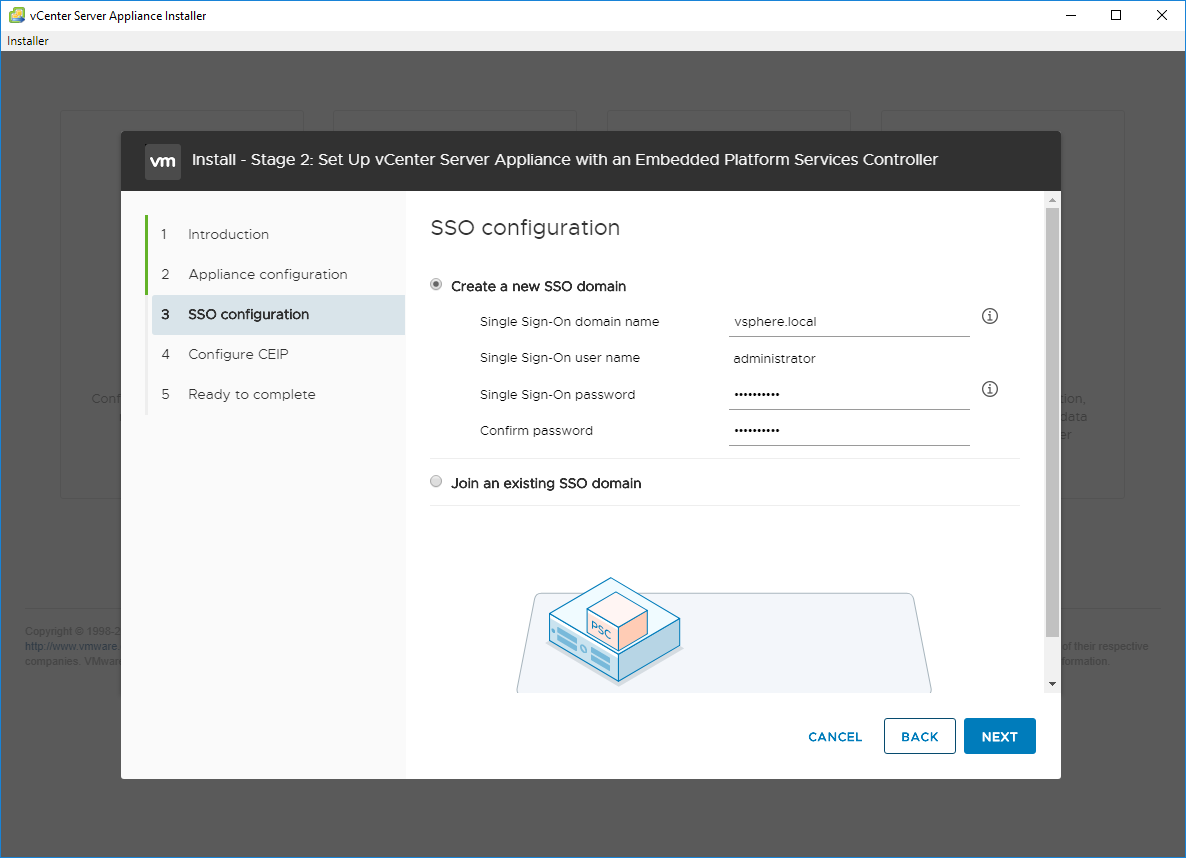
4. Opt in/out of the CEIP and click Next.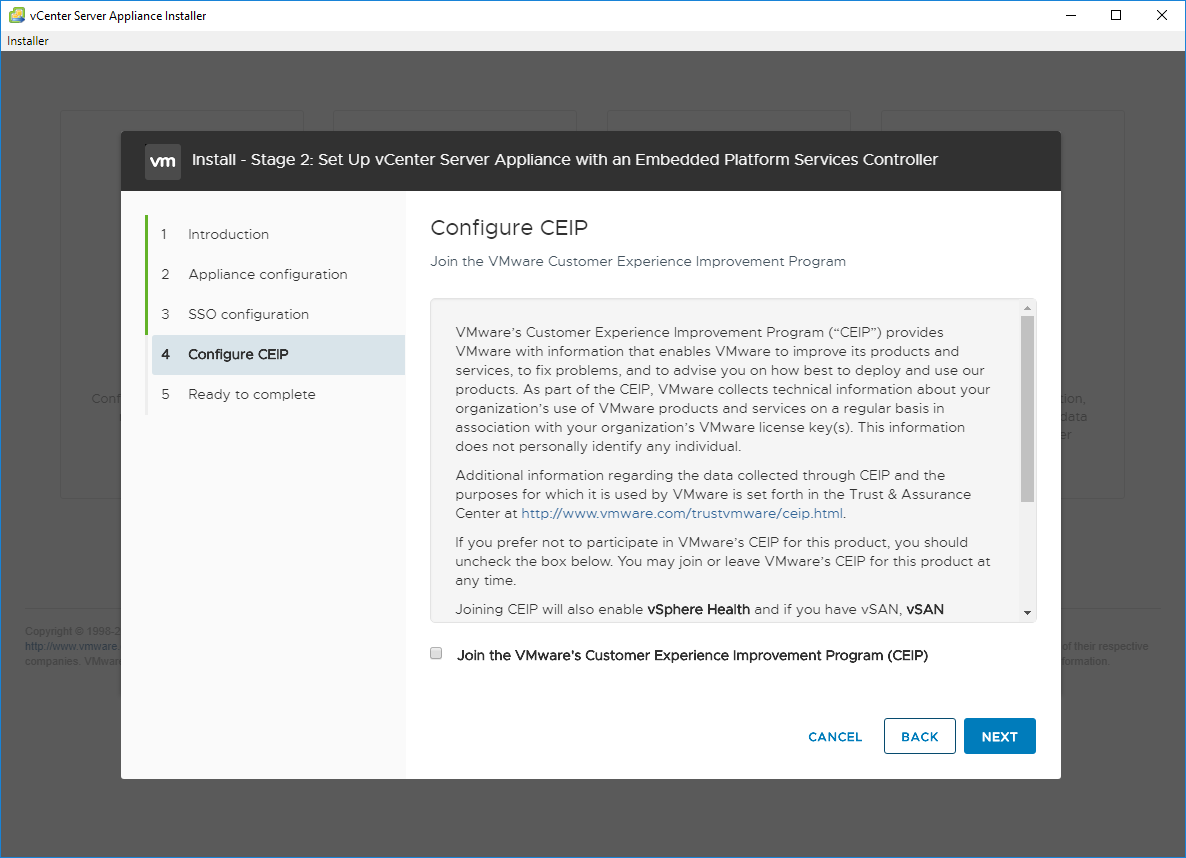
5. Review the configuration and click Finish. 
6. When prompted that you will not be able to pause or stop the installation process, click OK.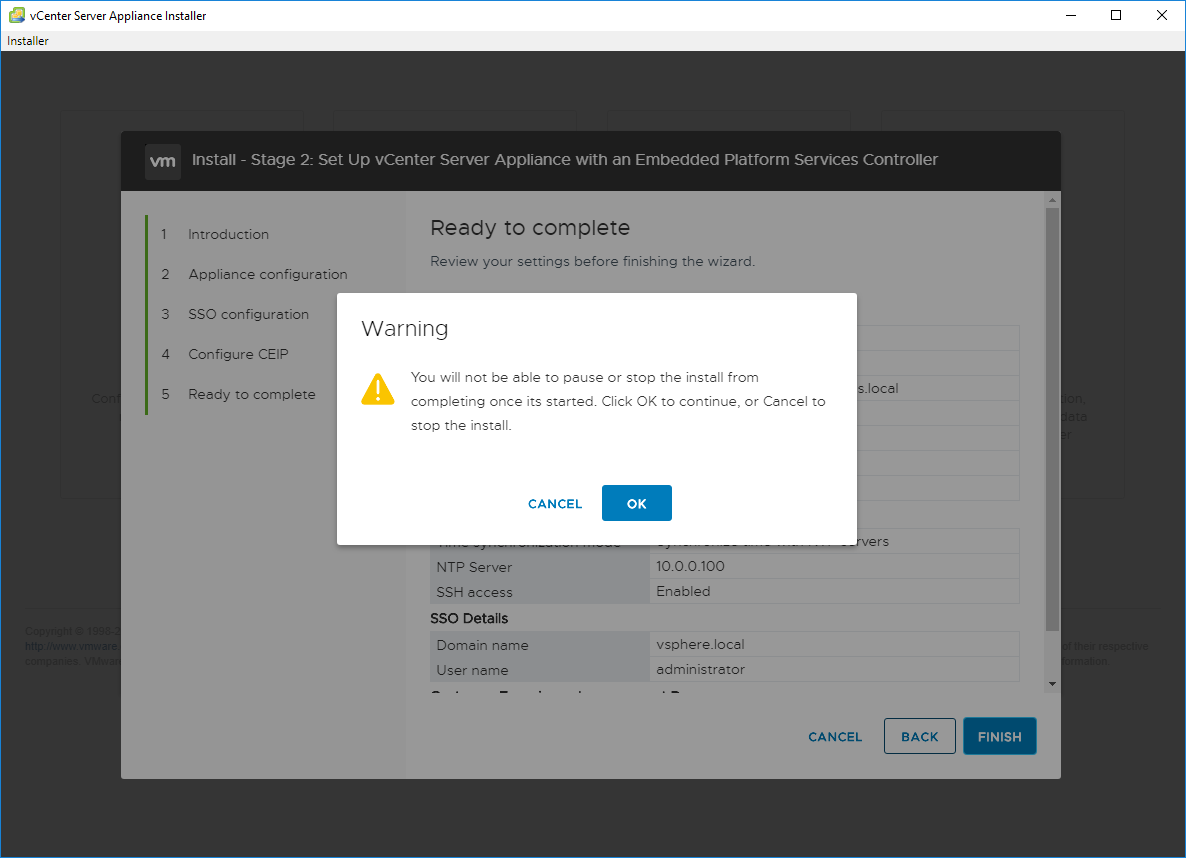
7. The configuration process will now begin.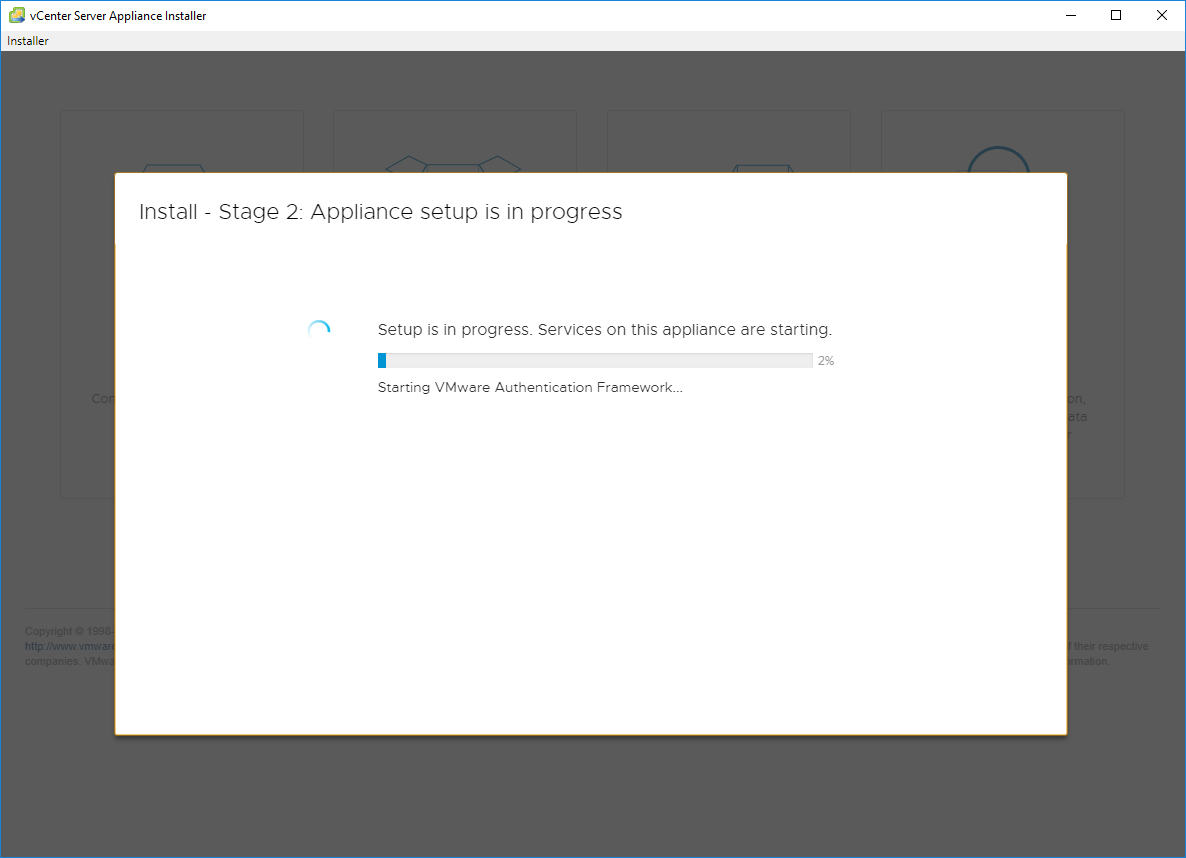
8. When complete, click close. The configuration of the vCenter Server Appliance is now complete.
9. Open a web browser and browse to the vSphere Client address (https://<VCSA-FQDN>/ui).
Next Steps…
With the new vCenter Server Appliance deployed to a single-node vSAN cluster, we now need to finalise the vSAN cluster by implementing a number of additional steps:
- Add additional hosts to the vSAN cluster (a minimum of two) (Stage 3).
- Complete the required configuration of the vSAN cluster (Stage 3).
- Apply the correct VM Storage Policy to the vCenter Server Appliance (Stage 4).
Before we do that, however, let’s take a quick look at the vSAN health.
1. Login to the vSphere Client (https://<VCSA-FQDN>/ui) and browse to Hosts and Clusters. Note the creation of the vSphere Datacentre and vSphere Cluster (as per the earlier datastore configuration above), and also the vSAN network warning. This is expected as we have not yet configured a vSAN network.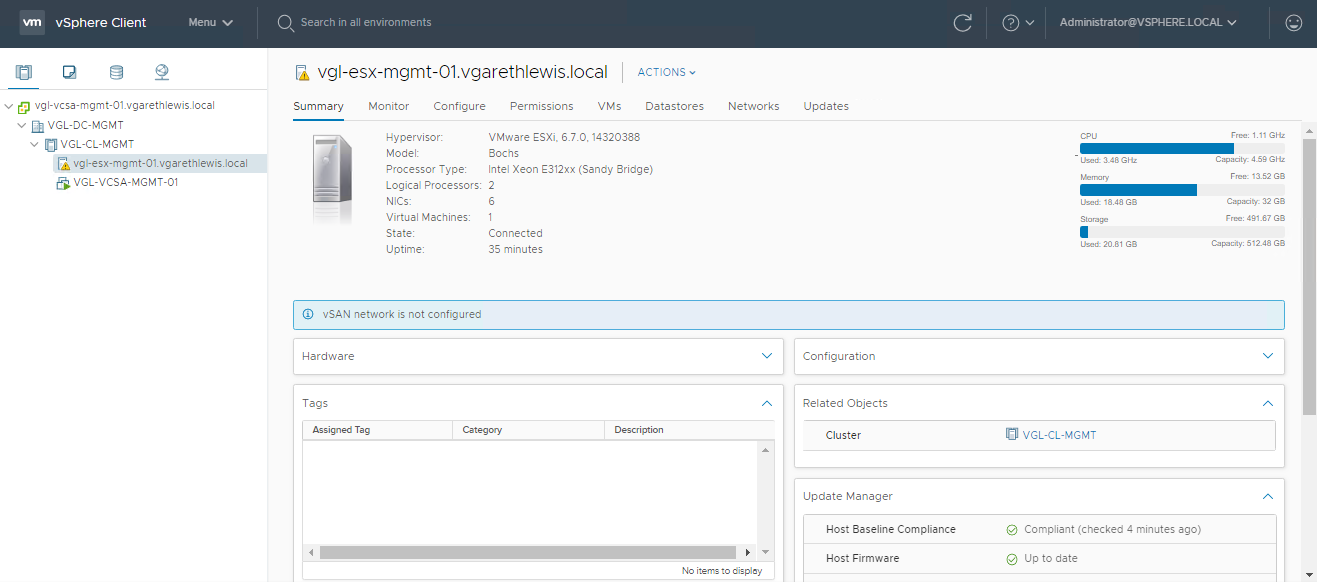
2. Select the new vSphere Cluster, and browse to Monitor > vSAN > Health. Note the vSAN health warnings. These are expected as a) the single vSphere Host (ESXi) has not been allocated a vmknic, b) it also lacks a vSAN network, and c) the vSphere Cluster does not have the required number of hosts. Again, all to be expected, and all will be resolved in Stage 3.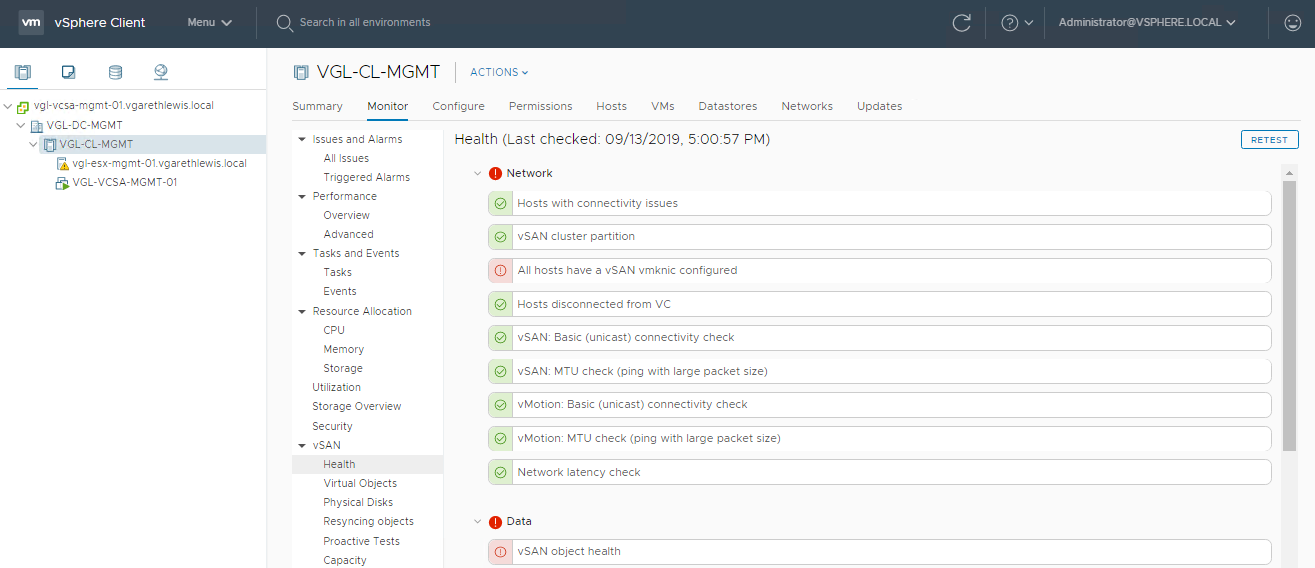
Stage 3: Cluster Quickstart – Add Hosts & Configure vSAN Cluster
Now that we’ve deployed our vCenter Server Appliance onto a single-node vSAN cluster, I add two additional hosts to the cluster (VGL-ESX-MGMT-02 and VGL-ESX-MGMT-03), create the required vSAN disk group(s), and configure the networking for both vMotion and vSAN traffic on all hosts. Thankfully, the Cluster Quickstart tool allows us to do all of this from one simple interface. A serious well done and thank you to the VMware teams who made this possible. This is one awesome tool!
1. Browse to Hosts and Clusters, select the new vSphere cluster, and browse to Configure > Configuration > Quickstart. Under Cluster Basics, click Edit.
2. Enable all required services (in my case vSphere DRS and vSphere HA (vSAN will already be enabled)), and click OK.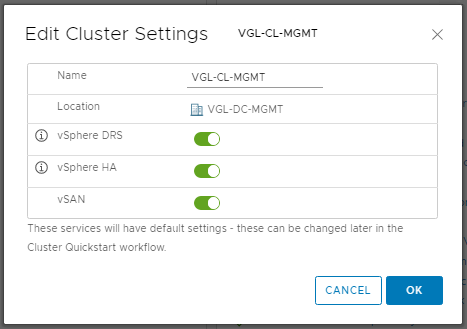
3. Under Add Hosts, click Add.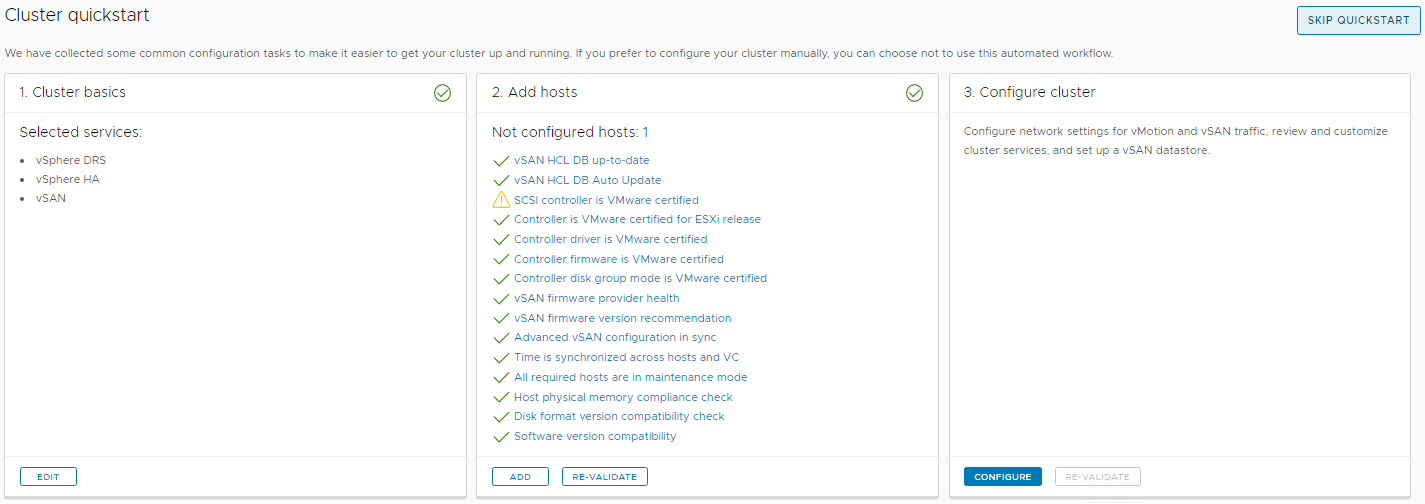
4. Enter the FQDN and root credentials for your vSphere Hosts (ESXi) and click Next.
5. When prompted, accept the thumbprints for the additional vSphere Hosts (ESXi) and click OK.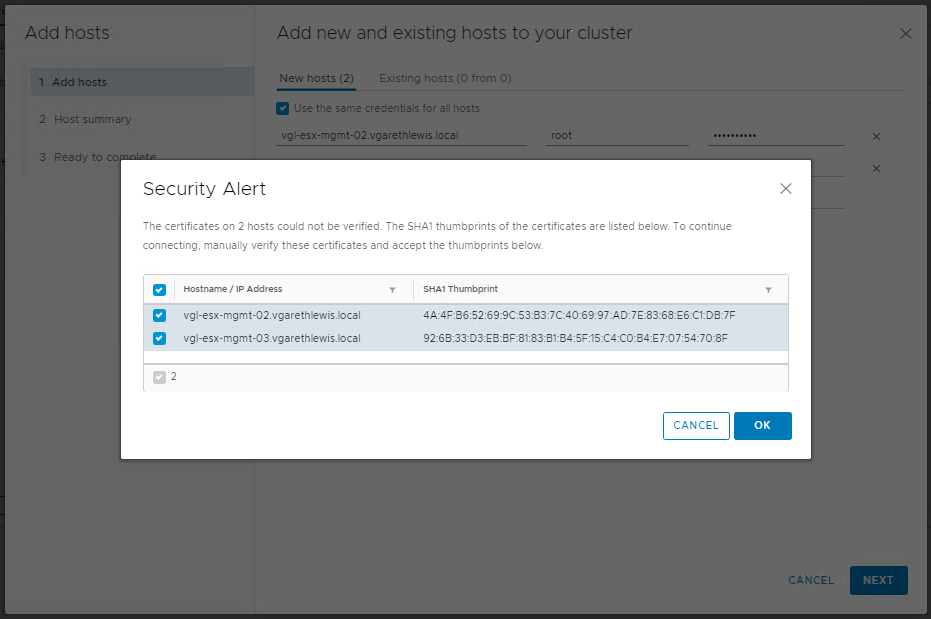
6. Review the Host Summary and click Next.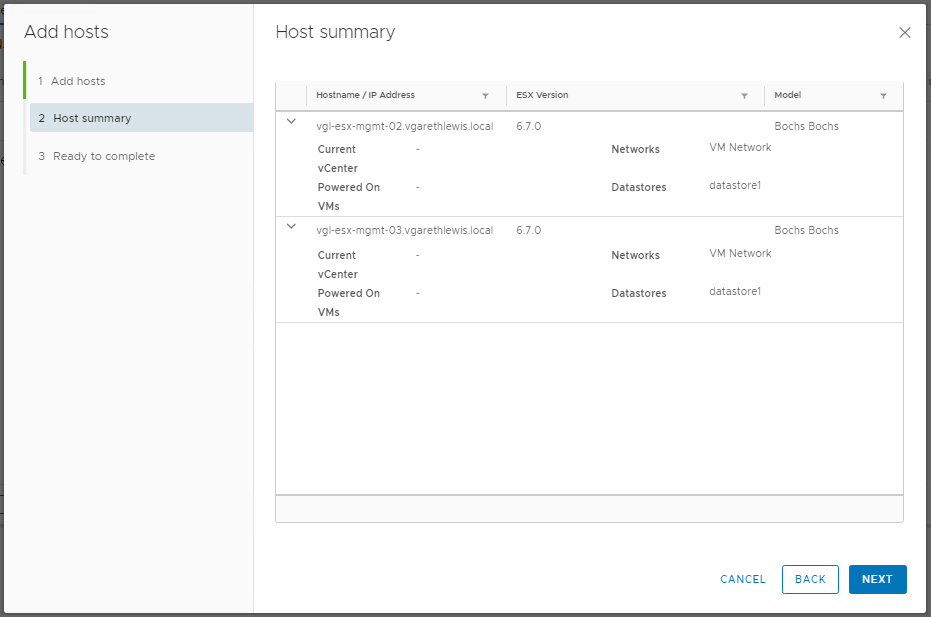
7. At the Review and Finish tab, click Finish. 
8. Before proceeding, note the addition of our two new hosts. To ensure the hosts do not partake in any live cluster services until we have configured their storage and networking, the hosts are automatically added to the cluster in Maintenance Mode. Under Configure Cluster, click Configure.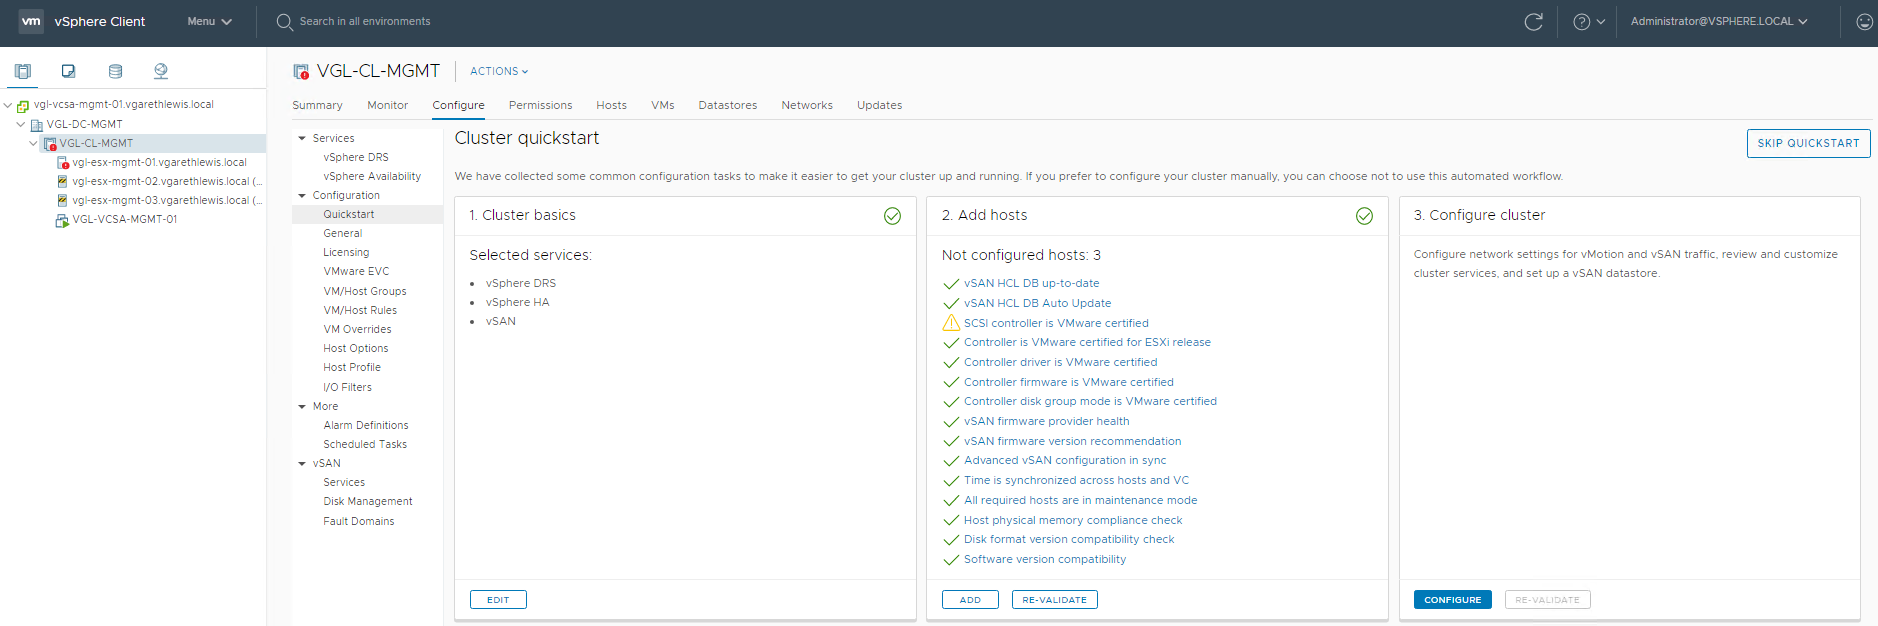
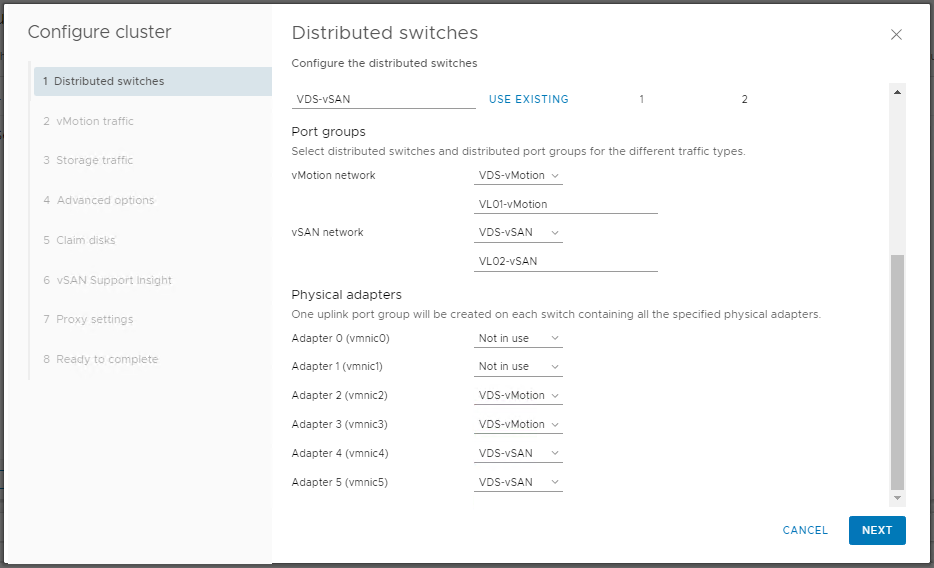
9. On the Distributed Switches tab, select the required number of Distributed Switches for your environment and configure accordingly. For my environment, I require two (one for vMotion and one for vSAN). These I label as VDS-vMotion and VDS-vSAN respectively.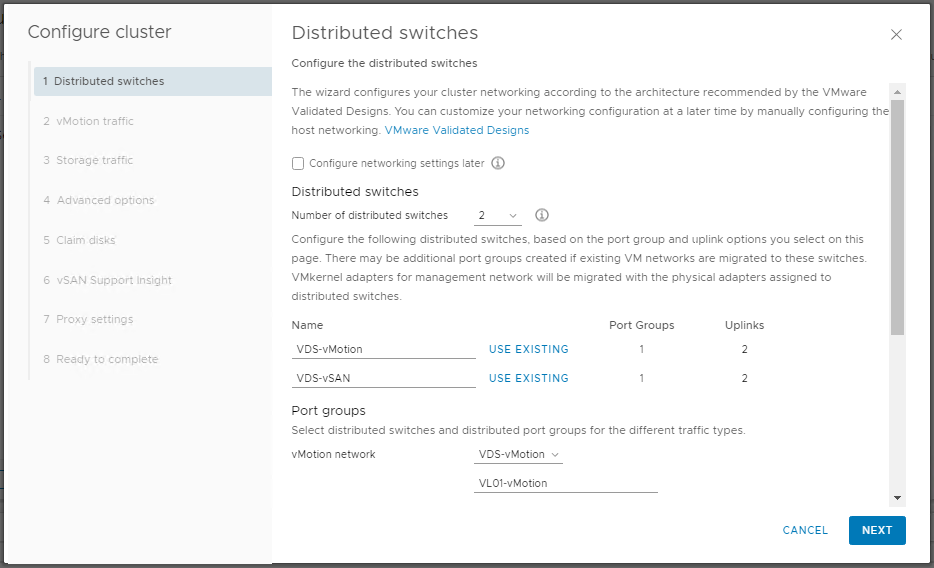
10. Scroll down a little and assign the distributed switches to the appropriate traffic type, as well as assign a name for the distributed port group in each distributed switch. Lastly, assign the relevant physical adapter to the appropriate distributed switch.
11. On the vMotion Traffic tab we can configure the vMotion VMkernel interfaces for all hosts.This is pretty cool, and allows us to configure all hosts from within one window!
12. On the Storage Traffic tab we can configure the vSAN VMkernel interfaces for all hosts. 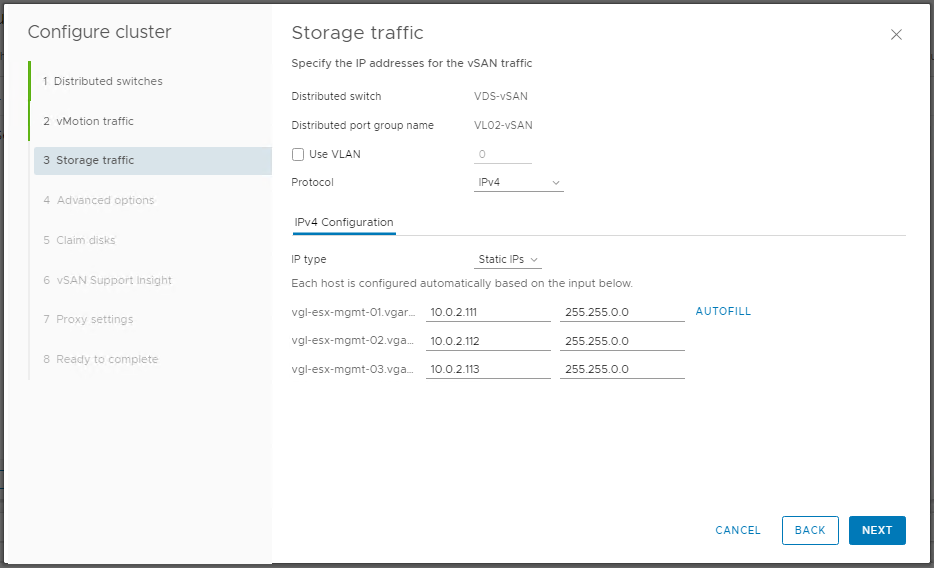
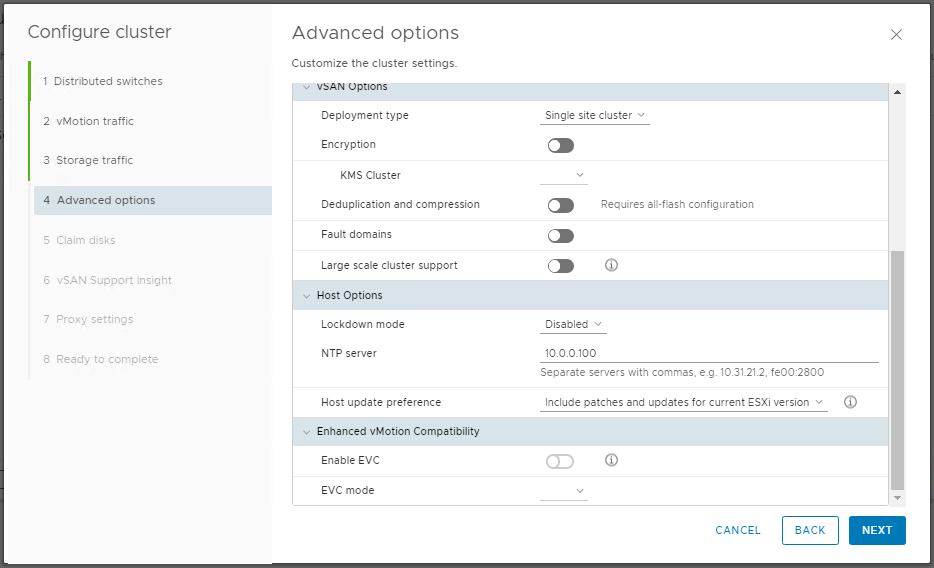
13. The Advanced options allow us to configure a number of aspects of both vSphere HA and vSphere DRS. In my environment I simply enable HA and DRS, define an NTP sever to be used by all vSphere Hosts (ESXi) and leave all other options as default. When ready click Next.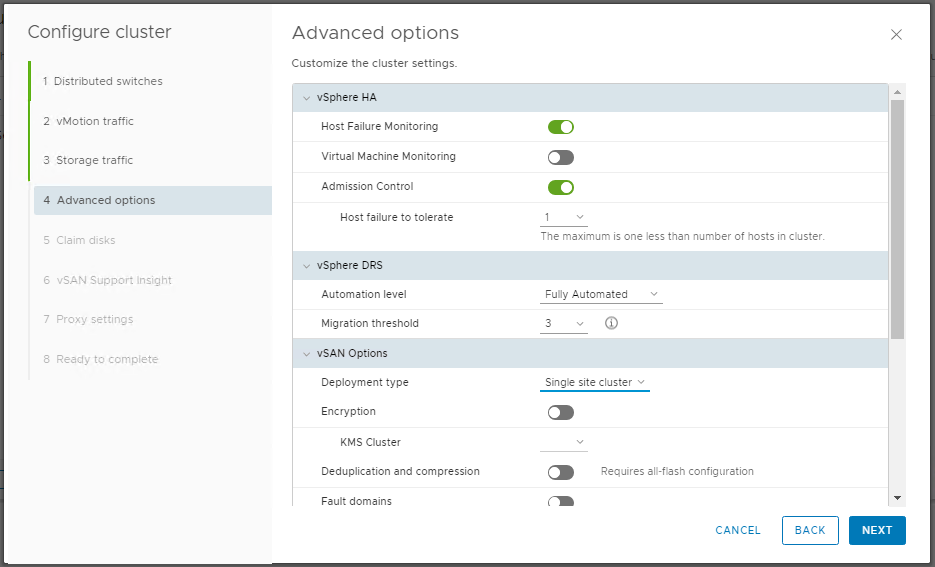
14. Next we will define which of the available storage devices will be utilised in our vSAN datastore. Note, all of the 50 GB flash SSDs have been grouped, as have all of the HDDs. These have then been assigned to the appropriate tier (Cache or Capacity).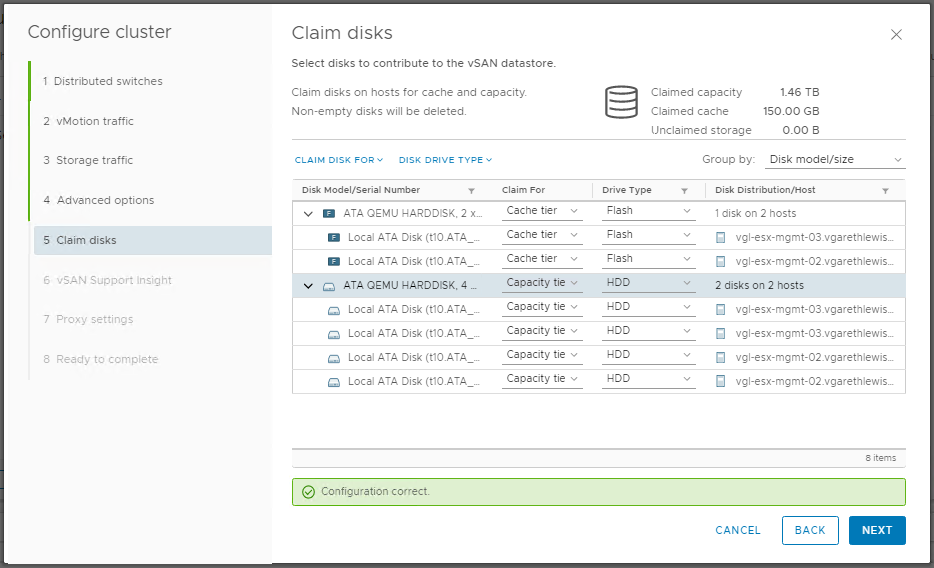
15. In my lab environment, I won’t enable vSAN Support Insight. Click Next.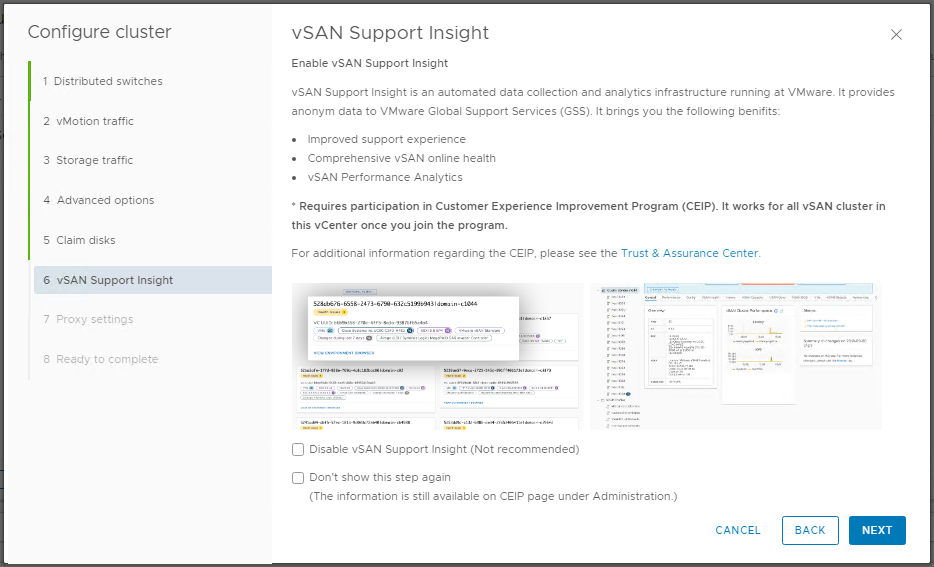
16. Review the summary and click Finish.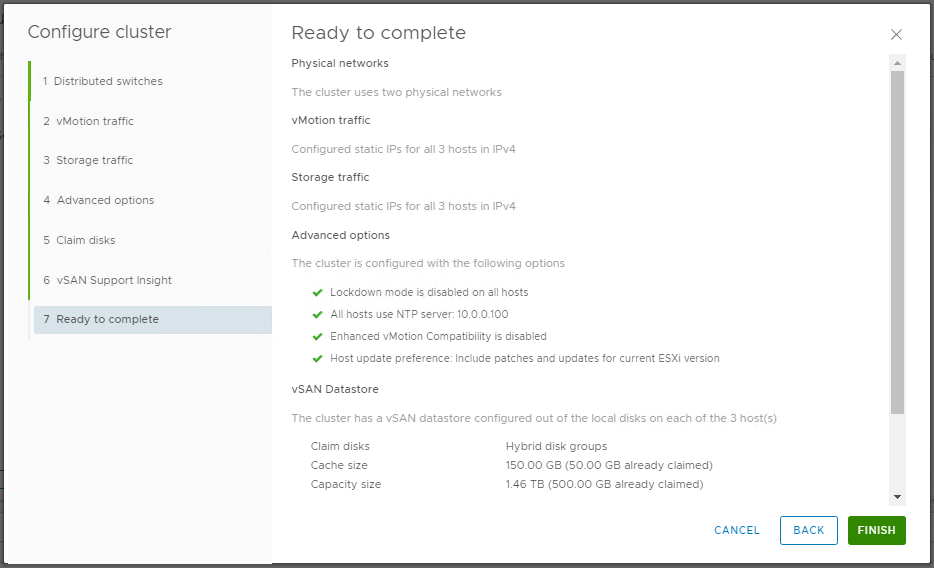
17. Once complete, note the creation of the new distributed switches.
18. Via Hosts and Clusters, browse to Monitor > vSAN > Capacity to view our vSAN datastore capacity.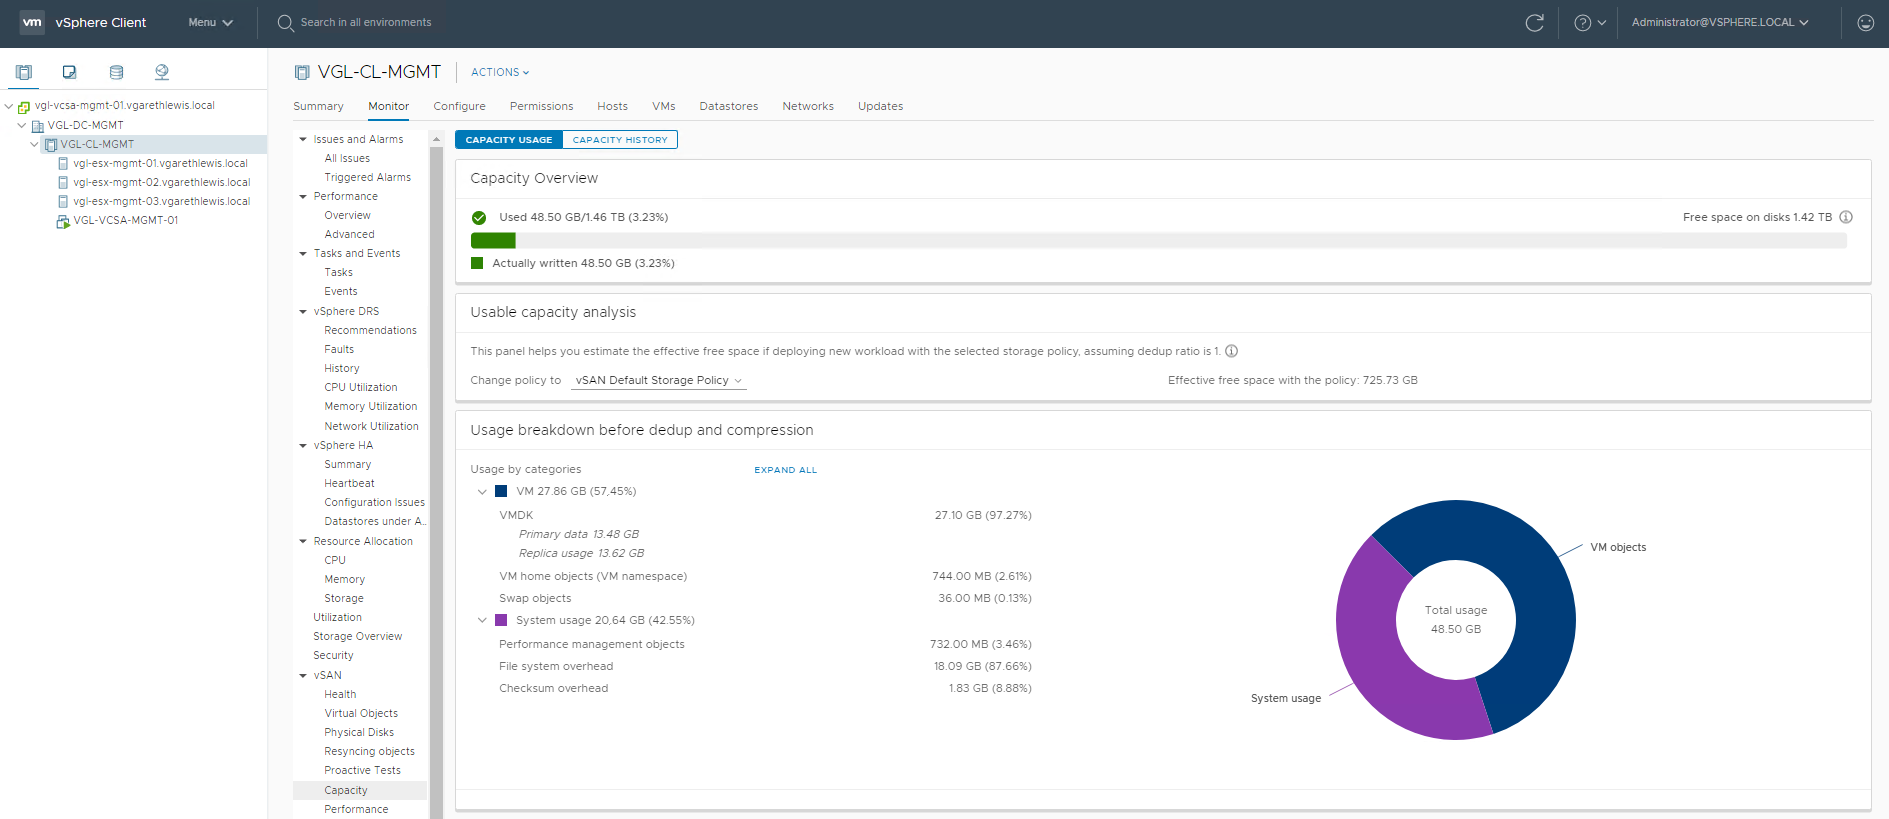
19. Finally, if we check vSAN Health again, all should now be well.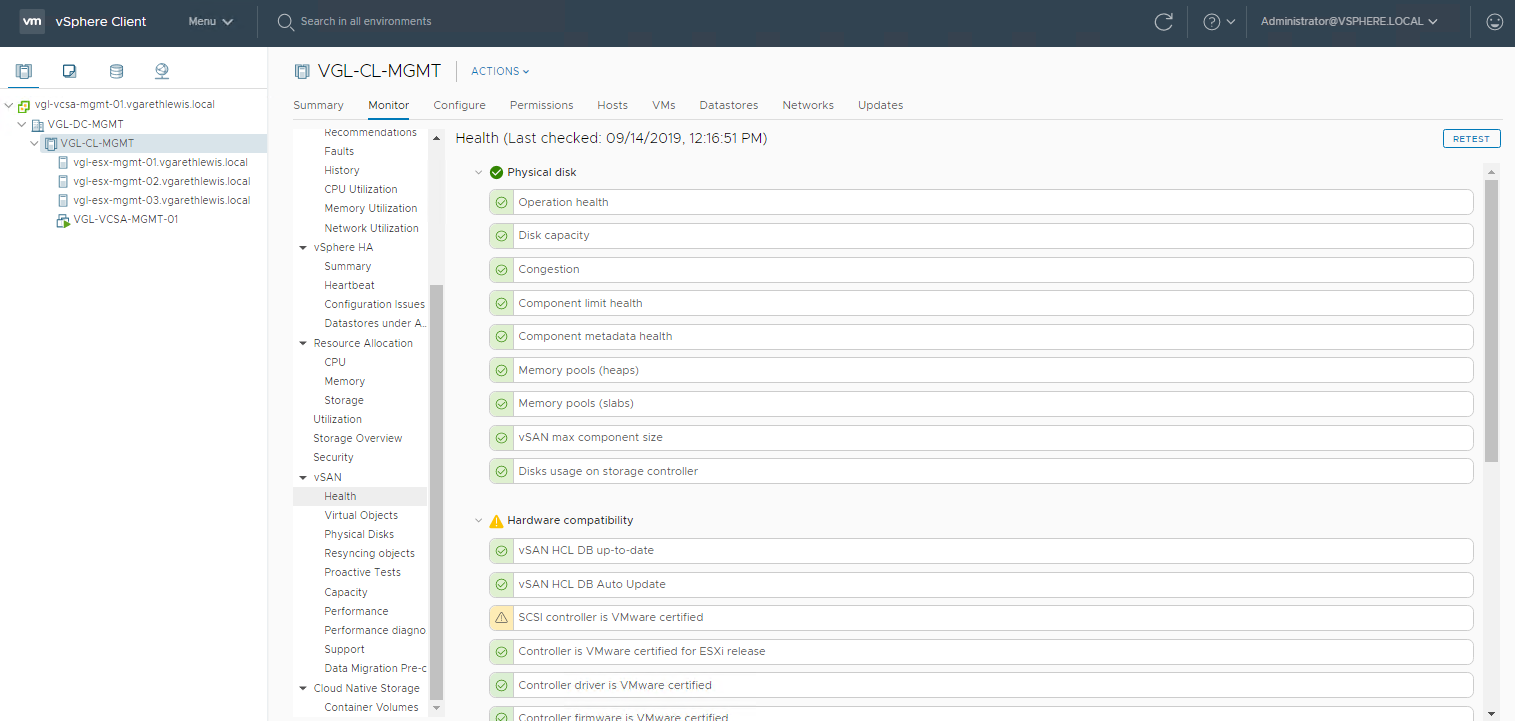
Stage 4: Apply vSAN Default Storage Policy to vCenter Server Appliance
In our final stage, we apply a vSAN storage policy to the vCenter Server Appliance VM. After which, we’re done.
1. Select the vCenter Server Appliance VM, and browse to Actions > VM Policies > Edit VM Storage Policies.
2. From the VM storage policy drop-down menu, select vSAN Default Storage Policy.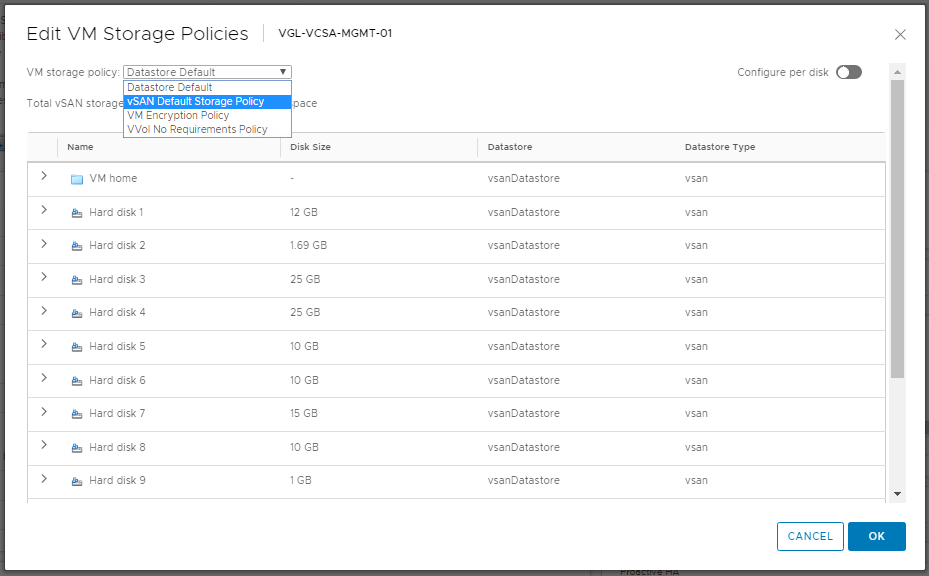
3. Note the vSAN storage consumption details for this VM. When ready, click OK.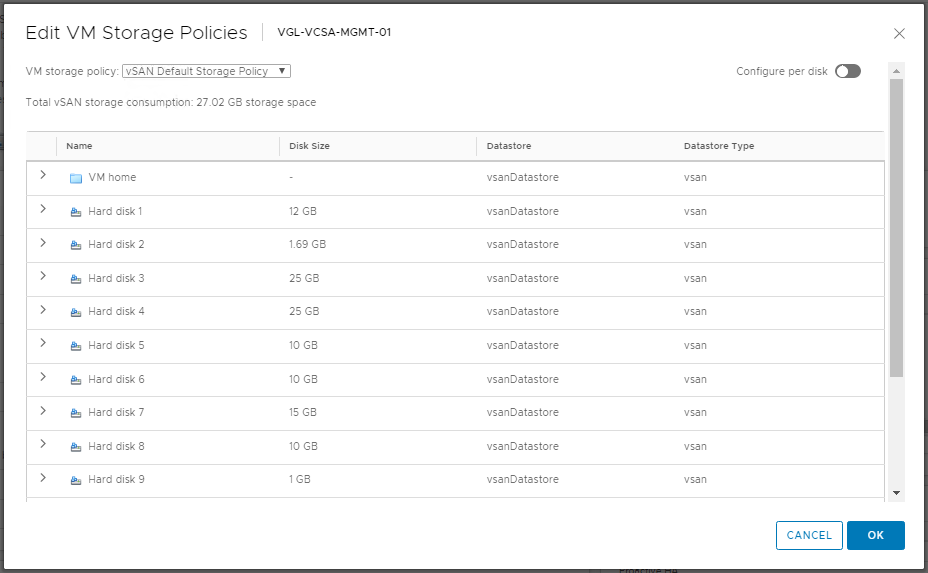
4. Finally, browse to Policies and Profiles > VM Storage Policies > vSAN Default Storage Policy and note the Compliance Status.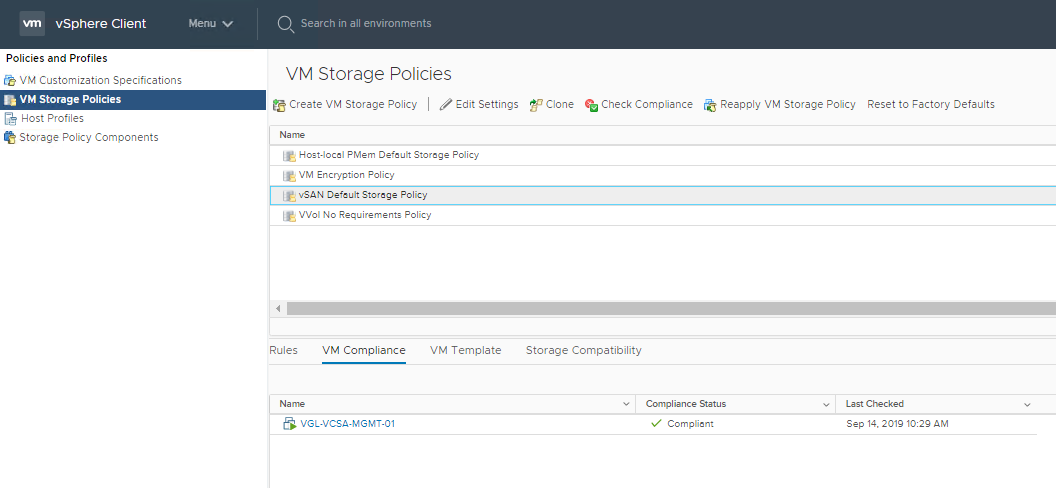
In Summary
As I noted at the very start of this process, enabling vSAN in a brownfield environment is easy. The conundrum around deploying a vCenter Server Appliance into a brand new greenfield environment is just as simple. There is no chicken-and-egg scenario, simply a vCenter and vSAN deployment. The Cluster Quickstart tool also helps to speed things up nicely; being able to configure vMotion and vSAN VMkernel adapters in one simple interface makes things a breeze.
Further Reading
Hey this is awesome! I was wondering if you have ever explored automating this?
Thanks for the kudos Joel! And strangely, yes I have. I’ve a multitude of ideas for future posts, and automation just this very element is on the list…the list however keeps growing 🙂
Nice walk through, thanks! When we tried it the vsan dc and cluster aren’t created when we log into Center, though the vsan datastore is there on the esxi host. Is there a step not mentioned that must be completed beforehand?
Nice post, but now we want an EVC enabled VSAN cluster, greenfield. Normally I power off the vCenter and move the vCenter VM (offline) into the cluster. How to do that here, an ESXi host without shared storage? Any thoughts?
Hi Marcel, this is possible but does require some juggling. If you’ve not already seen it, check out KB1013111 for the walkthrough – https://kb.vmware.com/s/article/1013111.
I know that KB article, Did you read the first note? And with greenfield you don’t have shared storage….
Note: These procedure works only if the vCenter Server virtual machine is running on an ESXi host that is presenting the same CPU features as the ESXi host in the new EVC cluster and vCenter machine is not part of vSAN cluster, migrate the vCenter Server machine to shared datastore (apart from vSAN datastore) ONLY then follow below procedure.
Hi, we managed to move the vCenter with Veeam B&R CE, quick migrate. Basically the same as the VMware KB article, but without the shared storage. Pity that you have to install the whole Veeam B&R product, but it works nicely.
Thank you!
Have a question about DNS( It’s more like a chicken and egg situation)…I intent to use a VM as DNS server. How can I deploy vcenter without DNS ?
Hey Adil, I’ve heard some have gotten around this by using IP addresses instead of FQDNs when no DNS server is available; however, this isn’t supported and will probably lead to headaches further down the road should you have success with this approach.
If you have the ability to build a temporary DNS server outside of vSphere, it would be my preference to deploy the vSphere environment using the required forward and reverse DNS records. I’d then deploy DNS VMs within vSphere and switch vCenter and ESXi hosts to the new name servers. Possibly more work to begin with, but it will be a much cleaner deployment.